
Lonnie
'66 F100 Custom Cab Short/Styleside Factory Correct Resto
-
FORDMANLCRACKEL

- Posts: 1237
- Joined: July 11, 2006, 9:48 pm
- Location: williamston, n.c.
- Contact:

Re: '66 F100 Custom Cab Short/Styleside Factory Correct Rest
I'm going to miss this project. 
Lonnie
Lonnie
The most rewarding job i ever had was being a dad.
1988 Ranger Build http://s275.photobucket.com/albums/jj31 ... %20RANGER/
1988 Ranger Build http://s275.photobucket.com/albums/jj31 ... %20RANGER/
-
theastronaut

- Posts: 439
- Joined: August 7, 2013, 10:43 am
- Location: Upstate SC
Re: '66 F100 Custom Cab Short/Styleside Factory Correct Rest
**Ewie** wrote:Another major milestone.. congrats
So how long until she goes for a shake-down cruise?
I actually moved it outside the shop under its power a couple weeks ago. Clutch needs adjusting but it did great otherwise. We are next door to a high school with a huge open parking lot that's empty on the weekends, so we have the perfect test area when we do start the shake down drives.
olliesshop wrote:Awesome!!!
Thanks!!
FORDMANLCRACKEL wrote:I'm going to miss this project.
Lonnie
Lonnie, we'll keep the thread updated as much as we can. We try to clean/detail the vehicles we restore when we or the owners show them, so we'll keep in contact with the truck/owner after it's gone from the shop. I'll post show pictures in the build threads to keep everyone up to date.
-
theastronaut
- Posts: 439
- Joined: August 7, 2013, 10:43 am
- Location: Upstate SC
Re: '66 F100 Custom Cab Short/Styleside Factory Correct Rest
The door locks were hazy so I buffed them with green, then white compound before installing them.


Installing the floor mat from ACC. The mat looks good and fits the shape of the floor very well. We still need to finish trimming around the door jambs and gas tank but it's fairly close for now. Dad wants to finish it up so I stopped trimming at this point. If you're going to be installing the floor mat and the firewall pad, you'll be way better off to install the floor mat first as it's tough to tuck the floor mat under the firewall pad around the pedals.
The padding they sent was too small so we added more padding around the edges and missing spots. We also cut reliefs in a few places since the padding is flat and not shaped to the pans already.

Roughly fitted. I'll post more pics once it's in and settled. The instrutions say it takes 48 hours for wrinkles to come out from being boxed up.

Extra length at the rear in case you moved the gas tank. Needs trimming in our case.

This is how much we removed from the front edge.

-
theastronaut
- Posts: 439
- Joined: August 7, 2013, 10:43 am
- Location: Upstate SC
Re: '66 F100 Custom Cab Short/Styleside Factory Correct Rest
So the same day we install the floor mat, we find a NOS 65-66 tan/black, low hump floor mat... right here in town. What are the odds of that! He's going to dig it out of storage and check it's condition, and he's willing to part with it if it's in good shape still. He says it's never been exposed to heat so our fingers are crossed!
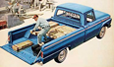
Shot the inside of the bed this morning.


Shot the inside of the bed this morning.


-
64f100sixcylinder
- Posts: 112
- Joined: April 17, 2014, 8:59 pm
Re: '66 F100 Custom Cab Short/Styleside Factory Correct Rest
That bed is now way too nice to ever be used to haul stuff, very nice work
-
theastronaut
- Posts: 439
- Joined: August 7, 2013, 10:43 am
- Location: Upstate SC
Re: '66 F100 Custom Cab Short/Styleside Factory Correct Rest
64f100sixcylinder wrote:That bed is now way too nice to ever be used to haul stuff, very nice work
We've said before that we'll end up on an episode of "America's Most Wanted" if he tries to put anything in the bed!!
-
theastronaut
- Posts: 439
- Joined: August 7, 2013, 10:43 am
- Location: Upstate SC
Re: '66 F100 Custom Cab Short/Styleside Factory Correct Rest
We shot the bottom with red oxide epoxy, then added overspray around the edges with single stage.


-
theastronaut
- Posts: 439
- Joined: August 7, 2013, 10:43 am
- Location: Upstate SC
Re: '66 F100 Custom Cab Short/Styleside Factory Correct Rest
The trim came back from King of Trim late Friday so we installed what we could Monday. They strip, straighten, buff, bright dip, and anodize the aluminum trim so that it looks better than new.

Correct black detailing around the headlights and upper/lower vertical bars in the grill.


Rechromed original door handles.


ACC floor mat after trimming and getting a few wrinkles out with a heat gun.


Correct black detailing around the headlights and upper/lower vertical bars in the grill.


Rechromed original door handles.


ACC floor mat after trimming and getting a few wrinkles out with a heat gun.


Re: '66 F100 Custom Cab Short/Styleside Factory Correct Rest
I think I would construct a pile of used railroad ties, gravel and broken concrete blocks out of styrofoam and foam rubber, paint appropriately, use some felt on the bottom. And lay it in the bed. No charge for that idea.
Any propmaker guy could whip that out for you.
Any propmaker guy could whip that out for you.
-
theastronaut
- Posts: 439
- Joined: August 7, 2013, 10:43 am
- Location: Upstate SC
Re: '66 F100 Custom Cab Short/Styleside Factory Correct Rest
bird55 wrote:I think I would construct a pile of used railroad ties, gravel and broken concrete blocks out of styrofoam and foam rubber, paint appropriately, use some felt on the bottom. And lay it in the bed. No charge for that idea.
Any propmaker guy could whip that out for you.
That would be hilarious!!
-
theastronaut
- Posts: 439
- Joined: August 7, 2013, 10:43 am
- Location: Upstate SC
Re: '66 F100 Custom Cab Short/Styleside Factory Correct Rest
A few more pics. Had a couple leaks to fix, whoever built the engine didn't get the thermostat housing sealed up so we had to pull it off and resurface the housing to get it fixed. They also used a fiber washer on the drain plug that had split, so it was leaking too. Got those taken care of yesterday, changed the oil and filter, and pulled it out so it could run for awhile to check for leaks again. No wet spots underneath this morning.
Some daylight pictures.


Scott Drake headlight with Ford embossed from Mustangs Unlimited. They're halogen so they're brighter than the old style sealed beams.

Checking the park lights and headlights.


Some daylight pictures.


Scott Drake headlight with Ford embossed from Mustangs Unlimited. They're halogen so they're brighter than the old style sealed beams.

Checking the park lights and headlights.


-
theastronaut
- Posts: 439
- Joined: August 7, 2013, 10:43 am
- Location: Upstate SC
Re: '66 F100 Custom Cab Short/Styleside Factory Correct Rest
Some of today's progress. We a shooting to have the truck finished by June 14th for a local Father's Day show.
The armrest from Dennis Carpenter needed some finishing work before we dyed them to match the seat material.

After smoothing the edges with 500 grit.

Dad found a NOS seat bottom locally to use as a pattern.

Backrest vinyl from SMS with the correct heat stamped logo and pleats.

Fabric from SMS matches the imprinted pattern of the original material.


Re: '66 F100 Custom Cab Short/Styleside Factory Correct Rest
Very impressed by what you have done-essentially the polar opposite of my build!!
2003 F150 SVT Lightning-"Bonnie"-Mid 12s Daily Driver
1963 F100 SWB Project-"Lacy"-Crown Vic frame swap in the process!
viewtopic.php?f=32&t=28059
1963 F100 SWB Project-"Lacy"-Crown Vic frame swap in the process!
viewtopic.php?f=32&t=28059
-
skidoorulz
- Posts: 359
- Joined: April 11, 2013, 9:02 pm
- Location: Billings MT
Re: '66 F100 Custom Cab Short/Styleside Factory Correct Rest
When I first started watching this build I figured it would be right at 80K to do it. Now I have revised my estimate to over 100K. How close are you to that number?
-
theastronaut
- Posts: 439
- Joined: August 7, 2013, 10:43 am
- Location: Upstate SC
Re: '66 F100 Custom Cab Short/Styleside Factory Correct Rest
HawaiiKid wrote:Very impressed by what you have done-essentially the polar opposite of my build!!
Thanks!!
skidoorulz wrote:When I first started watching this build I figured it would be right at 80K to do it. Now I have revised my estimate to over 100K. How close are you to that number?
You are pretty close, somewhere around 95 on labor. Not sure on parts/materials or rebuilding the engine/trans/axle; the customer has done/bought those things himself. Top notch body/paint materials are somewhere around 6-7k for everything start to finish. I'd guess around 120-130 for everything. That's at only $50/hour and with overhead we're really not making much. Our next jobs will have to be more per hour to make it worth our time. We have had a couple guys that have seen the truck in person say that it's easily 75-100/hour quality of work... just need to find people that can appreciate and afford this level of work so we can keep doing this.
-
theastronaut
- Posts: 439
- Joined: August 7, 2013, 10:43 am
- Location: Upstate SC
Re: '66 F100 Custom Cab Short/Styleside Factory Correct Rest
This time next Saturday we'll have it at it's first show... lots to do until then!!
Dad's been working on the seat bottom yesterday and today. It's mostly finished, he still has a little "fine tuning" to do.
For whatever reason SMS sent us pre-cut material for the seat face.... four inches too narrow!! Called them back and asked why they sent pre-cut sections and they said that that's all they had... and they cut the whole roll that way. Would be "awhile" before they made another run of the fabric in the correct width (60"). They didn't mention that when we ordered the material. So the boxing is a little taller than it should be on the sides, but what else do you do when you only have a week to finish it and no other known material source?


Backrest in place to mark the pattern so Dad can line up the back rest cover with the seat bottom.

Arm rests dyed to match the seat vinyl.

I have a matching pair of original paint '66 plates from my '66 C10 that I'm putting on temporarily for it's first show. I scuffed them and shot a few coats of clear to preserve the original paint.

Dad's been working on the seat bottom yesterday and today. It's mostly finished, he still has a little "fine tuning" to do.
For whatever reason SMS sent us pre-cut material for the seat face.... four inches too narrow!! Called them back and asked why they sent pre-cut sections and they said that that's all they had... and they cut the whole roll that way.


Backrest in place to mark the pattern so Dad can line up the back rest cover with the seat bottom.

Arm rests dyed to match the seat vinyl.

I have a matching pair of original paint '66 plates from my '66 C10 that I'm putting on temporarily for it's first show. I scuffed them and shot a few coats of clear to preserve the original paint.

-
theastronaut
- Posts: 439
- Joined: August 7, 2013, 10:43 am
- Location: Upstate SC
Re: '66 F100 Custom Cab Short/Styleside Factory Correct Rest
Dad's nearly done with the backrest, these were some progress pics.


Heavier gauge steel rod for the adjusters. This won't ever stretch out of shape and become loose, and the cardboard wrap will keep it from rattling if the springs bottom out on it.


Rangoon Red and Whimbledon White sprayed. Letters are masked, I'll spray the Sahara Beige and a few coats of clear tonight.

Re: '66 F100 Custom Cab Short/Styleside Factory Correct Rest
Why the red? Looks good btw.
-
theastronaut
- Posts: 439
- Joined: August 7, 2013, 10:43 am
- Location: Upstate SC
Re: '66 F100 Custom Cab Short/Styleside Factory Correct Rest
bird55 wrote:Why the red? Looks good btw.
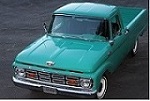
From what I've researched Rangoon Red is the correct letter color for Whimbledon White/Sahara Beige trucks.
Here's an identical 16K mile original paint truck with red letters.
-
theastronaut
- Posts: 439
- Joined: August 7, 2013, 10:43 am
- Location: Upstate SC
Re: '66 F100 Custom Cab Short/Styleside Factory Correct Rest
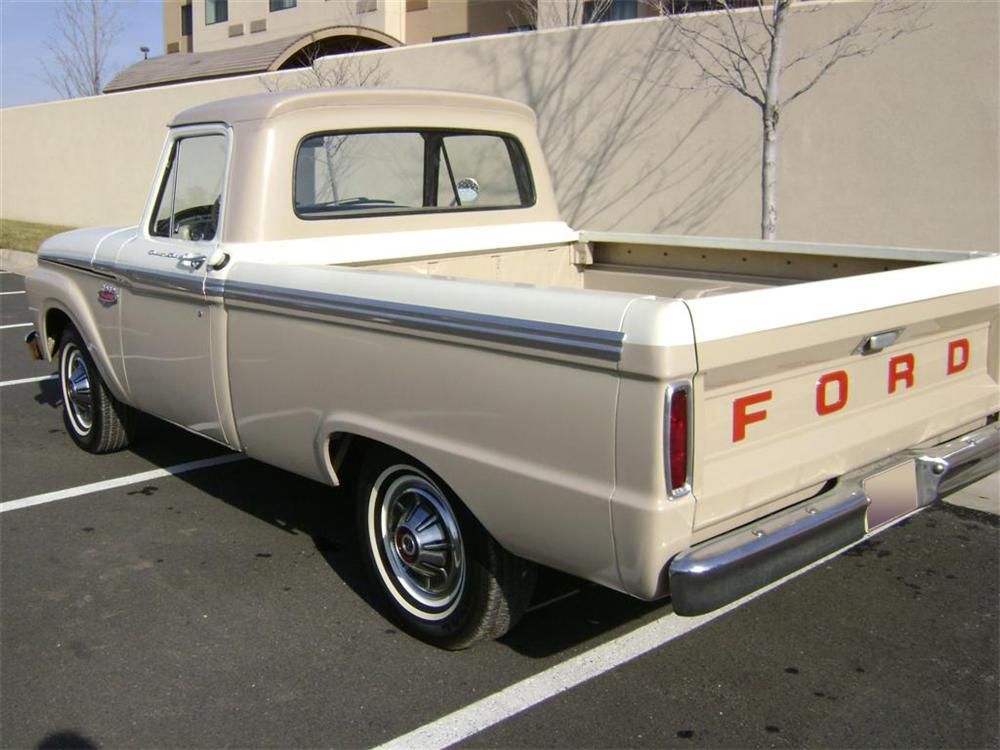
Truck is 99% finished now and we took it to it's first show today!! Had a great day at a local Father's Day show, took the F100 and a '65 C10 that I finished about three years ago. Can't wait to get the pair out again!
I'll go ahead and post the rest of the progress pics, then post pics from the show to keep things in order. Was a loonnnggg week getting it ready!!
Zinc plated tailgate handle bucket was hazy so I tried Mother's polish... helped but still didn't look good enough.

Used 0000 steel wool and Mother's to really shine it up.

Wetsanded and buffed the bedsides.

Also sanded and buffed the tail light lenses.

Bed and side trim back in place. Looking like a truck at this point!!

Interior mostly finished up.


Last piece of the puzzle. I finished wetsanding and buffing the tailgate late Friday night, then got it installed by about 9 pm. We bolted the bumper up after that and waited til this morning to adjust it level and tighten it down.
