
Steve's 64 Short-bed Project
-
SteveCanup
- Posts: 1096
- Joined: November 7, 2014, 11:08 pm
- Location: Wytheville, Virginia

Re: Steve's 64 Short-bed Project
Rotten hood issues. I removed the hood this past week-end to remove the hinges for sandblasting and repainting and to get the firewall, etc cleaned up and painted. When I laid my hood over I noticed for the first time how much rot I had on the front support. I drilled out 50 spot welds and removed it and will give it a good grinding and cut out and replace the rot. I may have saved the front outer edge of my hood from a fate worse than death...actually, it would be death for the hood. Hopefully, I will not have to cut out and reweld any of the front outer skin of the hood. Pics to follow...
1964 F-100

-
SteveCanup
- Posts: 1096
- Joined: November 7, 2014, 11:08 pm
- Location: Wytheville, Virginia
Re: Steve's 64 Short-bed Project
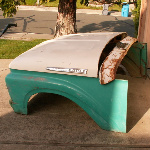
Here's an "after" pic. The front bracing has been removed...

The bracing doesn't look too bad from this angle...

The side that was up against the bottom of the hood...pretty rusty...

AND....here's the problem...or, uh, ROT, which was right along the very front edge....time to cut and remove...
Lots and lots of spotwelds...I just used a 3/8 titanium bit and drilled them out.


Just a word to the wise...If you are missing the gasket that should be under your front hood badge, then water will get into the two mounting holes and pool between the hood and the brace. After many years...viola'....you will have this problem. I am considering removing the front badge altogether. Stay tuned....(or stunned, like me...lol...) Pics of repair progress to follow...
The bracing doesn't look too bad from this angle...
The side that was up against the bottom of the hood...pretty rusty...
AND....here's the problem...or, uh, ROT, which was right along the very front edge....time to cut and remove...
Lots and lots of spotwelds...I just used a 3/8 titanium bit and drilled them out.
Just a word to the wise...If you are missing the gasket that should be under your front hood badge, then water will get into the two mounting holes and pool between the hood and the brace. After many years...viola'....you will have this problem. I am considering removing the front badge altogether. Stay tuned....(or stunned, like me...lol...) Pics of repair progress to follow...
Last edited by SteveCanup on March 24, 2018, 1:56 pm, edited 1 time in total.
1964 F-100
-
surfcanada

- Posts: 56
- Joined: April 21, 2015, 3:16 pm
- Location: SoCal USA
Re: Steve's 64 Short-bed Project
Hey Steve,
Do you have any pictures of how you mounted your seats? I'm just getting ready to sort out mounting my seats and I'm looking for some practical ways. GREAT BUILD!
Do you have any pictures of how you mounted your seats? I'm just getting ready to sort out mounting my seats and I'm looking for some practical ways. GREAT BUILD!
-
SteveCanup
- Posts: 1096
- Joined: November 7, 2014, 11:08 pm
- Location: Wytheville, Virginia
Re: Steve's 64 Short-bed Project
SurfCanada...I didn't get any pics. I just used some scrap angle iron and fabricated with loooong bolts and washers. I had a time getting them to sit level. I want to take them out and build a nice set of mounts out of angle iron. That's on the "re-do" list...
1964 F-100
-
SteveCanup
- Posts: 1096
- Joined: November 7, 2014, 11:08 pm
- Location: Wytheville, Virginia
Re: Steve's 64 Short-bed Project
Cut out the rot and fabricated a patch piece. Luckily this is under the hood skin and will not be seen, so it doesn't have to be absolutely perfect...

I have to work on the left side of the patch piece a little more to get a better fitment. Again this is the support that goes under the front of the hood.

I also have some pinholes along the front edge of the hood since it is such a small area I am going to try to weld in a small patch panel...try not to warp my hood. Stay tuned....

I have to work on the left side of the patch piece a little more to get a better fitment. Again this is the support that goes under the front of the hood.

I also have some pinholes along the front edge of the hood
1964 F-100
-
unibody madness
- Posts: 2140
- Joined: December 4, 2008, 4:33 pm
- Location: Paradise,CALIFORNIA 95969
Re: Steve's 64 Short-bed Project
Steve The hood work looks great.
On my seat I had a heck of a time figuring out all the different heights, cutting each foot a different height.
On my sons truck, I removed the feet off of a bench seat, screwed them down where they belong, and crossed the distance between them with some 1" square channel, shimming both sides evenly so they are level, with short pieces
Since the runners on all seats are parallel you only have to shim up to the adjusters works for bench or buckets and leaves a platform for the center consul
Turk build thread at:
viewtopic.php?f=32&t=18944
It does not matter what you think, it only matters what you do about it!
viewtopic.php?f=32&t=18944
It does not matter what you think, it only matters what you do about it!
-
SteveCanup
- Posts: 1096
- Joined: November 7, 2014, 11:08 pm
- Location: Wytheville, Virginia
Re: Steve's 64 Short-bed Project
Great idea! I somewhat did that, I made 'legs' for the seats with the outer 2 being longer and the inner 2 being shorter. But I want to do something like you did....thanks!
1964 F-100
-
SteveCanup
- Posts: 1096
- Joined: November 7, 2014, 11:08 pm
- Location: Wytheville, Virginia
Re: Steve's 64 Short-bed Project
Hood work still progressing a little at a time. I finished the bracing and painted it and I have cut out a section of rot from the front edge of the hood, made a patch panel and welded it in. I had to skim it with bondo and then ran out of time. I'm helping my neighbor build a garage behind his house a few evenings a week. In return, he has a large sandblasting cabinet and cleans up some of my parts for me. He just finished my hood hinges and they look great. I just have to get them painted. Didn't have the camera out in the garage today...but will get pics of progress...ya'll stay tuned....we're going to whip this beastie yet!
1964 F-100
-
SteveCanup
- Posts: 1096
- Joined: November 7, 2014, 11:08 pm
- Location: Wytheville, Virginia
Re: Steve's 64 Short-bed Project
The "Hood Beastie" is kicking my backside...forgetting to take the camera out to take pics of this debacle...
I got the outer hood skin rot and pinholes repaired and the bracing tacked back in. I thought it was alright...it wasn't. It was bowed up in the middle at the front. When we set it on the truck to check everything we had a one inch gap in the middle between the front edge and the valance panel below it. Grrrrrr.......I took it apart and adjusted the bracing, tacked it back in and rechecked it on the truck. It fits better. Now to weld it all up, sand, prime, sand, prime, sand...(You get the idea) and eventually get it back onto the truck. ...wearing....me....out.....
I got the outer hood skin rot and pinholes repaired and the bracing tacked back in. I thought it was alright...it wasn't. It was bowed up in the middle at the front. When we set it on the truck to check everything we had a one inch gap in the middle between the front edge and the valance panel below it. Grrrrrr.......I took it apart and adjusted the bracing, tacked it back in and rechecked it on the truck. It fits better. Now to weld it all up, sand, prime, sand, prime, sand...(You get the idea) and eventually get it back onto the truck. ...wearing....me....out.....
1964 F-100
-
SteveCanup
- Posts: 1096
- Joined: November 7, 2014, 11:08 pm
- Location: Wytheville, Virginia
Re: Steve's 64 Short-bed Project
For posterity's sake...

Lots of "finish" work to do to make it presentable...

Front edge repair...

It's a rainy day here in Virginia today, which we sorely need, and hopefully I can get out in the garage this afternoon and work on it a little. I want to finish welding the edges together and grind everything smooth and start cleaning and sanding the underside for paint. I bought a "blister pack" of small rubber and metal washers for the trim clips.

They will go under the clip nuts against the backside of the hood to seal out water

1964 F-100
-
SteveCanup
- Posts: 1096
- Joined: November 7, 2014, 11:08 pm
- Location: Wytheville, Virginia
Re: Steve's 64 Short-bed Project
I shot some paint on the underside of the hood a couple of days ago....and that's as far as I was able to get. My wife had pneumonia back in February and spent several days in the hospital. She has had a relapse with bronchitis, etc. and is back in the hospital. So I am typing this from a hospital room...
Hopefully she will be discharged in a few days and back home and I can get back on the truck. Family first!
Hopefully she will be discharged in a few days and back home and I can get back on the truck. Family first!
1964 F-100
-
SteveCanup
- Posts: 1096
- Joined: November 7, 2014, 11:08 pm
- Location: Wytheville, Virginia
Re: Steve's 64 Short-bed Project
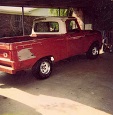
Sitting in the hospital thinking about my truck. I bought it 2 years ago this month...Here's a look back at what I started with, some pics of the day that I brought it home...


It was crusty, rusty, dirty and neglected and has come a long way...still more to go!
Hopefully I can get back to the hood repair this week. Stay tuned for more....


It was crusty, rusty, dirty and neglected and has come a long way...still more to go!
Hopefully I can get back to the hood repair this week. Stay tuned for more....
1964 F-100
-
shipwrecked
- Posts: 1462
- Joined: December 29, 2012, 10:06 pm
- Location: Yorktown VA
- Contact:
Re: Steve's 64 Short-bed Project
Hope all is well with your wife and the illness. Hope she gets better soon
As for your truck- it certainly has come a long way!
As for your truck- it certainly has come a long way!
The months may change, but I am always APRIL
'63 F100 Custom Cab 223inline 6, 3speed manual- mostly stock
https://www.youtube.com/coastiereid
Truck has been home in CA,OR,WA,NJ,VA since it's birth in San Jose Jan63
'63 F100 Custom Cab 223inline 6, 3speed manual- mostly stock
https://www.youtube.com/coastiereid
Truck has been home in CA,OR,WA,NJ,VA since it's birth in San Jose Jan63
-
SteveCanup
- Posts: 1096
- Joined: November 7, 2014, 11:08 pm
- Location: Wytheville, Virginia
-
SteveCanup
- Posts: 1096
- Joined: November 7, 2014, 11:08 pm
- Location: Wytheville, Virginia
Re: Steve's 64 Short-bed Project
Well the 'hood saga' is coming along....managed to finish bodywork on the front edge where I had welded in a repair patch. I just shot some etching primer, sanded and then shot some high build primer...

Closer up

Another view...

Hood hinges sandblasted and painted and ready to install...I have to 're-hook' those big nasty springs...no problem...

and the rest of the hardware...

Tomorrow is very promising as far as squirting some paint on the hood...stay tuned.

Closer up

Another view...

Hood hinges sandblasted and painted and ready to install...I have to 're-hook' those big nasty springs...no problem...

and the rest of the hardware...

Tomorrow is very promising as far as squirting some paint on the hood...stay tuned.
1964 F-100
-
SteveCanup
- Posts: 1096
- Joined: November 7, 2014, 11:08 pm
- Location: Wytheville, Virginia
Re: Steve's 64 Short-bed Project
Paint squirting occurred....although I do not have pics of said event... Shot fresh paint on both front fenders first thing this a.m. then installed the hinges and then the springs. Set the hood out in the sun on sawhorses and shot paint on it. Took mom (and dad and wife out to dinner) came back and installed the hood and adjusted the seams. Now all that is needed is to install the trim. Leaving tomorrow night for Charleston, SC for a week of vacation 
 Stay tuned...
1964 F-100
-
SteveCanup
- Posts: 1096
- Joined: November 7, 2014, 11:08 pm
- Location: Wytheville, Virginia
Re: Steve's 64 Short-bed Project
Okay...here's some pics...after pics.....


I still have to get the firewall painted and detailed....more to come....


I still have to get the firewall painted and detailed....more to come....
1964 F-100
-
therealjoeshmoe
- Posts: 1059
- Joined: July 24, 2006, 2:18 am
- Contact:
Re: Steve's 64 Short-bed Project
looks really good!
Why fart and waste it when you can burp and taste it!


-
SteveCanup
- Posts: 1096
- Joined: November 7, 2014, 11:08 pm
- Location: Wytheville, Virginia
Re: Steve's 64 Short-bed Project
How do you eat an elephant? One bite at a time...Still on vacation until Monday, but I'm back home from Charleston, SC. Had a relaxing week away from it all. After getting the grass mowed today I want to shoot one more coat of paint on the hood and get the emblems installed. I also want to get a fresh coat of black on the inside of the bed. Our first cruise-in is next Saturday and I'm looking forward to going. More pics to come....Stay tuned.....
1964 F-100
-
SteveCanup
- Posts: 1096
- Joined: November 7, 2014, 11:08 pm
- Location: Wytheville, Virginia
Re: Steve's 64 Short-bed Project
First cruise-in tomorrow night. The hood is finished, emblems installed, and spent the afternoon slicking up the slick. Ready to go...


I'm still offering to build steering wheels....


I'm still offering to build steering wheels....


1964 F-100