Steering wheel repair on a budget.

Got a helpful tip or trick related to your slick? Please share...

Moderators: Kid, Casey 65

Post Reply
User avatar
ccain
Posts: 46
Joined: August 16, 2009, 2:06 pm
Location: Temecula, CA

Steering wheel repair on a budget.

Post by ccain »

OK, so I know there are a few neigh sayers out there that will probably roll their eyes at this and say "leave it to the pro's" but, on a budget this is the best way I've devised for a decent repair for you old ford steering wheel. Granted, this is the way I do it, and I can't be held responsible for damage to your wheel. Beware and do this only if you feel your level of experience will allow you.

Here is the offending beast, a 45 year old, nasty cracked wheel:

Image

The first step is to remove the wheel making sure to unscrew the horn contact on the back. Next you clean the wheel thoroughly. And I do mean thoroughly! You need to make sure that the areas inside the cracks get clean as well. I've fount that good old fashioned lacquer thinner works well.

Next take a triangular file and grove each and every crack. Mix yourself up some JB Weld. I know, I know but, I've tried everything and JB Weld (not the quick stuff) holds up really well and is easy to work. I use it for everything, even wood working. It's hard and like I said easy to shape.
You'll probably have to buy a couple of packages depending on how badly your wheel is cracked.

When you're done your wheel will look like this:

Image

Now, walk away and leave it set over night.

The next day, start with a flat file for the outside and a half-round for the inside and roughly shape the filler but not too much. Now the fun part. Clear your schedule and plan on a few thumb blisters. Sand every nook and cranny until you get the desired shape. This isn't like bondo work where you leave a little filler in place to hide the dent. No, you have to sand away all the filler except for what's in the cracks. Start with course (80 grit) and work your way up to extra fine (400 grit) until the wheels shape is once again smooth. Remember, if you can feel it, you'll be able to see it once it's painted.

Now, for the paint. Here is the sanded, painted wheel:

Image

On other forums there is much talk about the proper paint used to paint the wheel. Personally, I use duplicolor truck and van lacquer. It leaves a beautiful shine and is durable. Sure, maybe not as durable as an epoxy based paint but hell, I don't mind pulling this thing back off down the road and fixing it. Use what ever paint you want. I use the duplicolor because I can get it in a color that is complementary to the trucks interior. Granted, duplicolor doens't make "Marlin Blue".

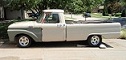
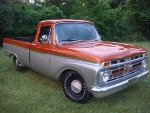
Let it harden, as painters we are inevitably impatient. Give it a few hours in the sun to cure a bit. Lay a clean towel on your bench and lay the wheel face down and replace the horn contact ring. Then put the wheel back in and ta-da, 45 years of wear have magically disappeared. I figure after 40 some years the wheel has shrunk as much as it will in my lifetime so cracks down the road shouldn't be a problem.

Image

Image

Is it as nice as one of those $400 professional repairs? Probably not, but the untrained eye would have a problem pointing it out.
Obsa
Posts: 1928
Joined: July 19, 2006, 4:33 pm
Location: Northwest Georgia
United States of America

Post by Obsa »

Nice work, by the way your truck looks nice too!
Brian Taylor
Posts: 1469
Joined: August 18, 2009, 3:52 pm
Location: Dallas , Texas
Contact:
United States of America

Post by Brian Taylor »

I did my wheel too. I used 2 part epoxy and had to make a round clamp sort of jig to hold the center hub in place due to mine being cracked all the way through and spreading in 2 places. I wrapped tape around where I was going to squeeze in the epoxy. After it dried I just sanded through the tape into the epoxy. Like you said sand till it hurts but do not sand away contours. The hardest is the ribs in the center and spokes but the triangle file and a nail file makes good ribs.
And it is a lot cheaper and mentally fulfilling than paying for someone else to do it or buying a NOS one.
You have saved enough doing it yourself you can take the silicone out of the vent window and buy new rubber weatherstripping. LOL
1966 Ford F-100 LWB 300
User avatar
Greg D
Posts: 10113
Joined: September 13, 2006, 4:39 pm
Location: Podunk Iowa
United States of America

Post by Greg D »

JB Weld should be an excellent repair filler for this. I would guess the 2 part filler in the restoration kits is pretty similar - sure looks to be about the same texture in the pics. That looks great BTW!
1964 F 100 - I am going to do "something" with it.......

viewtopic.php?f=32&t=15942

1987 Mustang LX Convertible, 2.3 Auto - cruiser.
1994 F 150 XLT 2WD


~ Yes - I adopted another cat..............

Cam L Milan,
You'll be missed my friend.
User avatar
Max
Posts: 3456
Joined: July 11, 2006, 11:53 am
Location: 29°35'07.00"N 95°09'07.49"W
Contact:
United States of America

Post by Max »

Nice job! JB Weld would be perfect for this. The Eastwood kit uses PC7 which is similar 2-part mix.
"If you don't want to stand behind our Troops, feel free to stand in front of them."

1964 Ford F100
1967 US Army M416
User avatar
64Ranger
Posts: 377
Joined: July 17, 2006, 2:45 pm
Location: Riverside, CA

Post by 64Ranger »

Nice work ccain...that is exactly how I repaired my steering wheel. It's been about 4 years since I did the repair and a few hair-line cracks have appeared but it was better than spending a couple hundred dollars for a new one.

Good lookin job...
Doug
Riverside, CA
User avatar
Brians1966
Posts: 265
Joined: August 1, 2009, 9:51 am
Location: Kansas City Mo.
United States of America

steering wheel

Post by Brians1966 »

Awesome job ccain,
Also nice lookin slick- have the same issues with my 66, I see a new lookin wheel in the near future- Thanks for the help and info
Brian
1966 F-100 LONG BED, 240cid 3 speed red and white, Red and White Interior with a Mossy Oak Seat Cover
2013 Ford F150 STX Supercab 5.0 litre

DETERMINATION: The feeling you get right before you try to do something incredibly stupid!

CONFIDENCE: Is the feeling you have before you fully understand the situation!
Phil
Posts: 2125
Joined: June 1, 2007, 9:37 pm
Location: toledo

Post by Phil »

Did my Fairlane's rimblow this way

One thing that helps

Image
gumshoe
Posts: 47
Joined: November 22, 2009, 4:58 pm

Post by gumshoe »

nice repair, I just finished my wheel useing JB weld it takes overnight to set up but works great. gumshoe
User avatar
Okla66F100
Posts: 70
Joined: December 17, 2009, 5:55 pm
Location: Newcastle, Oklahoma

Post by Okla66F100 »

Thanks for taking the time to post this. This is information I will be using down the road.
Scott

1966 F-100 Custom Cab LWB
User avatar
slickmainer
Posts: 2555
Joined: October 8, 2007, 6:41 pm
Location: Auburn Maine
Contact:
United States of America

Post by slickmainer »

its been covered but I just ordered some of this NuMetal Putty. Im going to follow the video. looks pretty good.

pt1
http://www.youtube.com/watch?v=wIEM7r_B ... ure=search

pt2
http://www.youtube.com/watch?v=1EzPmNyo ... re=related
--Gregg--
you can't get there from here
Oldman
Posts: 22
Joined: August 22, 2006, 11:21 pm
Location: Central Iowa

steering wheel that makes your had black

Post by Oldman »

I have a 66 F-250 High boy with a steering wheel that is solid but when I drive it it makes my hands black. Can I do the same as you had done by painting it? Thanks
Oldman
69supercj
Posts: 404
Joined: July 24, 2010, 8:17 pm
Location: Fair Grove, MO.

Post by 69supercj »

Sounds like it needs a really good cleaning. I'd pull it off, and let it soak in some good degreaser type cleaner. Take a toothbrush after it, rinse it and rinse it again, wipe down with some laquer thinner, let it dry. Hit it with a tack cloth, then prime and paint to suit.
User avatar
slickmainer
Posts: 2555
Joined: October 8, 2007, 6:41 pm
Location: Auburn Maine
Contact:
United States of America

Post by slickmainer »

sanding a steering wheel blows. wear a mask as that stuff goes everywhere. mine is sitting in primer right now. kinda pissed at myself because I missed a small crack and now being in primer it shows up really easily.
--Gregg--
you can't get there from here
Oldman
Posts: 22
Joined: August 22, 2006, 11:21 pm
Location: Central Iowa

steering wheel

Post by Oldman »

Thank you for the information. This will be a good winter project. I am looking forward to it.
Oldman
Post Reply