
Insted of spending a great amount of $$ on this panel I would rather repair it. Two splits where the two center screws mount it to the dash. Any thoughts on what would work best? Glue, fiber resin of some type???
[/img]http://fordtruk.com/forums/album_pic.php?pic_id=7412&user_id=1908
Repairing the 1966 Instrument Panel?
-
Okla66F100

- Posts: 70
- Joined: December 17, 2009, 5:55 pm
- Location: Newcastle, Oklahoma
Repairing the 1966 Instrument Panel?
Scott
1966 F-100 Custom Cab LWB
1966 F-100 Custom Cab LWB
-
Okla66F100
- Posts: 70
- Joined: December 17, 2009, 5:55 pm
- Location: Newcastle, Oklahoma
-
Brian Taylor
- Posts: 1469
- Joined: August 18, 2009, 3:52 pm
- Location: Dallas , Texas
- Contact:

I would get a good epoxy 2 part cement. Clean the sides well and then glue together. Wipe away any ciment that comes out the face side. Leave it for more than a day to let it set up even if it is a 5 minute epoxy. Then repaint if needed should look good as new.
A lot of people think all screws have to be hercules tight and do that to a lot of interior parts. I have glued a lot of interior plastic parts together because of previous owners.
A lot of people think all screws have to be hercules tight and do that to a lot of interior parts. I have glued a lot of interior plastic parts together because of previous owners.
1966 Ford F-100 LWB 300
-
Okla66F100
- Posts: 70
- Joined: December 17, 2009, 5:55 pm
- Location: Newcastle, Oklahoma
-
Okla66F100
- Posts: 70
- Joined: December 17, 2009, 5:55 pm
- Location: Newcastle, Oklahoma
Brian do I need to worry about supporting the back side of the panel for strength or the epoxy will be strong enough?
Short of cleaning the surface should I do any other prep before painting it?
Does anyone have any recommendations on chrome paint for the trim and edges or should I stick with color?
Hate to be a pain here but I want to try and do the best job for little money seeing as were in a recession and all (actually I'm just cheap. LOL) Thanks in advance.
Scott
1966 F-100 Custom Cab LWB
1966 F-100 Custom Cab LWB
-
Alan Mclennan

- Posts: 9324
- Joined: October 14, 2006, 6:16 pm
- Location: In the shed... Cranebrook NSW

I agree with Brian about people over tightening screws tho!
Honey, If I say I`ll fix something I will, there`s no need to remind me every 6 months!!
66 f100 tabletop swb 351 Clevo C6 "Beryl"
Slick Stock 3 KCMO
Slick Stock 4 Altoona
Slick Stock 5 KCMO
Slick Stock 6 Altoona
Slick Stock 7 Salina KS
Slick Stock 8..............................
66 f100 tabletop swb 351 Clevo C6 "Beryl"
Slick Stock 3 KCMO
Slick Stock 4 Altoona
Slick Stock 5 KCMO
Slick Stock 6 Altoona
Slick Stock 7 Salina KS
Slick Stock 8..............................
-
Okla66F100
- Posts: 70
- Joined: December 17, 2009, 5:55 pm
- Location: Newcastle, Oklahoma
-
Okla66F100
- Posts: 70
- Joined: December 17, 2009, 5:55 pm
- Location: Newcastle, Oklahoma
-
Alan Mclennan
- Posts: 9324
- Joined: October 14, 2006, 6:16 pm
- Location: In the shed... Cranebrook NSW
randyr wrote:Alan, it's just plastic on the 66 sweep instrument panel.
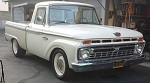
Scot, I definitely understand trying to save a buck or two but depending on your overall intentions for the truck, it may be worth it to run it as is until you can turn loose of $150 for a new one. Just a thought.
Nice old truck though....
Well I didnt know that!, thanks Randy
Honey, If I say I`ll fix something I will, there`s no need to remind me every 6 months!!
66 f100 tabletop swb 351 Clevo C6 "Beryl"
Slick Stock 3 KCMO
Slick Stock 4 Altoona
Slick Stock 5 KCMO
Slick Stock 6 Altoona
Slick Stock 7 Salina KS
Slick Stock 8..............................
66 f100 tabletop swb 351 Clevo C6 "Beryl"
Slick Stock 3 KCMO
Slick Stock 4 Altoona
Slick Stock 5 KCMO
Slick Stock 6 Altoona
Slick Stock 7 Salina KS
Slick Stock 8..............................
-
dotcentral
- Posts: 1341
- Joined: August 18, 2006, 5:13 pm
- Location: Charlotte, NC
If you have a decent hobby store near you, you can buy a nicer type of "krazy glue". This stuff is thinner, and using a small paint brush (like for parting model cars and air planes size).
There is an automotive grade krazy glue that is expensive, but the model car stuff is cheaper, and some stores sell it in different thicknesses. The thin stuff follows seams or cracks better and seems to cure faster, but if held wrong can either run off the piece and onto your fingers really fast if your not careful - gluing you to the part. The thicker stuff I used was like pancake syrup, was slow to cure, and didn't work as well for me.
Clean the area needing fixed, then hold or clamp the piece where you want it. Dip the brush into the glue, then put a small dot of this glue on the back side of the panel. The glue will run down the seam (capillary action) and fuse the piece back together. I have used it to glue together some plastic pieces, and if done right, It will hold up. Don't use the accelerator, a little spray bottle sold seperately that makes it dry instanteously. It leaves a white film behind that will not come off.
It should be fully cured in 1-2 minutes, and strong or close to it, as the rest of the panel, providing the plastic is clean. Maybe some alcohol wipes along the front and back off the area needing repair.
Driver: 71 F100 Shortbed: Disc swap, 5.0 HO EFI & AOD
Project Vehicle/Mild Custom: 66 F100 CC longbed: Sold
Project Vehicle/Mild Custom: 66 F100 CC longbed: Sold
-
Brian Taylor
- Posts: 1469
- Joined: August 18, 2009, 3:52 pm
- Location: Dallas , Texas
- Contact:
-
Okla66F100
- Posts: 70
- Joined: December 17, 2009, 5:55 pm
- Location: Newcastle, Oklahoma
No it has an auto trans. Not sure why that's there unless it's an auto floor shifter. I haven't even looked at it yet. I have an auto shifter steering column I'm installing down the road. I bought it for $300.00 from a local Muffler shop who told me that the guy that owned it was going to fix it up for his son to drive but had abandoned the project after putting the engine and trans in it. I'm going with a 390 and auto trans myself.
My plan is to repair the cancer, place the 66 body on the 79, drive the crap out of it and then start the long work of rebuilding the original frame with a fresh drive train. I also plan on lowering the set up but I'm not sure if I want to swap the front end or keep it mild with DMJ.
That's the plan anyway. Kids are out of the house (still using my shop for storage but I'm fixing to have a hell of a yard sell....LOL) so I have plenty of time on my hands now to take on this project.
Scott
1966 F-100 Custom Cab LWB
1966 F-100 Custom Cab LWB