First of all, thanks to all of you who are following this build...makes it all the more satisfying to have an audience that I can share with. Please forgive the fact that there are fewer pictures during the reassembly. Most questions can be answered by reviewing the fab/mock-up pictures. But, feel free to ask anyway.
Randy, I'll get there but yes, hydraulic slave & master from a '57-60 F-100. Have the parts sitting here, just one of the next steps.
John, the shackles look great! Better than mine, in fact...this is why I show all the pictures, in the hope that someone can use part or all of this info on their build!
Last time Tim came up, he dropped off a pick-up load of goodies.
Unfortunately, I have had a hard time getting into the garage the past month due to a pretty serious series of events, including my Dad's health issues rearing their ugly head again, a job change, a bad round of the flu, etc...but that's another story.
A little clean-up goes a long way. And we're back on the axles! (Springs aren't yet painted, as I anticipate playing around with the pack a bit for final ride height once the front end is properly loaded).
As I mentioned before, I built in 10º caster to the axle flip for stability at speed...
Relocated and re-mounted steering box, with steering tube running through the revised firewall reveal. Shift arms will be cut off the column. 3-speed has been replaced with a T-5.
Front end will drop a few inches with the engine and front clip, but you can see how the geometry of the pitman arm/drag link are falling right into place. (please note the bolts and lower plates are for MOCK-UP. For those of you that only look at the pictures in a build thread, I'll anxiously await your comments on the subject)
I love it when a plan comes together.
Another view of the revised suspension layout.
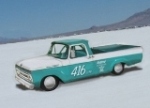
I believe I'll refer to this as a milestone. First time it's rolled out of the garage since it rolled in...feels much closer now. Won't be long until it heads down south to Tim's for the repaint, roll cage, and other goodies.
The 301" Y-block (+ .080" 292, standard stroke) that wil be the first test bed engine built, of course, by Tim McMaster. For those of you that don't know the story, this is the engine that I bought on Craigslist in Oregon. My firend Bryan picked it up and shipped it down to Turlock in a reefer.
Turned out to be a great "sight-unseen" purchase. Engine was a beautiful virgin block in really clean shape.
Last edited by BIGREDTODD on February 7, 2011, 5:16 pm, edited 1 time in total.
[quote="BIGREDTODD"]First of all, thanks to all of you who are following this build...makes it all the more satisfying to have an audience that I can share with. Please forgive the fact that there are fewer pictures during the reassembly. Most questions can be answered by reviewing the fab/mock-up pictures. But, feel free to ask anyway.
Randy, I'll get there but yes, hydraulic slave & master from a '57-60 F-100. Have the parts sitting here, just one of the next steps.
John, the shackles look great! Better than mine, in fact...this is why I show all the pictures, in the hope that someone can use part or all of this info on their build!
As I mentioned before, I built in 10º negative caster to the axle flip for stability at speed...
Why would you put in 10Deg of NEG caster? Do you plan on going in reverse for the record?
Thanks for the kind words but I do not pretend to have your skill, only the desire to improve my own.
The build looks great.Hope your life gets back to some semblance of order soon.
When you get a chance, could you please get that center line measurement for me?
John
BIGREDTODD wrote:As I mentioned before, I built in 10º negative caster to the axle flip for stability at speed...
Why would you put in 10Deg of NEG caster? Do you plan on going in reverse for the record?
You caught our secret. We are going to drive in reverse. Incredible aerodynamic advantage...or I'm just sleep deprived and made a mistake. It should have said 10 degrees positive caster.
This was covered early on in the build, but there's more information in the link below, to avoid any further confusion.
baby steps...PUN intended, because at this point I've been asked to leave, so Corinne's baby shower can go on unfettered
Definitely looks like it's starting to mean business.
...trimmed off the old shifter links...
Just about final steering geometry...the goal is to have just a bit of inlcine from the front to the rear. Should be just about right when reassembled and wet.
As planned, still plenty of clearance between the engine and relocated steering box. Oil filter clearance is fine, the angle of this shot is deceiving.
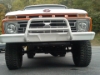
A bit over 2" of axle/pan clearance. Yeah, not much, but this is a race truck so no one gets to bitch about being impractical. Practicality is for your Toyota Camry.
BIGREDTODD wrote:A bit over 2" of axle/pan clearance. Yeah, not much, but this is a race truck so no one gets to bitch about being impractical. Practicality is for your Toyota Camry.
Well, it's getting there. not too much of an update functionally, but it will be great for you guys who only look at the pictures in magazines
While I didn't get to this today, here's the makings of the roll cage "outriggers". The 4" x 4" tubing will be welded perpendicular to the trucks ladder frame, and the 2" x 4" tubing will gusset/triangulate the 4" x 4" tubing. Open ends of the 4" x 4" tube will be boxed for strength and completely sealed, to prevent salt & dirt storage.
While they aren't painted yet (had to brong them, and the paint inside to warm up) the factory shock mounts were marked to clear the c-notch in the frame. these, and a few other items will go back in when the truck goes back on stands.
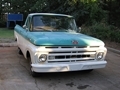
At this point it was decided that it was time to mount (temporarily) the front clip, to get an idea of stance, clearances, and to start cleaning out the bed of the truck (former home for the front sheet metal). So I pulled the grill and inner fenders and set it on...Look at that, a nearly complete truck peeking out of the garage!
More to come this week if all goes even close to plan
I keep watching this with much anticipation on the run in it... I do have a question though... It looks as if you have re-drilled your wheels to fit your front hubs?? It looks like the studs stick out about 3 inches or so??? Is there a reason for this? are my eyes playing tricks with the pics? or is it just the way they are??? I was just curious?? I love this build!!!
Anthony: I don't know about SCTA Rules, but for NHRA, open ended deep lug nuts are required, and the studs must protrude by a min amount (1" IIRC).....I'm assuming SCTA has a similar rule?
There is a pic in one post on pg 5 of the studs still in their MOROSO packaging....
When is your first run at the Salt Flats planned? My neighbor has been wanting to go up there and this might be a good reason to go. I have a lot of things going on this August and September but if I can make it, I would like to see it run and maybe help out if needed.
Kevin
kstones63
_______________________________________
63 F100
29 Ford Sedan Delivery
99 F250 PSD, 4x4, CC
95 F350 Flatbed Dually Diesel
DAMN !
That truck is looking sharp! Very nice work.
SCTA rules are similar, though not the same as NHRA. I don't want to step on toes and side track this thread. But, SCTA requires 1" dia. lug nuts in most classes, and the studs must have a min. of 5/8" "engaged' by the nut. Long studs alleviate any questions there. It also looks like the wheels are dual bolt pattern, not re-drilled.
Looking real good guys!
Mitch
Mild Mitch
Mitchell Motor Works
Anderson, California
1962 F250 Uni
2000 F100 Lightning
1951 F5 car hauler project
1931 Ford Roadster
The notched factory shock mounts painted & installed with stainless hardware...
Building blocks for the cage outriggers, and assembly.
Outriggers as they will be positioned on the frame. Front outriggers only have one gusset, as they will be welded to a factory body mount on the frame.
The finished rear outriggers, ready to install. Should be enough beef there to do the job.
This picture will hurt all you guys that started with rusty trucks. We actually needed some big holes in the floor. Care was taken to avoid cutting through any structure, and locate the mount locations as close to the cabin corners as possible...
Trimmed a little more off the floor pan to provide as much access as possible to the top of the outrigger. Outriggers are simply tackd in place for now. Cage fabricator will weld in final location.