It's Bedtime

A place just for our project & build threads.

Moderators: Kid, Casey 65

User avatar
64low-n-slow
Posts: 296
Joined: January 5, 2009, 4:05 pm
Location: Daytona Beach

It's Bedtime

Post by 64low-n-slow »

Over the past 3 years I've done a bunch to this truck. Just now getting into the worst part, the bed. Until now haven't posted anything in Projects & Builds, but a lot of people, myself included, post questions about rust repairs, parts availability, etc. Must give credit to a few people in advance. First - Backyard Resto for doing the research to find an available bed floor panel that fits, second - Twistedfreak....you make metalwork look easy, and finally, everybody on this forum who shares such a great wealth of knowledge on these trucks.

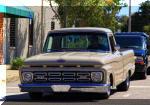
Starting with a pic from the day I loaded the truck near Atlanta_Image

This truck was a great project, had been in the garage for 20 years. Cab was in great shape. I knew the inside of the bed might be a challenge, actually figured I could easily buy a clean bed for cheap (duh).

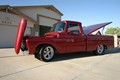
Here's a pic with the center of the floor cut out
Image
User avatar
64low-n-slow
Posts: 296
Joined: January 5, 2009, 4:05 pm
Location: Daytona Beach

Post by 64low-n-slow »

Found a local sheet metal shop to bend up the 4 corner floor panels. Here they are along with the floor for trial fit. The floor panel I used was the correct width, but required some slight modification. First it is about 3 inches too long. Once I trimmed out the old front panel I got an exact measurement. I cut it using a straight edge and an air saw. Afterward I used 80 grit on a grinder to smooth the cut. The floor braces were different so I drilled out the spot welds and removed all 3, then moved the rear brace to the front to replace my original rusted out one. The second pic shows from the top where I welded it back on.

Image

Image
User avatar
64low-n-slow
Posts: 296
Joined: January 5, 2009, 4:05 pm
Location: Daytona Beach

Post by 64low-n-slow »

Last post for today, first pic is the front panel clamped into place. I cut off the top of the original front panel to reuse. It is rusted out in a few places but I'll patch it to retain as much of the original look as possible. A piece of square tubing would be an easier way to go.

Image

A shot of inside the bed from the back. Spent this weekend sandblasting on the inside panels and mocking- up the floor and front panel. Nights when I am home this week I will finish prepping the inside for primer and finishing the hammer and dolly work to get ready for welding.

Image

Left rear corner clamped in place .

Image
ICEMAN6166
Posts: 11470
Joined: July 11, 2006, 11:28 am
Location: Dove Creek, Co. elevation 6842
Poland

Post by ICEMAN6166 »

very nice work !
1966 F250 4x4
1964 Rambler Ambassador 990
Rest in peace departed Slick family members
Cam Milam
Lesley Ferguson
Steve Lopes
John Sutton
36truck
Posts: 3144
Joined: October 20, 2007, 8:32 pm
Location: Land of Sunshine AZ
United States of America

Post by 36truck »

Loots of work doing that but you can't beat how it looks now. Great job.
Tom Williams
User avatar
Max
Posts: 3456
Joined: July 11, 2006, 11:53 am
Location: 29°35'07.00"N 95°09'07.49"W
Contact:
United States of America

Post by Max »

I agree, very nice! Will be sweet after it's painted. Don't forget to allow for drainage!
"If you don't want to stand behind our Troops, feel free to stand in front of them."

1964 Ford F100
1967 US Army M416
User avatar
jwh f-100
Posts: 1903
Joined: June 11, 2007, 6:25 pm
Location: Equinunk, PA
United States of America

Post by jwh f-100 »

X4 very nice!!!!
Jason

Beer will change the world.

I don't know how but it will.
User avatar
Greg D
Posts: 10113
Joined: September 13, 2006, 4:39 pm
Location: Podunk Iowa
United States of America

Post by Greg D »

Nice work.
1964 F 100 - I am going to do "something" with it.......

viewtopic.php?f=32&t=15942

1987 Mustang LX Convertible, 2.3 Auto - cruiser.
1994 F 150 XLT 2WD


~ Yes - I adopted another cat..............

Cam L Milan,
You'll be missed my friend.
tschmitt
Posts: 165
Joined: November 11, 2008, 4:53 pm
Location: IL

Post by tschmitt »

Great job looks great!
Jim
Posts: 6
Joined: April 26, 2009, 7:15 pm
Location: Cooper City, Florida

Post by Jim »

I need to do the same for my 66, where did you buy the bed pannel?
thanks
Jim
1966 f-100 V-8, 3 on the floor, shorty
Power by Ford
Posts: 192
Joined: August 22, 2008, 9:07 pm
Location: Atlanta Ga

Post by Power by Ford »

Looks very nice. What truck did the bed floor come from?
Love those SLICKS
User avatar
ezernut9mm
Posts: 9141
Joined: July 21, 2006, 9:37 pm
Location: KCMO
Sweden

Post by ezernut9mm »

i wish i was that ambitious. lookin' good.
always
"i believe i've achieved satisfaction".-bubbles
"should i be gettin" baked for this boys?"-bubbles


i could no longer keep "r.i.p.ing" all of our fallen brothers and sisters, so i say here, slick loads of love and much respect to all you beautiful people.
User avatar
64low-n-slow
Posts: 296
Joined: January 5, 2009, 4:05 pm
Location: Daytona Beach

Post by 64low-n-slow »

Thanks for the encouragement. I will add some drain holes into the corners before primer and paint for sure.

The bed panel is a factory Ford panel. It's an '08 F-250 4x4 6 1/2 foot replacement panel. Backyard resto has the part # listed on his build post.
User avatar
kstones63
Posts: 1504
Joined: April 7, 2007, 10:55 pm
Location: Phoenix, AZ
United States of America

Post by kstones63 »

Looking good. It's good to see that we can get a bed floor that looks good in these trucks even though it wasn't made for them.

Kevin
kstones63
_______________________________________
63 F100
29 Ford Sedan Delivery
99 F250 PSD, 4x4, CC
95 F350 Flatbed Dually Diesel
User avatar
64low-n-slow
Posts: 296
Joined: January 5, 2009, 4:05 pm
Location: Daytona Beach

Post by 64low-n-slow »

I've been slackin' on the Slick. Worked the last 3 weekends so had to take a break. Should finish all the welding and grinding this weekend and get the underside primed. Will post pics Sun.
tschmitt
Posts: 165
Joined: November 11, 2008, 4:53 pm
Location: IL

Post by tschmitt »

If you dont mind me asking could you tell me how much the bed floor cost? I may consider doing this to my bed as well and would like to have an idea financially how much this would cost me.
User avatar
64low-n-slow
Posts: 296
Joined: January 5, 2009, 4:05 pm
Location: Daytona Beach

Post by 64low-n-slow »

Including tax, just over $300. There is still a fair amount of spotweld drilling and trimming needed with the new panel because the braces are not in the right location. I just needed 1 NEW part to work with for clean, straight edges.
tschmitt
Posts: 165
Joined: November 11, 2008, 4:53 pm
Location: IL

Post by tschmitt »

Thanks alot, im sure its going to turn out great.
User avatar
64low-n-slow
Posts: 296
Joined: January 5, 2009, 4:05 pm
Location: Daytona Beach

Post by 64low-n-slow »

Didn't make the progress I hoped for this weekend. Spent most of today fixing fence so my honey's horses can't run away (shame). Did get more welding done and shot a few pics. If anybody wants to come by and help.....

Image

Image

Image

Image
User avatar
ezernut9mm
Posts: 9141
Joined: July 21, 2006, 9:37 pm
Location: KCMO
Sweden

Post by ezernut9mm »

lookin' good man. can't wait to see the finished pics.
always
"i believe i've achieved satisfaction".-bubbles
"should i be gettin" baked for this boys?"-bubbles


i could no longer keep "r.i.p.ing" all of our fallen brothers and sisters, so i say here, slick loads of love and much respect to all you beautiful people.
Post Reply