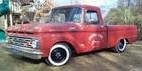
So I took the weekend off to go to a local show here in Anderson. The truck got a lot of attention but the coolest part was my 4 year old son explaining the engine to my daughter. Too funny.
That is awesome, can't wait till I get my uni hammered a little, won't get that far but I sure need some drop. Lot's of other things on that little list before then but someday. Keep after it your a great inspiration.
Cory
1962 F100 SWB Unibody, 223 1931 Ford 5 window coupe 1968 GT/California Special Mustang, 289 Complete 61 LWB Unibody parts truck with 292 Y Block
Power by Ford wrote:Red the bumper looks nice. Are you planning to cap the ends?
Red
Your truck is coming together and looking really nice. The console is very nice and the bumper is very similar to what I did with mine. I used 2 1/2 bumpers to make one. You can cut a section out to get the profile and use it to kill out the each end into the fenders. Ill get a pic of mine and post it. Keep up the great work.
Power by Ford wrote:Red The bumper is very similar to what I did with mine. I used 2 1/2 bumpers to make one. You can cut a section out to get the profile and use it to kill out the each end into the fenders. Ill get a pic of mine and post it. Keep up the great work.
Any ideas would be appreciated. I got two different ideas but both would require major work. Both could be done but I'm afraid that my patience isn't up for the challenge. I've also been pondering where to place the gages. I had an apifiany (spelling???) at the car show. Waiting on some measurements from Dakota Digital but I think I can place them above the sunvisor. Out of sight from the average joe looking at the truck but plenty visable for the driver. Just an idea. Once I confirm if they will fit, I'll mock it up with a full scale print of the gages and posterboard to see how I like it. Sounds good and functional but it's a lot easier and cheaper to test drive an idea with posterboard and a print. Has anyone seen anyone do anything like this with their gages before? Anyone know of a reason no to do them like this? I'm in unchartered waters.
I for some reason!, have trouble seeing the face of my radio, that`s in the over head console!, but gauges may be different as you only need to glance at them!. 56 years and failing eye sight doesn't help either!
Honey, If I say I`ll fix something I will, there`s no need to remind me every 6 months!! 66 f100 tabletop swb 351 Clevo C6 "Beryl"
I got the pulley kit on today. 2 hrs from unpacking to all tools cleaned up and back in the tool box. Concept one has their act together. Hope to have the power steering pump plumbed up the first part of next week.
Before
After
Well I couldn't wait so I got up at the crack of dawn and went to the shop so I could be home before the wife and kids got up and about. Power steering is plumbed. I need to make some aluminum blocks to hold them together. Details, details....
Power by Ford wrote:Red The bumper is very similar to what I did with mine. I used 2 1/2 bumpers to make one. You can cut a section out to get the profile and use it to kill out the each end into the fenders. Ill get a pic of mine and post it. Keep up the great work.
Kenny, did you ever get a chance to get a pic of yours?
I'm still steady working on mine with high hopes for the F100 Nats in Tn this weekend but the weather doesn't look like it is going to be nice. Well needless to say a bare metal truck and rain don't mix. I am still working full steam ahead though. Hope to get back on the front bumper tomorrow evening and then the compressors and air management buttoned up on Thursday. Fingers crossed on the weather but it ain't looking promising.
Hey Red I have been working 16 hour days lately and flying out to Texas. I have got way behind on my truck. Ill try this weekend to get a pic of the bumper. Basically i got rid of the tag recess in the middle, added some flat stock about 1 inch wide across the top, sectioned the bumper to bring it in tight on the fenders it matches up perfect with the lines on the stone guard and the body line on the fender. If you scrap the body line of the fender think about capping the ends of the bumper with a profile section you can leave a 1/8 gap between the fender and bumper and it will look very smooth and fit the style of your truck IMO.
Well, the weather doesn't look like it is going to cooperate so the truck will be staying at home this weekend. The wife and I will be headed out in the morning to go to the F100 show in Tn. I have managed to get a lot done on the ole truck this week though. I re-made the hood rollers out of stainless. Still have to tig them together. The front bumper is about 80% complete. I've learned that 1+1 can equal 1. 2 bumpers cur all to pieces to get one bumper made. A little left on the corners and a lot of slab sanding to get any waves out. Also still have to weld in the bumper brackets that I cut out today. My goal is to have it ready to chrome but thet may be a little on down the road. Here are some pics of the progress. Alan, I also remembered to take some pics of the hood stops that I came up with.
Adjustable Hood Stops
Since this is the second set of hood rollers that I've made, I went ahead and made a jig. Never know, I might build another slick one day.
Bumper brackets that will weld to the inside of the bumper.
Thanks guys, i wanted something a little different. You can't tell it from the pictures but i pointed the bumper to match the upper valance. Still a ways to go but it'll get there.
You nailed it Red on the bumper. It does take alot of time. I had planned to chrome mine along with the grill but after the ball park quote of 2,200 I decided to go with a painted finish that I will work to look like brushed stainless. All the other stainless I have brushed instead of polished. Get lots of pics at the show for us. Safe travels.