robert's 61 F350

A place just for our project & build threads.

Moderators: Kid, Casey 65

rwhistles
Posts: 553
Joined: October 15, 2006, 7:42 pm
Location: winter haven, Florida
United States of America

Post by rwhistles »

I got a little more done to the ole truck today.Pulled the gas tank and cleaned everything up real nice so the sound deadner would stick good.

Image

Image

here is the deadner in place.I put it as far in and deep as I could reach down into the cab corner.

Image

And the insulation is in place now. I would like to cover it up with some black material or something. Cain't just leave it like that
1961 F350 pick up
1962
1963
1964
1965
1966 F350 camper
User avatar
Greg D
Posts: 10113
Joined: September 13, 2006, 4:39 pm
Location: Podunk Iowa
United States of America

Post by Greg D »

Maybe spray a piece with some aerosol bedliner, let it dry good an then flex it alot to see how it sticks?
Maybe a coat of adhesion promoter first?
1964 F 100 - I am going to do "something" with it.......

viewtopic.php?f=32&t=15942

1987 Mustang LX Convertible, 2.3 Auto - cruiser.
1994 F 150 XLT 2WD


~ Yes - I adopted another cat..............

Cam L Milan,
You'll be missed my friend.
rwhistles
Posts: 553
Joined: October 15, 2006, 7:42 pm
Location: winter haven, Florida
United States of America

Post by rwhistles »

Got a little more done this past week.Put sound deadner on the roof and one layer of insulation, ran out of insulation and had to have pepboys order more then I will put a second layer on the roof and behind the seat.

Image

The floor mat came in and this is just a rough fit until I get the insulation then I will put a layer of it under the mat. Hope it comes in by Monday or tuesday.

Image
1961 F350 pick up
1962
1963
1964
1965
1966 F350 camper
MadMaxetc
Posts: 2600
Joined: July 10, 2006, 12:00 pm
Location: Wichita, KS
Contact:
United States of America

Post by MadMaxetc »

Looks good.

Should be a nice ride when you are done.
Dan
Project: '63 F-100 LWB / 460 / C6 / 2x4
My Build Thread
User avatar
kstones63
Posts: 1504
Joined: April 7, 2007, 10:55 pm
Location: Phoenix, AZ
United States of America

Post by kstones63 »

Some fabric stores sell automotive fabrics and carry that insulation. You can buy it by the yard and possibly cheaper than PepBoys. This way you don't have to worry about them running out.

Kevin
kstones63
_______________________________________
63 F100
29 Ford Sedan Delivery
99 F250 PSD, 4x4, CC
95 F350 Flatbed Dually Diesel
User avatar
64low-n-slow
Posts: 296
Joined: January 5, 2009, 4:05 pm
Location: Daytona Beach

Post by 64low-n-slow »

Lookin' good Robert. Keep it up!
rwhistles
Posts: 553
Joined: October 15, 2006, 7:42 pm
Location: winter haven, Florida
United States of America

Post by rwhistles »

Thanks guy's we all need those kind words to keep motivated. The insulation came in the other day and picked it up today.Laid it in for a rough fit.

Image

I got all the bolt holes for the seat mount punched out also the gas pedal, E-Brake handle,and the hole for the gear shifter. Done a final cut on it and laid the floor mat back in place. Now I need to final fit the floor mat then I can put it back together.Will post a pic of it when I get finished with the floor mat install.
1961 F350 pick up
1962
1963
1964
1965
1966 F350 camper
rwhistles
Posts: 553
Joined: October 15, 2006, 7:42 pm
Location: winter haven, Florida
United States of America

Post by rwhistles »

Got the floor mat finished up and put the seat back in

Image

Got the gear shift boot installed but it interfers with the E-brake boot retainer. They are to close together will have to figure out something or just live with it.Somehow during all the destruction I misplaced the gearshift knob. It's here some where just don't know where.
1961 F350 pick up
1962
1963
1964
1965
1966 F350 camper
rwhistles
Posts: 553
Joined: October 15, 2006, 7:42 pm
Location: winter haven, Florida
United States of America

Post by rwhistles »

I found the shifter knob and decided to clean it up a little. Ended up scratching the paint out of the shiift pattern. Then I sprayed white paint on it and wiped it off with a paper towel dampened with paint thinner. It looked pretty good so I did it 3 more times then hit it with clear several times. Dont know how long it will last but will look good for awhile.

Image

Here you can also see the interference between where the E breke lever boot will go and the gear shift boot. minor point will worry about that later.
1961 F350 pick up
1962
1963
1964
1965
1966 F350 camper
User avatar
supersmitty
Posts: 247
Joined: November 4, 2009, 8:11 pm
Location: Plainfield, CT
United States of America

Post by supersmitty »

Looks good. Glad to see your at least motivated. Me...not so much..although the 3 feet of snow isnt helping either. :?
65' F100
R.I.P Steve
rwhistles
Posts: 553
Joined: October 15, 2006, 7:42 pm
Location: winter haven, Florida
United States of America

Post by rwhistles »

I went to the frabic store today to get some cotten batten amd vinyl to cover my door inserts. bought 1 yard of each and there is enough to do the inserts and vizors.Heres what I started with.

Image

Sorry for the fuzzy pic.Can't seem to hold a camera steady anymore.All the old cardboard had came off. All that was left was the masonite and hinge piece.

Image

I used 3M super spray adhesive to glue 2 layers of cotten batten to the vizor.Then I cut a piece of vinyl to fit with an extra 1/4 inch extra on all sides.Then I cut a strip 1/2 inch wide to fold over the ends and sew together.

Image

Now I have a padded sun vizor. The hand stiching took abount an hour and a half useing a small pair of needle nose pliers to push the needle through 4 layers of vinyl. The stich spaceing is crappy so the other side will have to wait untill I havre acess to a sewing machine or I get very bored and have nothing else to do.
1961 F350 pick up
1962
1963
1964
1965
1966 F350 camper
rwhistles
Posts: 553
Joined: October 15, 2006, 7:42 pm
Location: winter haven, Florida
United States of America

Post by rwhistles »

Some parts came in yesterday. UPS brought the E-Brake lever boot and a few things from DC came in also.

Image

Heres the new E-Brake lever boot will pull the retainer and paint it later.

Image

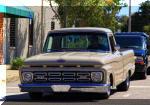
You can just barely make out the new cowl rubber and hood bumpers but you can see the new turn signal lens pretty well. Nothing major just minor progress.
1961 F350 pick up
1962
1963
1964
1965
1966 F350 camper
fire truck
Posts: 2141
Joined: January 17, 2010, 9:06 pm
Location: Down in Mississippi and up to no good
United States of America

Post by fire truck »

rwhistles wrote:
Image


I dig the "custom Cab" emblem on the access panels....
So good lookin' that I've attracted an international stalker.


Rest in Peace Bumpstick....I miss ya man.
User avatar
kstones63
Posts: 1504
Joined: April 7, 2007, 10:55 pm
Location: Phoenix, AZ
United States of America

Post by kstones63 »

Where did you get your clear turn sgnal lenses? They look to be more clear than mine. Mine have a funny, almost yellow tint to them. I think mine look terrible next to the red paint and really need a more clear lens.

Kevin
kstones63
_______________________________________
63 F100
29 Ford Sedan Delivery
99 F250 PSD, 4x4, CC
95 F350 Flatbed Dually Diesel
rwhistles
Posts: 553
Joined: October 15, 2006, 7:42 pm
Location: winter haven, Florida
United States of America

Post by rwhistles »

fire truck
I took them off the door and filled the holes when I put the cc scratch guards on. Seemed like to much crome in one place and the access panels just begged for some attention.

Kevin
They came from Dennis Carpenter. they are real clear hold them up to the light and theres no trace of a tint to them.
1961 F350 pick up
1962
1963
1964
1965
1966 F350 camper
rwhistles
Posts: 553
Joined: October 15, 2006, 7:42 pm
Location: winter haven, Florida
United States of America

Post by rwhistles »

I got a truck support package from DC yesterday and got a little done for the ole truck.

contents of package.

headlight switch
spin on filter conversion
exhaust manifold gaskets
180 thermostat & gasket
dome light bezel & lens
inst. panel to dash seal

The headlight switch was a breeze as were the manifold gaskets.Changed the oil and installed the filter conversion kit.No leaks when I fired it off so I'm happy about that.The dome light is for the future when I get a new headliner. Will try to get to the thermostat tomorrow
1961 F350 pick up
1962
1963
1964
1965
1966 F350 camper
rwhistles
Posts: 553
Joined: October 15, 2006, 7:42 pm
Location: winter haven, Florida
United States of America

Post by rwhistles »

wow! been awhile since I posted anything.done a few things here and there nothing to write home about.

copyed this idea from another member .don't remember who. just saw it in their build thresd.

clutch rod with hime joints. First I took the old clutch rod out and put the hime joints on it so I could get a measurement for the new rod.


Image


cut a piece of 3/8 cold roll 17 and 1/4 inches long.


Image

thread it 1 inch on both ends to allow for jam nuts and any ajustment needed. Used the old rod to get centers of hime joints the same as old rod.

Image

got it to fit old rod and proceeded to install.

Image
Image

as my old rod had very little wear and the bushings were still good this wasn't necssary but was a neat mod.
1961 F350 pick up
1962
1963
1964
1965
1966 F350 camper
thenephilm
Posts: 542
Joined: June 25, 2009, 9:06 pm
Location: Cincinnati
United States of America

Post by thenephilm »

What did those wheels come off of? They look great!
rwhistles
Posts: 553
Joined: October 15, 2006, 7:42 pm
Location: winter haven, Florida
United States of America

Post by rwhistles »

the rims came off a 73 P 350/400 ford bread truck.
1961 F350 pick up
1962
1963
1964
1965
1966 F350 camper
rwhistles
Posts: 553
Joined: October 15, 2006, 7:42 pm
Location: winter haven, Florida
United States of America

Re: robert's 61 F350

Post by rwhistles »

here is where I left off last year on the tailgate I got from ice. After a little hammer and dolly work it still had a bulg in the center and some oi can on the right side.


Image

after watching many,many youtube vids on metal shrinking with a torch and a shrinking disc I decided to give it a whirl.you don't have to heat the metal red hot to shrink it just turn it blue and apply a wet rag and repeat the process. I sprayed it with my favorite paint remover so I could get a better picture of what needed to be done and then started heating and cooling with a little hammer work in between.


Image

the bulge in the center is gone and the oil can between the r and d is gone for the most part.this is about a far as I can go with a torch. Ordered a shrinking disc off ebay and will try to get all the high spots down. Will take it to be sand blasted today hopefully. Then jump on it with the disc and try to get it as straight as possible.
1961 F350 pick up
1962
1963
1964
1965
1966 F350 camper
Post Reply