Page 1 of 6
64 Tweety Bird
Posted: July 2, 2012, 10:01 pm
by Daryl
Well with the help of Uncle Skip, I am back on track to the 64 short bed flareside. Guess it only lets me load 3 pictures per posting. Anyay we test fitted the doors the last weekend and I post pictures of that Tuesday. They came out great since we had to put a new cab roof on.
Skip really has encouraged me to keep working on this since this is my 1st build so hats off to him. And since I am painting the truck Bright Ford yellow, Tweety Bird seemed as good of name as any.
Re: 64 Tweety Bird
Posted: July 2, 2012, 10:09 pm
by Gritsngumbo
Suggest you just post a "quick reply" (reply to your own post) and add more pictures. Better than making a new post for each set of pictures.
Re: 64 Tweety Bird
Posted: July 3, 2012, 9:49 am
by bcook07
or host your photos on photobucket and add the links with the "img" button on the create a post screen
Re: 64 Tweety Bird
Posted: July 4, 2012, 9:30 am
by Daryl
I'll set up a gallery here if that is the thing to do. Sorry for the rookie mistake.
Re: 64 Tweety Bird
Posted: July 4, 2012, 9:45 am
by SixtySix Ford
Id like to see some over all pics of the whole truck!

Re: 64 Tweety Bird
Posted: July 4, 2012, 5:19 pm
by Uncle Skip
Re: 64 Tweety Bird
Posted: July 6, 2012, 9:39 am
by Uncle Skip
Re: 64 Tweety Bird
Posted: July 6, 2012, 11:09 am
by Gritsngumbo
"Panel adhesive"? Tell me more.
Re: 64 Tweety Bird
Posted: July 6, 2012, 11:32 am
by Hunter's 64
Re: 64 Tweety Bird
Posted: July 6, 2012, 12:38 pm
by bird55
I don't own a welding setup, so this is what I used to patch in some small areas in my floor. I'm sold on the stuff. 3M makes good money on it and the required other stuff that goes with though. BUT I bought a set of tubes that at least don't require the applicator gun. You just mix it up like epoxy glue. I think what I used was called "3M structural Adhesive"
Re: 64 Tweety Bird
Posted: July 6, 2012, 12:46 pm
by Hunter's 64
Re: 64 Tweety Bird
Posted: July 6, 2012, 3:53 pm
by Uncle Skip
Truthfully, I'd be confident using J-B Weld myself if I ever do it again. Just make sure the surfaces are clean and dry. Use enough so the excess squeezes out and fills the gap. Then, just clean up the excess and skim with BONDO and some glaze.
I love the smell of Bondo in the morning.

Re: 64 Tweety Bird
Posted: July 21, 2012, 5:27 pm
by Uncle Skip
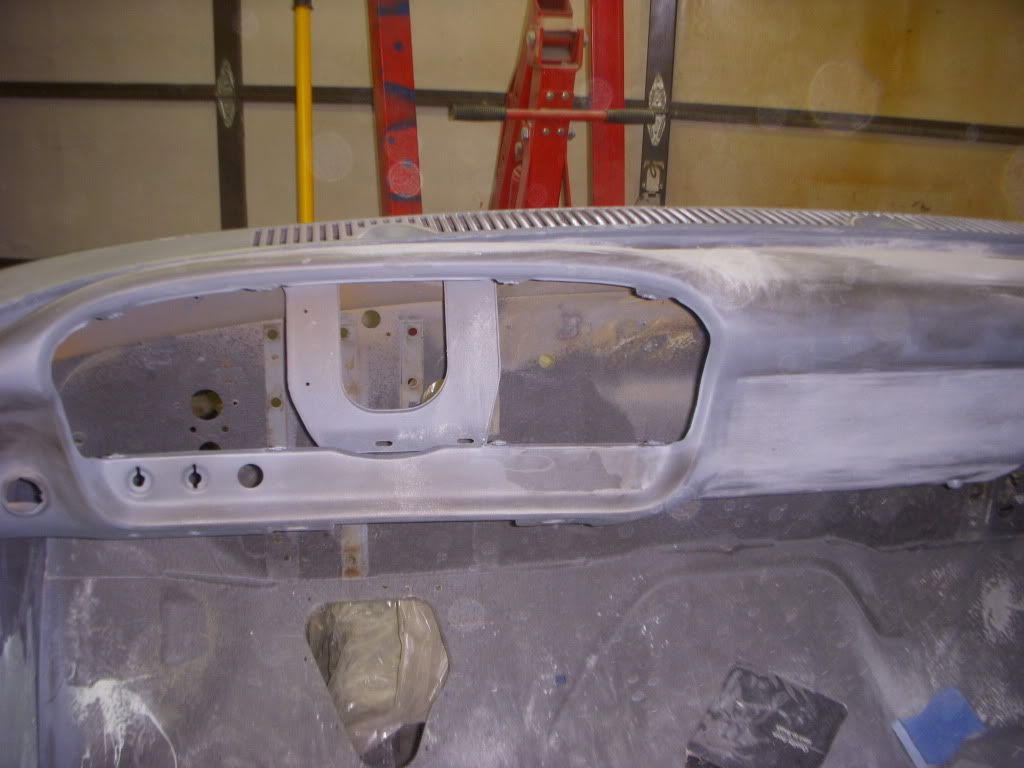
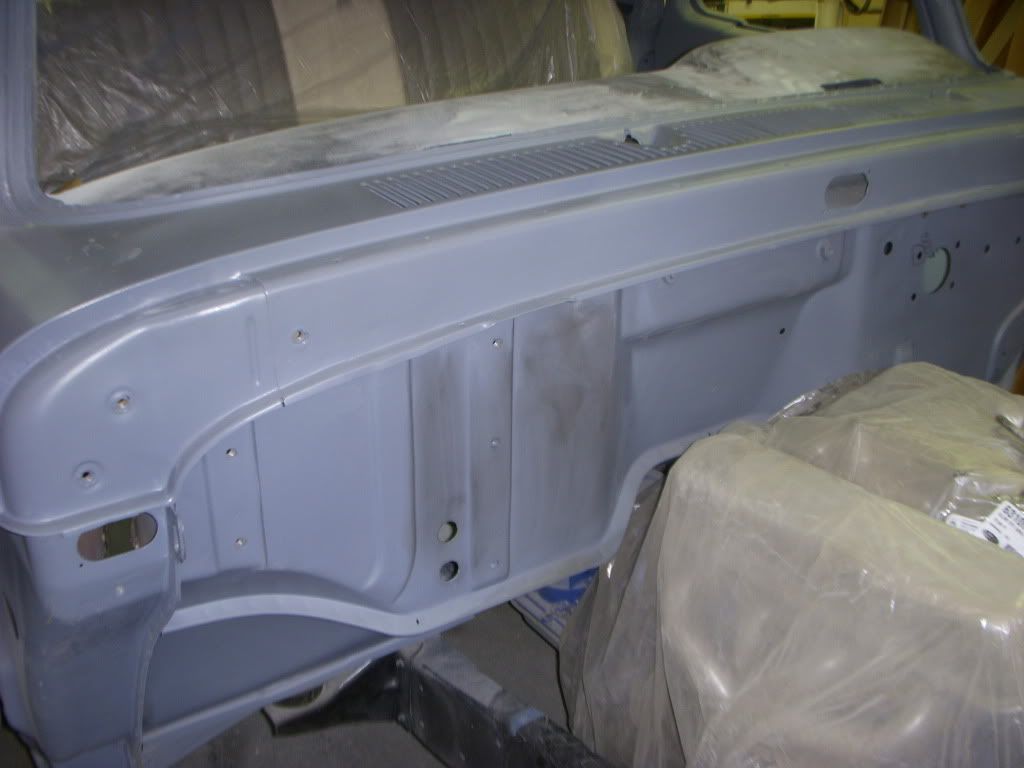
Progress in July. Its grunt time right now getting the body smooth and ready for primer and paint.
Almost time to pre-fit and pre-wire everything, take it all apart again, and then hopefully, shoot some color.
The dash and firewall are pretty much done as you can see.

 TIME
TIME..... marches on.
Re: 64 Tweety Bird
Posted: July 21, 2012, 6:56 pm
by jkimbrel65
That looks sweet!!!!!!!! Gonna look great with color.
Mike
Re: 64 Tweety Bird
Posted: July 21, 2012, 11:48 pm
by 1965fordf100
Looking awesome!
Re: 64 Tweety Bird
Posted: July 24, 2012, 8:10 pm
by Rusted64
Looking good.
Can't wait to see it when it's done.
J
Re: 64 Tweety Bird
Posted: August 12, 2012, 5:25 pm
by Uncle Skip
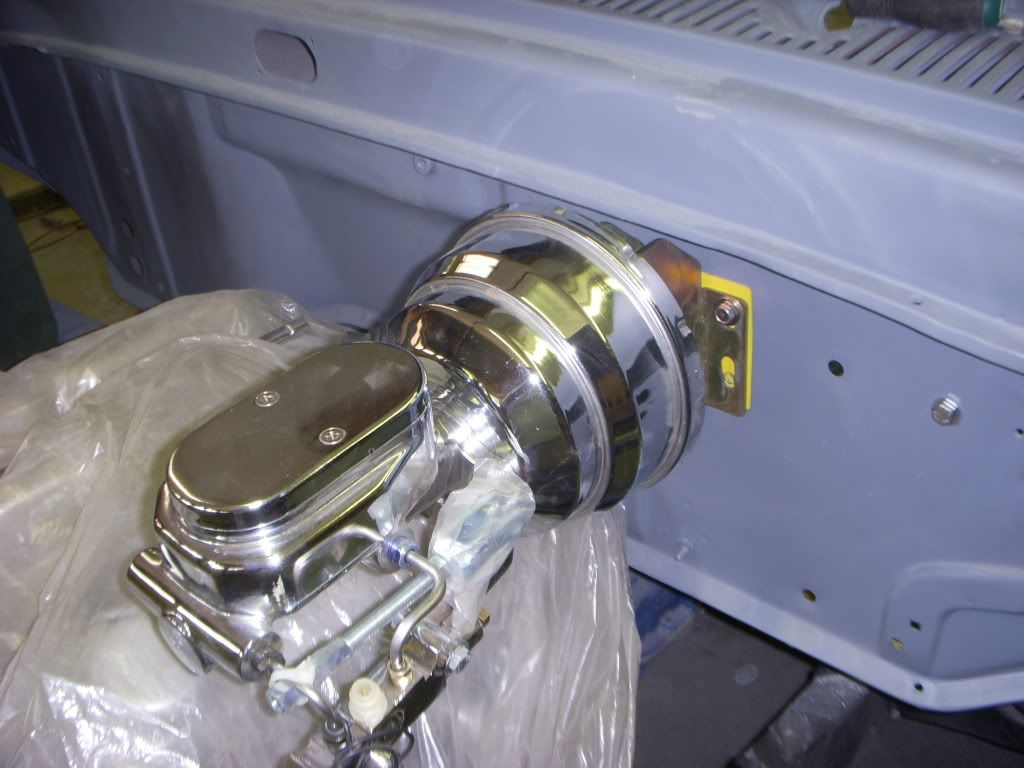
Might not look like much because we took everything back out before closing up shot but we got the floor plate installed and mocked up the steering column to the proper angle. We built an adapter and put in the new column drop.
Then we trial fitted the brake booster and proportioning valve to check clearances, and fabed up the spacer for the brake actuator rod (the yellow thing behind the booster on the firewall) closing the existing hole up to 1.75" so the new pedal seal will close up the opening.
The spacer will now be trimmed down to fit flush with the edges of the master cylinder mounting bracket. No peekee edges.
Not a bad day for two fat old men.
And as a plus, the body is now ready for the final coat of epoxy primer and a couple of coats of filler going on this week.
 TIME
TIME..... marches on.
Re: 64 Tweety Bird
Posted: August 12, 2012, 7:07 pm
by MadMaxetc
Looking good.
Mockup work takes a lot of time to get right.
What's brand/model of the booster and MC?
Re: 64 Tweety Bird
Posted: August 12, 2012, 7:27 pm
by Uncle Skip
Daryl, time to step up and answer questions. Where did you get the master cylinder? BTW, the firewall brace is being re-located to the inside to keep the firewall clean.
Re: 64 Tweety Bird
Posted: September 29, 2012, 4:57 pm
by Uncle Skip


