
This has been a long time in the making - this project was supposed to be done a long time ago and I just never got it off the ground like I had hoped. But I've finally reached a milestone where I'm comfortable starting a 'Projects & Builds' thread - simply because I've reached the point where my Project has become a Build........
I'm hoping to get a lot of parts cleaned up and painted here before it gets too cold out so I can at least make some progress over the winter.........
Project SLIXTYFIVE
-
slixtyfive

- Posts: 443
- Joined: January 19, 2007, 2:03 pm
- Location: Eastern Iowa

Project SLIXTYFIVE
- Attachments
-
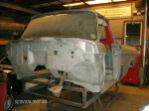
- 100_6182 (360x270).jpg (178.17 KiB) Viewed 9521 times
-
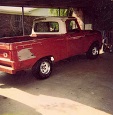
- 65driver (640x480).jpg (245.41 KiB) Viewed 9521 times
"It's better to be gone but not forgotten, than to be forgotten but not gone." Gary Allan
-
rickairmedic
- Posts: 1394
- Joined: July 19, 2006, 9:27 pm
- Location: Louisville,Ky
Re: Project SLIXTYFIVE
Well it looks like the hard part is over taking it apart and cleaning it up . Now the fun part trying to remember where you hid all the parts and getting lucky and getting them to all go back where they are supposed to go  .
.
Rick
Rick
if it aint broke fix it till it is 
-
slixtyfive
- Posts: 443
- Joined: January 19, 2007, 2:03 pm
- Location: Eastern Iowa
Re: Project SLIXTYFIVE
No kidding - remembering how it all goes back together will be a challenge!!!
"It's better to be gone but not forgotten, than to be forgotten but not gone." Gary Allan

Re: Project SLIXTYFIVE
take apart your doors and try putting them back together 6 years later.. if you can find the parts !
-
slixtyfive
- Posts: 443
- Joined: January 19, 2007, 2:03 pm
- Location: Eastern Iowa
Re: Project SLIXTYFIVE
Obviously an update (or two) is way overdue here......
I have made some progress but not nearly as much as I had hoped. And to make it worse, I've come to realize that I didn't do a very good job of taking pictures along the way. So I will just add a few posts over the next few weeks showing some of the work that I did 'document'.....
Hopefully when this not so friendly winter finally breaks, I'll be able to start making more progress again.
So to start with, here are a couple pics of the repairs made to the radiator support mount holes in the front of the frame.....
The area around them was heavily pitted and thus very thin - to the point that the holes had irregular shape and the material was thin. I wasn't concerned about making them pretty since they will get completely covered back up. But they do need to be strong enough to do the intended job.
Both sides were similar condition and repaired the same way. Holes still aren't perfectly round but are close to the original size and material thickness now.
The front cab mounts had similar issues and actually were worse. So I cut/drilled the rivets out to remove them and bolted on replacement pieces from another frame instead.
Last edited by slixtyfive on May 18, 2020, 8:24 am, edited 1 time in total.
"It's better to be gone but not forgotten, than to be forgotten but not gone." Gary Allan
-
olliesshop
- Posts: 737
- Joined: May 16, 2010, 8:38 am
- Location: Grosse Pointe, Michigan (Detroit Metro)
- Contact:
Re: Project SLIXTYFIVE
Good luck on your build! Mine sat for 20 years or so before I could get really going on it.
All the best
All the best
Tim - 1961 F250 Uni
"Big Red" pictures ... http://olliesshop.smugmug.com/Trucks
Current build thread ... viewtopic.php?f=32&t=29505
"Big Red" pictures ... http://olliesshop.smugmug.com/Trucks
Current build thread ... viewtopic.php?f=32&t=29505
-
Sweet6T6Ford

- Posts: 27
- Joined: September 19, 2011, 2:23 am
- Location: Harrison, Michigan
Re: Project SLIXTYFIVE
Just a suggestion on holes like that, take a large flat washer (we used 10 gauge) with the proper hole in the middle i believe 5/8 and weld it in place.... I had similar issues with my 66 and this seems to be stronger than just using weld to fill the hole. Good luck! Cant wait to see it done....
Robert
http://s1231.photobucket.com/albums/ee512/uofmfresh/
"In the silence of the night if you listen quietly you can hear your neighbors chevy rusting"-- unknown
http://s1231.photobucket.com/albums/ee512/uofmfresh/
"In the silence of the night if you listen quietly you can hear your neighbors chevy rusting"-- unknown
-
slixtyfive
- Posts: 443
- Joined: January 19, 2007, 2:03 pm
- Location: Eastern Iowa
Re: Project SLIXTYFIVE
Yeah, I started down that path but couldn't find any washers with the correct size hole. It probably wouldn't matter if it wasn't exactly the same but for the most part it was just deep pits so 'fill welding' them wasn't too bad.
"It's better to be gone but not forgotten, than to be forgotten but not gone." Gary Allan
-
slixtyfive
- Posts: 443
- Joined: January 19, 2007, 2:03 pm
- Location: Eastern Iowa
Re: Project SLIXTYFIVE
Dash repair (hacked up for aftermarket radio)....
Last edited by slixtyfive on May 18, 2020, 8:24 am, edited 1 time in total.
"It's better to be gone but not forgotten, than to be forgotten but not gone." Gary Allan

Re: Project SLIXTYFIVE
Nice job on the radio hole! 
Simon
65 f 100
56 willys m38a1 SOLD ( Have had since high school )
65 f 100
56 willys m38a1 SOLD ( Have had since high school )
-
slixtyfive
- Posts: 443
- Joined: January 19, 2007, 2:03 pm
- Location: Eastern Iowa
Re: Project SLIXTYFIVE
Thanks!...
Shoulder belt mount anchors......
Shoulder belt mount anchors......
Last edited by slixtyfive on May 18, 2020, 8:25 am, edited 1 time in total.
"It's better to be gone but not forgotten, than to be forgotten but not gone." Gary Allan
-
slixtyfive
- Posts: 443
- Joined: January 19, 2007, 2:03 pm
- Location: Eastern Iowa
Re: Project SLIXTYFIVE
Filling trim holes. Pics for just one but process was repeated MANY times......
Last edited by slixtyfive on May 18, 2020, 8:25 am, edited 1 time in total.
"It's better to be gone but not forgotten, than to be forgotten but not gone." Gary Allan
-
slixtyfive
- Posts: 443
- Joined: January 19, 2007, 2:03 pm
- Location: Eastern Iowa
Re: Project SLIXTYFIVE
FWIW - all the pics I posted above tonight were re-sized to 512 (long side) in photo bucket prior to copying the link over here. I don't understand why they are coming in so large here. Any suggestions?
"It's better to be gone but not forgotten, than to be forgotten but not gone." Gary Allan
Re: Project SLIXTYFIVE
Not sure why the pics are that size, but I like a good closeup on the work..
Seeing you weld in those trim holes reminds me off one of my best days welding.. I had been welding a lot, and I had all kinds of stray holes to weld in on the uni.. That thing had so many racks and different things screwed into the body its shocking...
I was just swirling that weld in there with the mig and giving it a soft tap in the weld when it was hot with the body hammer, the welds were just laying in there so clean and perfect..hardly had to even prime them. It is truly satisfying when the welder is working nice...
Some days the old proverb about never getting the welder set right until you are done is the truth ! So as an amateur you gotta love the days you are WORKIN MAGIC !
-
Alan Mclennan

- Posts: 9324
- Joined: October 14, 2006, 6:16 pm
- Location: In the shed... Cranebrook NSW

Re: Project SLIXTYFIVE
they look OK to me!
Honey, If I say I`ll fix something I will, there`s no need to remind me every 6 months!!
66 f100 tabletop swb 351 Clevo C6 "Beryl"
Slick Stock 3 KCMO
Slick Stock 4 Altoona
Slick Stock 5 KCMO
Slick Stock 6 Altoona
Slick Stock 7 Salina KS
Slick Stock 8..............................
66 f100 tabletop swb 351 Clevo C6 "Beryl"
Slick Stock 3 KCMO
Slick Stock 4 Altoona
Slick Stock 5 KCMO
Slick Stock 6 Altoona
Slick Stock 7 Salina KS
Slick Stock 8..............................
-
slixtyfive
- Posts: 443
- Joined: January 19, 2007, 2:03 pm
- Location: Eastern Iowa
Re: Project SLIXTYFIVE
Hmph!!!!...... they do look ok now (except the dash pictures which I didn't re-size prior to linking). Wonder why they were so large last night right after doing it??
Oh well...
Oh well...
"It's better to be gone but not forgotten, than to be forgotten but not gone." Gary Allan
-
therealjoeshmoe
- Posts: 1059
- Joined: July 24, 2006, 2:18 am
- Contact:
Re: Project SLIXTYFIVE
thats the worst thing im dreading is putting all that door crap back together.. i just know ill end up scratching somthing lolfoodstick wrote:take apart your doors and try putting them back together 6 years later.. if you can find the parts !
Why fart and waste it when you can burp and taste it!


-
slixtyfive
- Posts: 443
- Joined: January 19, 2007, 2:03 pm
- Location: Eastern Iowa
Re: Project SLIXTYFIVE
All 'dressed up' and goin' to the strippers! 
Last edited by slixtyfive on May 18, 2020, 8:25 am, edited 1 time in total.
"It's better to be gone but not forgotten, than to be forgotten but not gone." Gary Allan
-
slixtyfive
- Posts: 443
- Joined: January 19, 2007, 2:03 pm
- Location: Eastern Iowa
Re: Project SLIXTYFIVE
back from the blaster.......
Last edited by slixtyfive on May 18, 2020, 8:26 am, edited 1 time in total.
"It's better to be gone but not forgotten, than to be forgotten but not gone." Gary Allan
-
slixtyfive
- Posts: 443
- Joined: January 19, 2007, 2:03 pm
- Location: Eastern Iowa
Re: Project SLIXTYFIVE
I had been slowly assembling the suspension etc over the winter with no major progress at anyone point but today I managed to get it outside and took a couple progress pics. Engine and tran finally in (see other posts on trials and tribulations with engine mounts). I still need to finish the brakes - both front and rear. Also the rear end isn't all tightened down as I may still make some changes on the rear suspension. Sorry for the dust - that's just another thing to deal with when projects drag out this long......
Last edited by slixtyfive on May 18, 2020, 8:26 am, edited 1 time in total.
"It's better to be gone but not forgotten, than to be forgotten but not gone." Gary Allan