'61 Uni restoration

A place just for our project & build threads.

Moderators: Kid, Casey 65

User avatar
Gary Seymour
Posts: 1192
Joined: September 15, 2006, 5:17 am
Location: Brown County, Indiana
United States of America

Re: '61 Uni restoration

Post by Gary Seymour »

I don't think you will find any sheet metal panels for the torque box. Should be easy to fab up though.

There's a lot of metal missing there, but it all looks like it's from that one panel and everything it ties into looks to be intact. Not a hard repair, I IMHO. Hopefully sandblasting doesn't reveal a whole lot more.

Frame is nice. You are doing your grandfather's truck justice! :clap:
Power by Ford
Posts: 192
Joined: August 22, 2008, 9:07 pm
Location: Atlanta Ga

Re: '61 Uni restoration

Post by Power by Ford »

Instead of fabbing a new torque box IMO a better solution is to install a rear cab mount. It makes the body much stiffer.

Imagey
Love those SLICKS
User avatar
ROOSTER
Posts: 82
Joined: October 20, 2012, 4:16 pm
Location: Boise, Idaho
Contact:
United States of America

Re: '61 Uni restoration

Post by ROOSTER »

Power by Ford wrote:Instead of fabbing a new torque box IMO a better solution is to install a rear cab mount. It makes the body much stiffer.

Imagey


Very Nice!
User avatar
olliesshop
Posts: 737
Joined: May 16, 2010, 8:38 am
Location: Grosse Pointe, Michigan (Detroit Metro)
Contact:
United States of America

Re: '61 Uni restoration

Post by olliesshop »

Gary Seymour wrote:I don't think you will find any sheet metal panels for the torque box. Should be easy to fab up though.

There's a lot of metal missing there, but it all looks like it's from that one panel and everything it ties into looks to be intact. Not a hard repair, I IMHO. Hopefully sandblasting doesn't reveal a whole lot more.

Frame is nice. You are doing your grandfather's truck justice! :clap:

Thanks. I hope you're right. BTW, I was surprised at how much more was visible and rusted after the body came off. But, like you said it doesn't look that hard to repair. And I hope Grandpa would be happy with it. :)
Tim - 1961 F250 Uni
"Big Red" pictures ... http://olliesshop.smugmug.com/Trucks
Current build thread ... viewtopic.php?f=32&t=29505
User avatar
olliesshop
Posts: 737
Joined: May 16, 2010, 8:38 am
Location: Grosse Pointe, Michigan (Detroit Metro)
Contact:
United States of America

Re: '61 Uni restoration

Post by olliesshop »

With regard to rear cab mounts, it looks like there are already one on each side, as you can roughly see by the picture. The mount is about 4-6" rear of the one you pictured and just rear of the back of the cab (at the front of the torque box, which I think I'll replace regardless of where the mount ends up). I think it's a great idea, though, and will bring it up at the shop.

Image

I truly appreciate all the help and advice !!!
Tim - 1961 F250 Uni
"Big Red" pictures ... http://olliesshop.smugmug.com/Trucks
Current build thread ... viewtopic.php?f=32&t=29505
Power by Ford
Posts: 192
Joined: August 22, 2008, 9:07 pm
Location: Atlanta Ga

Re: '61 Uni restoration

Post by Power by Ford »

That is the torque box mount and you can get rid of it and replace it with a rear cab mount. The rear cab support already has provisions for the mount. Use the gas tank mounting holes and the problem is solved. In the pic the box tubing is part of the frame work that was built to install a wood bed in place of the metal bed floor but is not required. Good luck. One other advantage is you get rid of the spot welds on the bedsides where the torque box attaches and I have seen the welds show through the paint especially when sitting out in the sun.
Love those SLICKS
User avatar
olliesshop
Posts: 737
Joined: May 16, 2010, 8:38 am
Location: Grosse Pointe, Michigan (Detroit Metro)
Contact:
United States of America

Re: '61 Uni restoration

Post by olliesshop »

Thanks again for your insight. I talked to the shop, though, and they're recommending replacing the box to make it as original and strong as possible ... and originality is also important to me. The box will be rebuilt with 14 gauge steel (which they already got in), which will hopefully minimize both torsional and bending stresses compared to a mount.

Thanks again :D
Tim - 1961 F250 Uni
"Big Red" pictures ... http://olliesshop.smugmug.com/Trucks
Current build thread ... viewtopic.php?f=32&t=29505
User avatar
olliesshop
Posts: 737
Joined: May 16, 2010, 8:38 am
Location: Grosse Pointe, Michigan (Detroit Metro)
Contact:
United States of America

Re: '61 Uni restoration

Post by olliesshop »

I just got back from the shop and the body is mostly sandblasted. There are a lot of rust holes in the bed, mount supports and on the floor of the cab area. Ideally they all should be fixed, but I need to decide if the non-structural ones should be fixed or not, especially if they will not be seen. Also, the current plan on the chassis is to sandblast it then brush on a 2-part PPG product (kind-of like POR-15, but meant to be put on over clean metal) called Durethane DTM Eurethane Mastic. No decisions have been made on the rust holes or the chassis yet, so any words of wisdom would be welcomed.

Thanks !!!

Image

Image

Image

Image

Image
Tim - 1961 F250 Uni
"Big Red" pictures ... http://olliesshop.smugmug.com/Trucks
Current build thread ... viewtopic.php?f=32&t=29505
thenephilm
Posts: 542
Joined: June 25, 2009, 9:06 pm
Location: Cincinnati
United States of America

Re: '61 Uni restoration

Post by thenephilm »

Well, I would personally get all of the rust taken care of now because it will only get worse. Hate to see you spend all of this money then have rust coming through in areas within a couple of years.
Hi I'm Justin.
User avatar
simonscr
Posts: 228
Joined: April 18, 2010, 11:41 am
Location: Oregon
United States of America

Re: '61 Uni restoration

Post by simonscr »

You are in this far, would be best to just fix the holes now, and never worry about them again. :2cents:
Simon

65 f 100

56 willys m38a1 SOLD ( Have had since high school )
User avatar
olliesshop
Posts: 737
Joined: May 16, 2010, 8:38 am
Location: Grosse Pointe, Michigan (Detroit Metro)
Contact:
United States of America

Re: '61 Uni restoration

Post by olliesshop »

thenephilm wrote:Well, I would personally get all of the rust taken care of now because it will only get worse. Hate to see you spend all of this money then have rust coming through in areas within a couple of years.

simonscr wrote:You are in this far, would be best to just fix the holes now, and never worry about them again. :2cents:

Yeah ... I'm leaning that way too now. It's definitely the right thing to do. Hopefully they'll come up with a cost-effective way to fix them. praying.gif

Thanks and All the Best !!!
Tim - 1961 F250 Uni
"Big Red" pictures ... http://olliesshop.smugmug.com/Trucks
Current build thread ... viewtopic.php?f=32&t=29505
User avatar
olliesshop
Posts: 737
Joined: May 16, 2010, 8:38 am
Location: Grosse Pointe, Michigan (Detroit Metro)
Contact:
United States of America

Re: '61 Uni restoration

Post by olliesshop »

I was at the shop yesterday and they have a less expensive way to fill small rust holes that are non-structural. It's called "RUSTBUSTERS" and it's kind of like a MIG, but it sprays Zinc vs. making a bead. There are a number of small/pin holes that this should work for (bed floor, doors, fenders, hood, etc.). Although, there is still a bunch of metal work to do first though (Torque box, cross bar under back of cab, outside front of bedside). It's coming along ... :)
Tim - 1961 F250 Uni
"Big Red" pictures ... http://olliesshop.smugmug.com/Trucks
Current build thread ... viewtopic.php?f=32&t=29505
User avatar
simonscr
Posts: 228
Joined: April 18, 2010, 11:41 am
Location: Oregon
United States of America

Re: '61 Uni restoration

Post by simonscr »

I googled Rustbusters. A neat idea. Can the average joe do this in his home garage, or do you need special equipment?
Simon

65 f 100

56 willys m38a1 SOLD ( Have had since high school )
User avatar
olliesshop
Posts: 737
Joined: May 16, 2010, 8:38 am
Location: Grosse Pointe, Michigan (Detroit Metro)
Contact:
United States of America

Re: '61 Uni restoration

Post by olliesshop »

simonscr wrote:I googled Rustbusters. A neat idea. Can the average joe do this in his home garage, or do you need special equipment?

From what he said, it's a franchise with special equipment. I haven't seen it yet, though, so I'm not sure how extensive the equipment is. When we get to that point I'll try to get some pictures of the equipment and the results ... like how thick the Zinc is and how big of a hole to they normally fill with it. This is the website I found, which is probably the same on you did ... http://www.rustbusters.com. It looks like they can fill big holes, as long as they're non-structural. Hopefully it will work well.

All the best !!!
Tim - 1961 F250 Uni
"Big Red" pictures ... http://olliesshop.smugmug.com/Trucks
Current build thread ... viewtopic.php?f=32&t=29505
User avatar
Gary Seymour
Posts: 1192
Joined: September 15, 2006, 5:17 am
Location: Brown County, Indiana
United States of America

Re: '61 Uni restoration

Post by Gary Seymour »

Now that is a cool process for pin holes. Don't need to replace a big sheet of steel that is still structurally sound.

I think you have found a good shop to work with. That unibody appears to be smiling in those pics.
User avatar
olliesshop
Posts: 737
Joined: May 16, 2010, 8:38 am
Location: Grosse Pointe, Michigan (Detroit Metro)
Contact:
United States of America

Re: '61 Uni restoration

Post by olliesshop »

Thanks, they seem to be really good. They've slowed down a little, though, which is fine. Since they're also restoring a '55 Ford Pickup, which is fun to watch too.

They should have the chassis sandblasted by now, but I haven't been able to get over there this week. Then it shouldn't take much time to paint the frame black, with that PPG Durethane I mentioned before and the axles cast iron color. Hopefully it will look nice for a lot less money than doing a full restoration of the chassis. They also got the steel in for the torque box.

That's cool about the smiling. I hadn't noticed that before.

:)
Tim - 1961 F250 Uni
"Big Red" pictures ... http://olliesshop.smugmug.com/Trucks
Current build thread ... viewtopic.php?f=32&t=29505
User avatar
olliesshop
Posts: 737
Joined: May 16, 2010, 8:38 am
Location: Grosse Pointe, Michigan (Detroit Metro)
Contact:
United States of America

Re: '61 Uni restoration

Post by olliesshop »

There has been a lot of progress since the last update.

The Torque box has been completed. Note the copper "paint" that they put on before and after welding to seal the welds to prevent rust.
Image

Other rust holes were filled on the cross bars. On the rear cab cross bar and the wood mount sections where it retained water and rusted.
Image
Image

And the Chassis was fully sandblasted and the frame painted black. The suspensions will be painted cast iron or black depending on the part.
Image
Image
Image

Next will be finishing all the welding on the body and fully painting the chassis. Still a ton of work to go.

All the best :D
Tim - 1961 F250 Uni
"Big Red" pictures ... http://olliesshop.smugmug.com/Trucks
Current build thread ... viewtopic.php?f=32&t=29505
User avatar
simonscr
Posts: 228
Joined: April 18, 2010, 11:41 am
Location: Oregon
United States of America

Re: '61 Uni restoration

Post by simonscr »

How is the project going?
Simon

65 f 100

56 willys m38a1 SOLD ( Have had since high school )
User avatar
olliesshop
Posts: 737
Joined: May 16, 2010, 8:38 am
Location: Grosse Pointe, Michigan (Detroit Metro)
Contact:
United States of America

Re: '61 Uni restoration

Post by olliesshop »

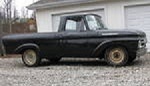
Thanks for asking ... It's actually moving along well.

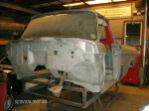
The Cab/Bed rust repair is almost done, the last thing to do is to replace the bed floor with a decent replacement one we found. This requires cutting the floor out of both beds and welding in the "new" floor into the Cab/Bed. This will get rid of many rust holes ranging in size from a pin-hole to about 2" dia. and also get rid of the extensive dents. This is a change from my original plan to just fix the holes and paint it.
Image
Image

The Chassis is almost done. We left it assembled and have painted the frame black and will paint the suspensions cast iron color and other colors.
Image

Also, the Hood, Doors and Fenders are being sandblasted, in preparation for rust repair, and there are a number of black parts being sandblasted and powercoated.

From a timeline perspective, I'm guessing it will be 2-4 more months, since I'm not rushing them. Then I'll bring it home, with the Body and Paint done, and start assembling. I hope to have it done this year, but it depends on how much time I can allocate to it.

All the best !!!
Tim - 1961 F250 Uni
"Big Red" pictures ... http://olliesshop.smugmug.com/Trucks
Current build thread ... viewtopic.php?f=32&t=29505
User avatar
olliesshop
Posts: 737
Joined: May 16, 2010, 8:38 am
Location: Grosse Pointe, Michigan (Detroit Metro)
Contact:
United States of America

Re: '61 Uni restoration

Post by olliesshop »

I picked up some powdercoated parts today and they look great.

Image
Image

The bed floor has been cut out and is ready to be put in, once some rust repair is done on the crossbars.

Image

This is the new used bed floor.

Image

Things are moving along. Woohoo !!!
Tim - 1961 F250 Uni
"Big Red" pictures ... http://olliesshop.smugmug.com/Trucks
Current build thread ... viewtopic.php?f=32&t=29505
Post Reply