'66 F100 Custom Cab Short/Styleside Factory Correct Resto

A place just for our project & build threads.

Moderators: Kid, Casey 65

Post Reply
jamesdfo
Posts: 1637
Joined: February 15, 2011, 10:32 am
Location: Edmonton, Alberta
Canada

Re: '66 F100 Custom Cab Short/Styleside Factory Correct Rest

Post by jamesdfo »

The seller you are looking for is STILWELLSOBSOLETE, I remember seeing that same box side listed before, which is actually when I saved them to my savedsellers list:)
Even if it's not currently listed you could still contact them to see if it is still in inventory.....

http://www.ebay.com/sch/stilwellsobsole ... ksid=p3686

James

skidoorulz wrote:Keep looking. The one I saw was definatly a right side short box NOS body part. It was in ruddy brown or red oxide primer and had the part number in yellow stamped on it. I think 800 was the buy it now price. It comes and goes I have seen it probably 4 times in the last year. The seller has a ton of all kinds of NOS parts for everything.
User avatar
theastronaut
Posts: 439
Joined: August 7, 2013, 10:43 am
Location: Upstate SC

Re: '66 F100 Custom Cab Short/Styleside Factory Correct Rest

Post by theastronaut »

Max wrote:I cut out and replaced the exact same section of bed floor in mine towards the front of the bed. Up and down and up and down with the welds over those ribs.


Welding wasn't bad... grinding them is going to be the fun part!


dennyboy wrote:That is some very nice work there buddy!


Thanks!


slickstysix wrote:I marvel at your bodywork skills... Nice job!


Thank you!


jamesdfo wrote:The seller you are looking for is STILWELLSOBSOLETE, I remember seeing that same box side listed before, which is actually when I saved them to my savedsellers list:)
Even if it's not currently listed you could still contact them to see if it is still in inventory.....

http://www.ebay.com/sch/stilwellsobsole ... ksid=p3686

James


Thanks James, I just have sent a message to the seller to see if they still have it! Fingers crossed...
User avatar
skidoorulz
Posts: 359
Joined: April 11, 2013, 9:02 pm
Location: Billings MT
United States of America

Re: '66 F100 Custom Cab Short/Styleside Factory Correct Rest

Post by skidoorulz »

What? No progress today :D
User avatar
theastronaut
Posts: 439
Joined: August 7, 2013, 10:43 am
Location: Upstate SC

Re: '66 F100 Custom Cab Short/Styleside Factory Correct Rest

Post by theastronaut »

skidoorulz wrote:What? No progress today :D


Caught us slacking! :lol: We worked on it yesterday, just didn't post. Uploading pics to photobucket now
User avatar
theastronaut
Posts: 439
Joined: August 7, 2013, 10:43 am
Location: Upstate SC

Re: '66 F100 Custom Cab Short/Styleside Factory Correct Rest

Post by theastronaut »

Monday's progress. We finished welding the bed floor and header panel flange back in, and started grinding the welds.


Image

Image


Header bottom flange ready for welding.

Image


Before welding the header flange on, we slipped a sheet of .060" aluminum between the bed floor and header panel to keep an even gap all the way across. This kept the weld from blowing through on the back side of the header flange, and will allow enough room for seam sealer later on.

Image


Header flange after welding and grinding.

Image


Tailgate bodyworked and shot with Slick Sand. I masked off the center section to preserve the spot welds, and also the details of the letters. Slick Sand is too thick for those areas. We'll mask off the letters themselves and shoot normal high build on that area.

Image
User avatar
theastronaut
Posts: 439
Joined: August 7, 2013, 10:43 am
Location: Upstate SC

Re: '66 F100 Custom Cab Short/Styleside Factory Correct Rest

Post by theastronaut »

I worked on the right bedside today while Rodney blocked out the tailgate and fixed any high/low areas that showed up.

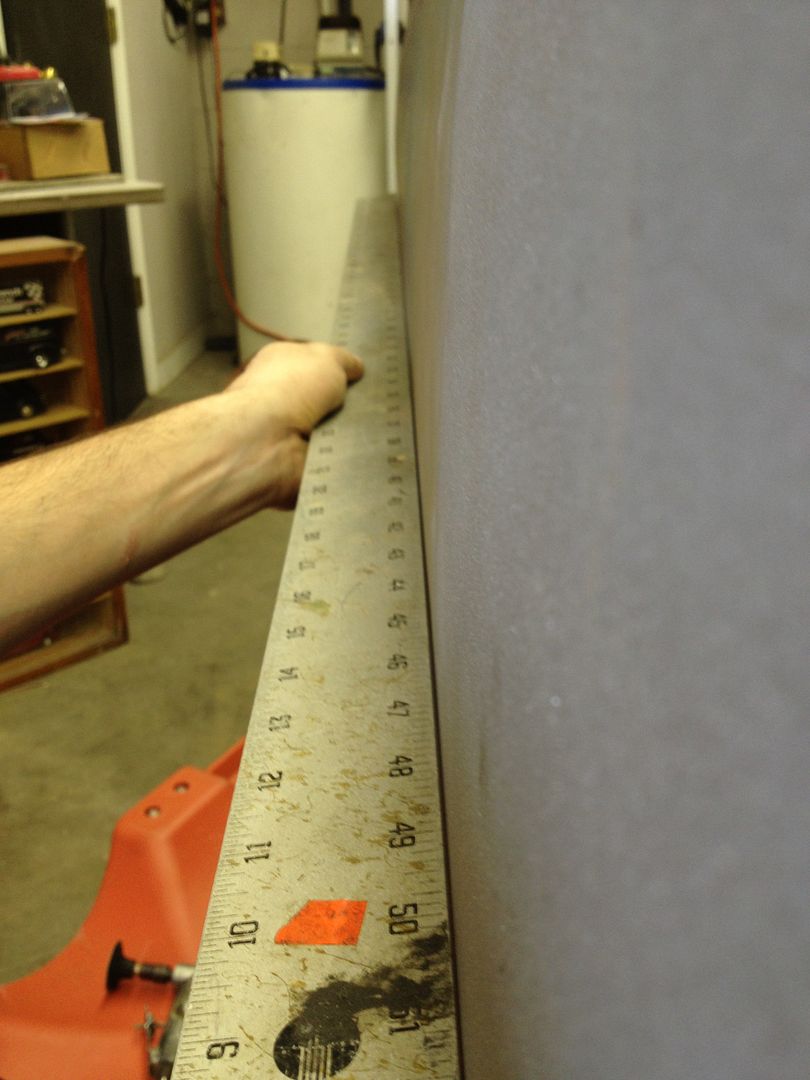
This is the bedside after working with it for awhile using a porta-power, various hammers/dollies, and a shrinking disc. It's still popping in and out, but it stays out and has the overall shape back. With some more time we'll have it ready to shoot epoxy and skim coat it. Using a straight edge during the metal shaping helps find the major high/low areas. One the overall shape is there, I'll switch to using a long sanding block to find the high/low spots.


Image


The seam at the bed corner and bed side was really badly repaired... they didn't even fix the inner spot welds that had broken loose! The only thing holding the bedside to the corner was the brazing in the seam. Once that was cut through the two panels came apart easily.

Image

Image

Image


This pic doesn't show it well but the two panels weren't flush with each other.

Image


Flange removed, this shows the busted spot welds.

Image


These two show how much the bedside could move.

Image

Image


Straightened and blasted the corner flange. This is test fitting it to check the shape against the bed side.

Image


After reshaping the flange with a shrinker/stretcher.

Image
User avatar
skidoorulz
Posts: 359
Joined: April 11, 2013, 9:02 pm
Location: Billings MT
United States of America

Re: '66 F100 Custom Cab Short/Styleside Factory Correct Rest

Post by skidoorulz »

Just out of curiosity what is your shop rate for this kind of work? Body work and paint?
User avatar
theastronaut
Posts: 439
Joined: August 7, 2013, 10:43 am
Location: Upstate SC

Re: '66 F100 Custom Cab Short/Styleside Factory Correct Rest

Post by theastronaut »

skidoorulz wrote:Just out of curiosity what is your shop rate for this kind of work? Body work and paint?


We're currently at $50/hour, and we really need to go up to match the other local shop's prices. Everyone else around here is at $60-65.
User avatar
theastronaut
Posts: 439
Joined: August 7, 2013, 10:43 am
Location: Upstate SC

Re: '66 F100 Custom Cab Short/Styleside Factory Correct Rest

Post by theastronaut »

Just received an early test sheet of gauge overlay decals from Jason at Greenback Decal. They'll be available soon if you're interested in buying a set. I've used them on a few C10 clusters in the past and they are great for making the whole cluster look brand new! I'll pull the cluster out of storage and go through it this week or next.

Image
User avatar
theastronaut
Posts: 439
Joined: August 7, 2013, 10:43 am
Location: Upstate SC

Re: '66 F100 Custom Cab Short/Styleside Factory Correct Rest

Post by theastronaut »

I tore down the cluster after lunch and started restoring it. Need to find a speedometer or a speedo needle since the original needle is broken.


Image

Image

Image

Image

Image

Image


Used florescent red paint on the needles.

Image

Image

Image


Cut up translucent red sheets from Hobby Lobby to use as warning light lenses. I stacked four pieces together to make them dark enough. The outside piece that goes against the background plate was sanded with 2500 grit to knock the shine off and look more like the original dull lens.

Image

Image

Image

Image


Holding it up to the shop lights.

Image


Test fitting the new bezel, lens, and background piece.

Image


Prepped the gauge faces by lightly sanding to remove any roughness or oxidized paint, then cleaned them and used a tack rag to remove dust before applying the overlay.

Image


Used a heat gun to make the vinyl stretch around the raised lettering on the gauge face, and a microfiber towel to help push the decal around the stampings.

Image

Image
User avatar
theastronaut
Posts: 439
Joined: August 7, 2013, 10:43 am
Location: Upstate SC

Re: '66 F100 Custom Cab Short/Styleside Factory Correct Rest

Post by theastronaut »

Another spot on the bedside flange that needed repair. Lots of splits/cracks.

Image


After welding/grinding.

Image

Image


Checking the fit of the bed corner flange.

Image
User avatar
theastronaut
Posts: 439
Joined: August 7, 2013, 10:43 am
Location: Upstate SC

Re: '66 F100 Custom Cab Short/Styleside Factory Correct Rest

Post by theastronaut »

I finished the cluster today. Here's how the speedo decal went. Lining up the lines with the raised ridges was the first step after cleaning the face.

Image


Working from the center out.
Image


Keeping the edges pulled tight to keep wrinkles out.

Image


Right side finished. Amazing how well the printed lines line up with the stamped lines, Jason got this right!

Image

Image


Speedo finished. Odometer cleaned, reset to zero and needle repainted.

Image


Housing bead blasted inside and out. Outside was shot with satin clear to preserve the zinc plating, and the inside was repainted with white.

Image

Image

Image


Masked out to repaint the two black areas.

Image

Image


Starting reassembly .

Image


Making new bumpers for the lens edges.

Image


Used 3M strip caulk to seal the edges of the light tubes.

Image

Image


Background plate and lens installed.

Image


And finished.

Image

Image

Image

Image

Image

Image
User avatar
kstones63
Posts: 1504
Joined: April 7, 2007, 10:55 pm
Location: Phoenix, AZ
United States of America

Re: '66 F100 Custom Cab Short/Styleside Factory Correct Rest

Post by kstones63 »

Sweet. That really looks good.

Kevin
kstones63
_______________________________________
63 F100
29 Ford Sedan Delivery
99 F250 PSD, 4x4, CC
95 F350 Flatbed Dually Diesel
User avatar
Greg D
Posts: 10113
Joined: September 13, 2006, 4:39 pm
Location: Podunk Iowa
United States of America

Re: '66 F100 Custom Cab Short/Styleside Factory Correct Rest

Post by Greg D »

OK guys,
got me on the wheels.
Oh well - what do you expect from a straight axle guy, lol?

I see you started repair on the rear bed section.
I have an 8' bed here I am cutting up.
Another member needs from the center wheel arch forward - the back half of the right side is straight if you'd have wanted to cut & paste instead.
Looks like I should have checked back in on your thread sooner.
I am cutting my frame and putting on a short bed - I only need the floor.
That gauge cluster probably didn't look that good new!
I seriously admire your solutions to some of the problems encountered - I've made a few of my own panels too.
I rarely restore but do hotrod/custom stuff though.
Gotta love the 3M strip caulk!
1964 F 100 - I am going to do "something" with it.......

viewtopic.php?f=32&t=15942

1987 Mustang LX Convertible, 2.3 Auto - cruiser.
1994 F 150 XLT 2WD


~ Yes - I adopted another cat..............

Cam L Milan,
You'll be missed my friend.
User avatar
theastronaut
Posts: 439
Joined: August 7, 2013, 10:43 am
Location: Upstate SC

Re: '66 F100 Custom Cab Short/Styleside Factory Correct Rest

Post by theastronaut »

kstones63 wrote:Sweet. That really looks good.

Kevin


Thanks Kevin!


Greg D wrote:OK guys,
got me on the wheels.
Oh well - what do you expect from a straight axle guy, lol?

I see you started repair on the rear bed section.
I have an 8' bed here I am cutting up.
Another member needs from the center wheel arch forward - the back half of the right side is straight if you'd have wanted to cut & paste instead.
Looks like I should have checked back in on your thread sooner.
I am cutting my frame and putting on a short bed - I only need the floor.
That gauge cluster probably didn't look that good new!
I seriously admire your solutions to some of the problems encountered - I've made a few of my own panels too.
I rarely restore but do hotrod/custom stuff though.
Gotta love the 3M strip caulk!


Appreciate that! We have the right bedside back 90% straight already, just need to get some of the smaller high/low spots out, didn't need to replace it after all.
User avatar
theastronaut
Posts: 439
Joined: August 7, 2013, 10:43 am
Location: Upstate SC

Re: '66 F100 Custom Cab Short/Styleside Factory Correct Rest

Post by theastronaut »

Friday we mounted the bed on a rotisserie to work on it easier.

Image


The inner fenderwell was beat up pretty badly and the concave area was nearly flat.

Image

Image

Image

Image

Image


After lots of beating with a sledge hammer, dollies, and wood blocks.

Image


Flatter than it was, still not all the way there.

Image

Image


Bottom half smoothed up.

Image


Flat bottom 1/2.

Image


Made a new bedside flange since the old was was so beat up.

Image

Image

Image


Reshaping the bed corner flange to fit the bedside flange using a shrinker/stretcher.

Image

Image

Image
User avatar
theastronaut
Posts: 439
Joined: August 7, 2013, 10:43 am
Location: Upstate SC

Re: '66 F100 Custom Cab Short/Styleside Factory Correct Rest

Post by theastronaut »

Tailgate ends were seam sealed with SEM epoxy sealer.

Image


Letters were masked before spraying Slick Sand to preserve the stamping crispness.

Image


Inside corner was blasted and shot with PPG DP epoxy.

Image

Image


Corner welded back on.

Image


Floor welds ground smooth.

Image


Checking the fit of the tailgate.

Image

Image
User avatar
FORDMANLCRACKEL
Posts: 1237
Joined: July 11, 2006, 9:48 pm
Location: williamston, n.c.
Contact:
United States of America

Re: '66 F100 Custom Cab Short/Styleside Factory Correct Rest

Post by FORDMANLCRACKEL »

Really great work man, and I have a question for ya. When ya turn off the lights, lock the door and head to the house. Do ya keep the project on your mind all the time till its finished? (like I do) Or can ya leave it in the shop till the next day?

Lonnie
The most rewarding job i ever had was being a dad.
1988 Ranger Build http://s275.photobucket.com/albums/jj31 ... %20RANGER/
User avatar
theastronaut
Posts: 439
Joined: August 7, 2013, 10:43 am
Location: Upstate SC

Re: '66 F100 Custom Cab Short/Styleside Factory Correct Rest

Post by theastronaut »

Thanks Lonnie, I've got my own projects on my mind after work! I'm building a resto-mod/pro-touring '66 C10 for myself, and I have a '64 VW Bug that's my daily driver. I'm currently building a set of widened smoothies for the VW so those have been getting my after-work attention lately.

Image


LS/T56 six speed for the C10.
Image
Post Reply