Final Assembly (part 5)
With the interior harness basically installed (I need to clean up the routing and secure it) I could install the brake pedal assembly and steering column, both went in without a hitch so the mock up worked in that regard, with this done I could reconnect the brake light switch, and all the other column wiring connections, some of the connections are tight but that is to be expected since the area behind the slicks dash is less than half the space the RM had so you have to cram more wire in less space, but it's fine there is still more than enough room for all the wiring and it's a lot less wiring than the CV.


The steering shaft hooked right back up as did the shifter linkage, like I mentioned before the steering shaft that connects to the column (intermediate shaft) is telescopic so you have a few inches of wiggle room, this aspect was a lot simpler than the uni was with the aftermarket steering column.


Brake pedal might be a little high and I might have to modify it like I did in the uni but we'll have to get the seat and gas pedal installed to see where it lands, this kinda' surprised me since it was ok during the mock up so it may just be that the rest isn't installed so it looks higher than it should.
The gas pedal will have to have the arm that the throttle cable connects to heated and bent slightly to the passenger side and in towards the firewall a slight amount, this is because of the differences between the two firewalls, on the RM it had a depression that the pedal sat in while the area where the throttle cable entered the firewall was at a different level, the slicks firewall is basically flat so the angle has to be modified so you can get WOT (wide open throttle) and that it has enough slack so the throttle will go totally closed when you release the pedal. ( I knew this would have to be done from the mock up but wanted to wait till the throttle cable was installed for the last time so it was correct.)
The area where I installed the windshield washer tank may look a little unorthodox because its mounted to the back side (engine side) of the radiator fans, but since it is small and is behind the fans it will have no effect on cooling but it is in a location that is easily accessible to add fluid for my wife without standing on something.


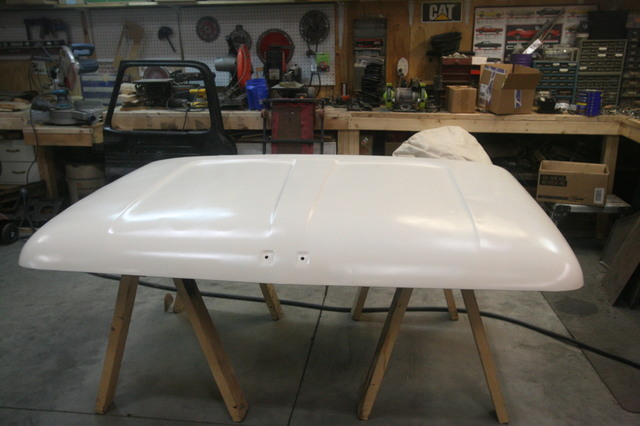
We installed the hood which we didn't do during mock up, and it took a couple tries to get it aligned correctly in fact it fits really nice and the gap at the cowl and tops of fenders is acceptable (better than we expected) even for our type of build...lol


-------------
We are on the fence since we bought the '09 CV P71 for the step side build as to the windshield, originally we were going to remove the windshield from the step side cab and put it in the '65 (it will have to come out anyway because the gasket is bad), but since we are going to build that truck we will be short a windshield that we'll have to come up with, and the '65 is a much nicer truck it might make sense to just get a new windshield for it... we are still undecided at this point.
-----------
Exterior lighting will be coming up soon, we will be doing the same type of exterior lighting as we did in the '62 uni that being halogen headlights and LED bulbs everywhere else, we have a good supply of 1157, 1156 LED bulbs along with the ballast resistors since when we did the uni we bought them in bulk from Amazon. I think we will use the same type of headlights we put in the uni with the LED halos, they have a really cool look and are bright enough for daylight running lights, I think I have a solid state flasher or two that we will have to replace the old flashers with so the LED turn signals will flash slower.
--------
The electrical aspect of this build has surprised me, I never expected that thinning the interior harness would be so easy, of course we will be adding our own wiring for the audio, power windows, and anything else we decide to add, the fuse panel from the Roadmaster was mounted to the driver's side of the dash, actually in the side of the dash, and used a piece molded into the dash to mount, at the moment it is just hanging in the air off the harness and it wound up on the passenger side of the steering column. I need to look at it closely to see if I can make some sort of bracket to mount it, it's not so heavy that it would cause a problem but really needs to be secured in some fashion under the dash.
Two of the circuits I removed from the harness were power wires for the HVAC and the radio, I kept the wiring for those power circuits from the fuse box and just rolled those wires up at the moment, I'll reuse them to power the blower motor and the audio so the fuses in the panel will match the circuit.
For the time being like the uni we will reuse the slicks wiper motor but will mate it to the RM switch in the column we will only have two speeds but I promise that when we do the step side truck I'll pull the wiper assembly out of it and figure out if I can mount the donor wiper motor to the slicks wiper transmission, if I'm successful then one by one I'll retro-fit the other trucks, I've kept the wiper assemblies out of each of the donor vehicles and left the wiring intact so it should be kinda' easy if I can make the mechanical aspect work.
------
So this coming weekend is making it run again, hopefully that goes off without a hitch and we keep all that smoke in the wiring harness...lol
Jon