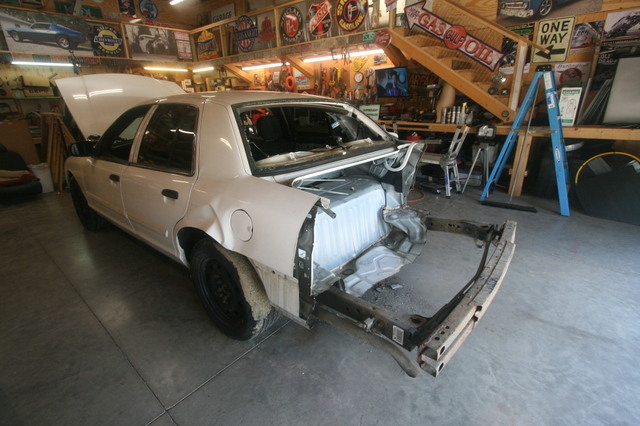
I did have a little shop time this weekend to bring the '09 CV in and start disassembling it, didn't make a lot of progress but did got a good start on removing the rear of the body.
Luckily the EVAP canister wasn't damaged (yeah I'll reuse it like on the uni).
After getting the trunk area cut off I could see that the right rear frame rail is pushed over and up a couple inches, it look worse in the picture than it is because the left front tire is flat (only holds air for 30 min or so) which raises the left rear, I'll be able to tell more after the body is off and since I'll be cutting off almost 2' of the rear frame rail it shouldn't be a big issue to pull it back close to original position before cutting it to length.
I'll be back after I get a spot back in the shop, for now the CV is back outside covered up again waiting...lol
Still no more progress on the '62 flare side build....but.
First I wanted to post the most recent video from " Rudy's Resurrection", this is really interesting and worth a view if you have a flare side that your considering a CV frame swap....take a look.
With that in mind.....
Fred if your still checking out this thread I wanted to say thank you, I'm sure I'm going to have to follow your lead and do the same bed mod on our build (I don't want the tires sticking out of the fenders either...lol), I had my wife watch the video above and she says that looks like a lot of work and that we should just look for a "style side" bed, but I really want the flareside and will be trying to shove the project in that direction, what you did in the video is very doable depending on how the tail gate is widened, I'm really looking forward to seeing your solution. After watching the video I went over to look at our tailgate and I think I see the way to do it and it look good, but I'll wait to see what and how you modify the tailgate..... Thanks again for everything you are doing and sharing on YouTube.
Jon
Glad to see you have started on your CV tear down. The mods for the flareside bed should be a piece of cake for y'all based on what I have seen of your other builds. If I can tackle it, anyone can. I say go for it. Unfortunately my welder is in the shop so I am at a bit of a standstill. I'll post more vids when I am up and running again. I don't think the gate should be too bad. Kinda excited to dive into it soon.
Cheers
Fred
Fjcaldwell wrote:Jon
Glad to see you have started on your CV tear down. The mods for the flareside bed should be a piece of cake for y'all based on what I have seen of your other builds. If I can tackle it, anyone can. I say go for it. Unfortunately my welder is in the shop so I am at a bit of a standstill. I'll post more vids when I am up and running again. I don't think the gate should be too bad. Kinda excited to dive into it soon.
Cheers
Fred
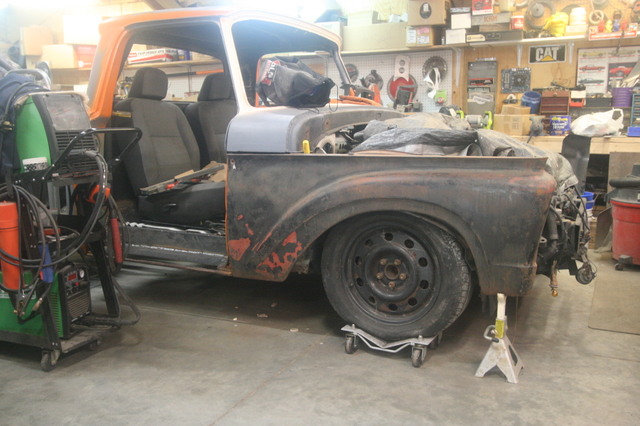
Yeah, it's been a on and off again kinda' thing getting the CV tore apart but like I said before the wife's business is more important than building the third truck, we did take the time last week to tint the windows in the '65 and put a little high build primer on the '62 flare side cab, I sanded that down and painted the dash along with the window openings, while I'm waiting on more shop time we are trying to decide on paint colors for the build which I think we have decided on another two tone rattle can paint job like the '65 using orange and a cream color similar to the light color on the '65.
The paint on the '65 is weathering nicely and very few people who see it in person believe it's a rattle can paint job... lol
I had a problem with my plasma cutter and had to order a new head for it which took two weeks to get but it's back working and ready to cut body panels..
I'm sure you noticed from the pictures I posted that our '09 donor was hit in the right rear quarter pushing the frame rail up and towards the left, after cutting the rear trunk area off the car then watching what you did to your rear frame rails I'm a lot less concern about straightening them, I will take a few measurements but plan on cutting and notching the rails like you did and moving them to the proper location. All the damage is behind the rear suspension so moving them back shouldn't be much of a issue, next time I get the CV in the shop the body will come off, temporally I'll leave the trunk floor to hold the fuel tank and keep the vehicle somewhat run-able but plan to mount the fuel tank like you did using angle iron. I've said this before but that is the only thing I dislike about using the CV as a donor, the way the fuel tank mounts is fine for it's original intention but doing the frame swap it hangs out and can be seen from the rear of the truck, it's a minor thing and really the only down-side to how the truck looks when completed.
Thanks again for all your vids...
I'll post pictures of my progress when I get back rolling again.
It's my first day back at work after vacation, just wanted to let everyone know that we did get the CV tore apart and the '62 cab and CV floor/firewall tacked together. over the last two weeks between all the other projects on our list.
As soon as I get the pictures uploaded to the hosting site I'll make a few posts to catch up with the project....it seems like forever since I've had the time to work on the truck but it's in a position now where I can devote a lot more time to it.
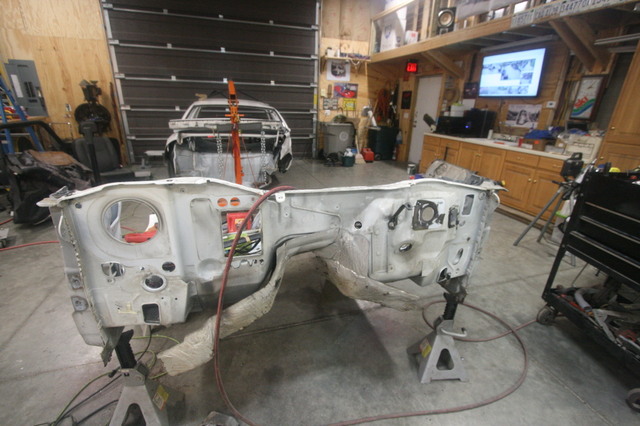
So the '09 CV is tore apart, cut up and hauled off....lol
Here's the donor firewall and floor cut down, this process is very time consuming, placing the cab on the donor part and marking, trimming, then start the process over again in the next or same area until you have enough clearance to start mating the two pieces together.
Here's the cab and floor finally tacked together, I bolted the CV floor back to it's body mounts and centered up the cab before tacking the two together, seats fit well and we'll be reusing the CV seats.
I cut a little more of the CV floor back than I really needed to, but like Fred did on his build I'll have to build a structure to support the floor and cab step area mating them both together.
------
My next step is to pull the assembly off the chassis and make filler panels for all the gaps..... more to come later.
So I had a few hours last weekend to work on the flare side build, I still need to pull the cab back off the frame to make filler panels for the rear of the floor and the firewall, but while it is still on the CV frame I took the time to look at the cab step area. I had originally planned to buy new cab steps and cut them to fit the new openings but after looking at what I had to do it made more sense to just cut out the old step leaving the tiny rocker panel and just use steel plate to box in the area recreating the step.
It just didn't make a lot of sense to spend prolly $100 for two steps to just cut the up, so following Fred's lead from his build I built a 1x1 square tube frame, and then covered it with 14g plate steel (yeah thick stuff). I plan to just use bed liner on that area to make it skid resistant if it gets wet.
I just about have the passenger side finished and ran out of argon, my wife is busy again and will be using the shop for the next few weeks, best case is I'll get a few hours here and there to finish the passenger side then I can spin around the truck and do the drivers side before pulling the cab off to make the filler panels for the front and back. At that time I'll also replace the cab corners (I have new ones) then I can get the cab back on the frame and move on to other aspects of the build, probably get the fuel tank remounted after that so I'm closer to making it run again.
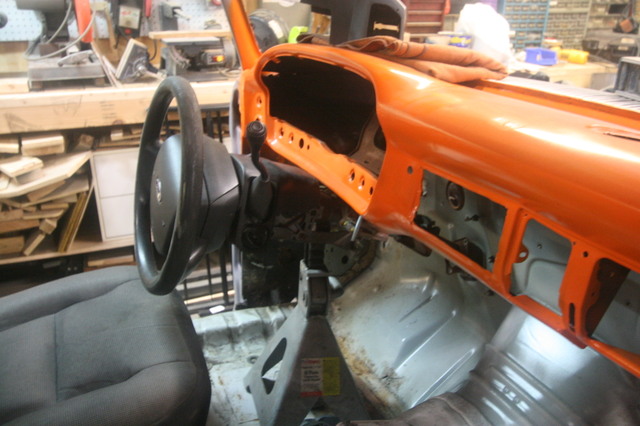
I also have done a little mock up on the steering column to see if it is possible to reuse the CV column and have it not look like a piece of crap, I have a idea so we will see if it will work, if not we'll order a new column like we did in the uni, I'm really trying to spend more time looking at thing in this build and reuse or repurposed as much out of the CV as I can, since I'm going to have to make a filler panel for the bottom of the dash to hide the HVAC box I think I can incorporate that to hide the ugliness of the factory CV steering column which will greatly simplify the wiring going back together.
Sorry for no pictures, I took some but the camera is still sitting on a work bench in the shop, I'll get them added and put in the next post.
I just about have the passenger side step and CV floor mated together....
Did a little mock up on the front fenders to figure out if my measurement were close.
Moved the cooling package (radiator, condenser, and coolers-fan) back closer to the engine so I could get a idea of where I had to cut the front frame horns at so the core support will fit.
(the string in the picture is to just give me a reference across the front so I could get a judgement on how far back to push the cooling package and have room for the core support)
-------
I still need to pull the cab back off the CV chassis and make the filler panels for the firewall and install the rear cab corners, since it's hit ans miss for now when I have the shop time and space to pull the cab back off I've been using the hours I have doing what I can get to with the cab on the chassis. While I'm glad we are building this truck using the CV floor and firewall is is considerably more time and labor intense than just replacing floor pans and cab steps like we did on the other two. Is it worth the effort? yeah I think it is going to turn out to be the right choice for this truck, I think about it everyday when I get in and out of the uni, about how much more comfortable it would be to drive (I'm 5'11') if had the lowered floor the flair side will have.
I'm still considering trying to use the CV steering column, the wife says it will look ugly and she may be right, I just need to look at it more to formulate a plan, like I said before if I can reuse the Cv column it will save us at the minimum $500 on the build, it would simplify the wiring, and would give us the ability to use the air bags in the steering column and seats (passenger bag is gone)....but the seats have side curtain bags made into them.
I'm going to have to cut into the bottom of the slicks dash like I did on the uni either way and it's a decision we don't need to make right now but I do like to think ahead so I have the CV column propped up so I can just look at it while I'm doing other work on the build.
Edit: One of the things I keep forgetting to mention is the rear cab mount..... So if you look at the pictures above (2nd one) you can see the reinforcement in the CV floor that runs from side to side close to the rear of the floor, when I cut the floor off the body I made sure to leave this area intact because it is the body mount area to the CV frame, it looks like I will not have to fabricate a square tube rear cab mount like I did on the other two trucks, this area of the CV floor is within 8 inches of where the original slick cab mounts are so I think it is sturdy enough to support the weight of the back of the cab, there are body mounts on each side of the floor in this area that I bolted back down along with the original CV front mounts at the bottom of the firewall. The structure I'm building for the cab steps, mating the floor, and filler connecting the CV floor and the back of the cab are all 14g steel which is plenty strong and really kinda hard to form unless hot from welding...lol
But I do think it will be fine without fabricating a mount to use the original slick rear cab mounting points.... we'll see lol
Anyway that's about all on the current progress....more to come!
So we've made a little more progress on the flare side build in the last two weeks, first I got the radiator support modified and the front frame rails cut off so the support will fit, still a lot to do in this area but we can tie the front fenders together at the support now and later can figure out the correct height of the support then make the mounts that connect it to the frame.
Next item was to pull the cab back off the CV frame and make the filler panels that mate the CV firewall to the slicks cowl, between Saturday and Sunday we got that accomplished along with grinding the welds, seam sealing all the area and painting the firewall black.....last thing was sitting the cab back on the CV frame, we didn't bolt it down yet but that will be the next thing to do then spin the truck around on the dollys and build the drivers side cab step and tie the CV floor to that like we did on the passenger side.
Once the cab is bolted back on its mounts, the step and cab floor finished I'll prolly do the rear cab corners and at that point the cab will be in a position where we can start assembling some of the items like the HVAC box can go back on the firewall, we can figure out the steering column and tackle some of the interior wiring harness. The interior harness will need some thinning to remove the CV door wiring for the power windows, locks and associated wiring that we will no longer need for this build.
Compared to the other two builds this one is moving at a snails pace, it's not a big deal, we will get there, my goal it by the end of the year to have it back moving under its own power hopefully we can get to that point, I keep thinking that my wife's business will slow down but the phone keeps ringing and she keeps knocking the work out one by one....lol
Made a little more progress over the weekend on the driver side floor, here's a few pictures.
Still have to replace the lower portion of the bottom hinge on the drivers side (which is next on the list) and fill in the area where the lower portion of the cab A pillar and CV floor meet around where the CV e-brake pedal was, then figure out if I want to leave the original air vents intact or cover them, I'll need a place for the HVAC to pull fresh air which will utilize the passenger side vent but the drivers side could remain functional, I have some rot in that drivers side interior panel below the vent hole that has to be repaired but I'm leaning towards reusing the drivers vent door depending on where the E-brake pedal winds up mounting and if it causes any clearance problems with the operation of the door opening, if its a issue I'll just make a cover plate for the hole and seal it up.
Here's a few pictures of the filler panels for the firewall, it's all seam sealed and painted now, it was easier than I thought it would be to fill this area in, we made cardboard patterns of the area then used the plasma cutter to cut them out of steel sheet, a little grinding and persuasion and they welded right in, it was difficult to get to some areas to grind the welds and some areas couldn't be reached at all, so seal sealer had to smooth the areas out...lol it's not like any of this will really be visible when the truck is finished.
Here's a few more random pictures...
I'm not sure if I mentioned before that the '09 CV had a roll bar in it when we bought the car, I saved all the pieces (mounts) and believe it or not it actually fits in the slicks cab sitting on top of the original cab rear mounting area, it is bent perfectly to follow the couture of the cab staying out of the window area so it can't be seen from looking in the rear window except for a very small amount in the upper corners of the rear window, it's like it was made for the truck and will be installed....lol
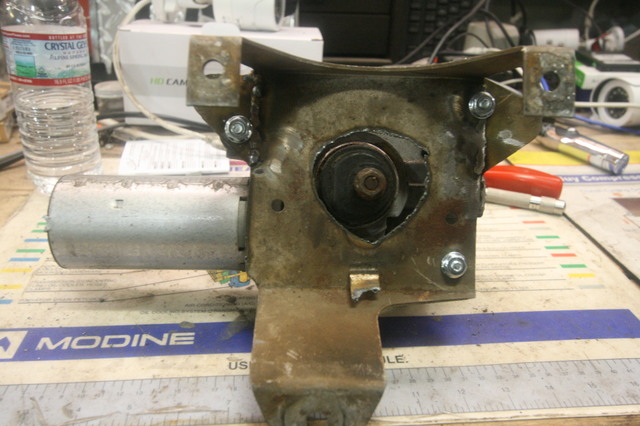
So...... one of the things I've talked about in both of the other builds was to incorporate the donor wiper motor to the slicks mount and transmission/pivoits.
Since my wife is busy working in the shop I decided to spend a little time and see if I could mate the two together.
I started by approximating where the motor should sit and it's orientation on the slicks mount, then opened up the hole the shaft has to pass through, the '09 CV motor had about a 2" dia hole that it needed to fit flush.
After opening that up with the plasma cutter I could locate one of the mounting holes, drilled that and installing a fastener to hold it in place, both of the other mounts were pretty well off the slicks mount, so I cut the wings or protrusions from the slicks mounting plate and relocated them in the area I needed, welded, ground, drilled a couple holes and wala!
Time to see if the arm from the transmission will fit...... a very small amount of file work and it slid right no.
I then took it over to the cab and mounted it via the top two bolts, the lower part of the mount landed in a area where the filler panel was installed so I had to drill a hole for that mounting bolt.
I think the orientation of the motor will be fine, I stuck the heater box on the firewall to check and it look ok at this point.
That actually was plenty easy to do, I'm sure I'll have to lengthen the wiring to reach the wiper motor when I get started on the wiring, that's not a big deal, it'll just be really nice to have intermittent wipers.
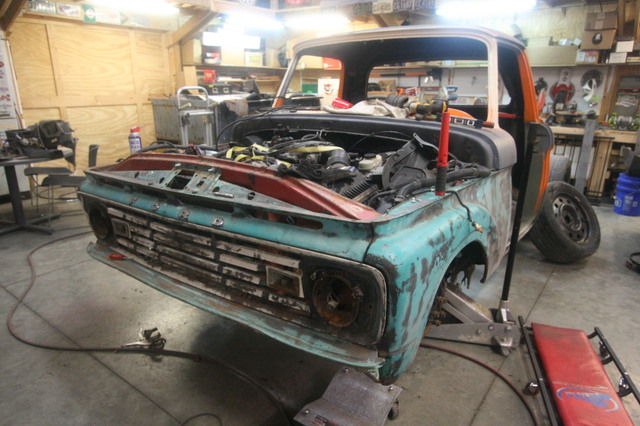
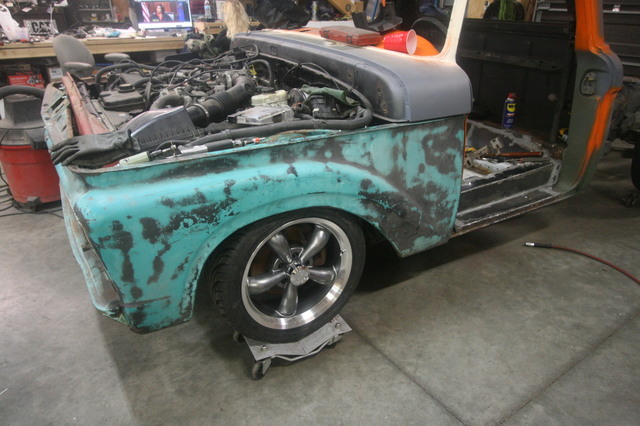
Firstly Finished getting the CV floor/firewall mated to the slicks cab, I already said this but it has been a lot of work mating these two together and yes it is going to be worth the effort but it makes putting floor pans in a slick cab a walk in the park...lol
Made the block off plate for the passenger side fresh air vent, and installed a 4" fitting for the HVAC to pull air from the cowl.
Also made a block off plate for the CV HVAC air intake, just need to take apart this unit now and install a fitting to connect a hose going over to the other connection.
Changed out the evaporator with a new unit and have that box ready to hang back on the firewall as soon as I'm done welding in that area.
Yesterday I replaced both cab corners....
--------
Some of you might remember that the donor CV had been wrecked when we bought it, after the body came off we could see the extent of the frame damage, initially we thought it was just the rear frame horns behind the rear suspension, but after looking at it closer it does have damage in the suspension area of the frame, in fact it has moved the rear end out of alignment enough that I don't feel comfortable trying to fix it myself. So..... it's going to take a trip to my cousins body shop for them to straighten the rear of the frame, it's a added expense but not really a big deal, maybe $500 to straighten it out so we have no worries down the road.
I have mixed emotions about sending it to the body shop, mostly having my fabra-cobbling inspected by guys that do body repair for a living, I'm sure they will look at my work and get a good laugh, we are not trying to win a beauty contest or a best hot rod award, just build something that is safe and reliable to drive, both of the other two trucks have proven that aspect with a endless parade of people asking to buy both of them. The wife had a guy last week walk up to her at the grocery store and was insistent that she give him a price she would sell her truck for, when she told him it wasn't what he thought it was and that it was a Buick Roadmaster he was even more insistent on a price.....she just told him it wasn't for sale..lol
Made some major progress this weekend getting the core/radiator support modified, frame mounts made for the support, and getting it mounted to the frame.
Getting past this hurdle allowed us to get the inner fenders from the CV cut and positioned to see if they will be usable...they are. This is really great news that the plastic CV inner fenders work, the basic shape or couture fit reasonably well to the inner part of the slicks fenders and wheel openings, I had to do a little cutting in the wheel opening at the firewall so it would sit flat against the front of the firewall (because of a pinch weld area on both sides) but all in all they will work nicely and in a way mimic the steel inner fenders the slick originally had. The drivers and passenger sides had to be cut to shorten it's length at the back of the radiator support on both sides, around a inch or so was all that had to be removed from both sides so it would lay flat...and not be in a bind.
On the passenger side inner fender at the radiator support is where the CV had its battery mount, it is a separate piece that only needed a couple tabs removed to fit back in its original location, a battery should fit back in this location and have a secure mounting just as it did in the CV, I may have to make a support for the under side of the battery box, it seems strong enough without it but we will see when I get to the point of mocking up the battery and its hold down.
So at that point I could mock up the fenders and get them basically in alignment with the core support and cab, make sure they will have enough movement to gaps will be close at the cowl and upper valance...just basically make sure its close enough so the bolt holes line up without a lot of prying, that was also a success, then I mounted the inner fenders to the fenders, had to drill about three holes on each side to suck the plastic inner fender up to the slicks fenders....worked great.
I finished off yesterday getting the grill, valance (upper and lower) all mounted to the fenders and core support, then tore apart the headlight buckets to get them cleaned up and painted then we will reinstall them with new adjusting hardware.
I have been waiting for some parts to come in to finish off the cab, I needed both of the lower hinge pieces to replace that rotted area, they arrived from Carolina Classics yesterday along with one of the wiper pivots that was bent needing replaced...how do you bend the shaft on one of those?
Anyway here's some pics.
This is the core support mounts I made from left over CV parts.
And a few of the mock up.
---------
A couple other items, we ordered wheels for the truck that should be here next week, no tires yet but we are getting closer to a decision on those.... the wheels for this build have to be a minimum of 17" to clear the brake calipers (original wheel were 17"), back space is important but the offset was more important trying to move the mounting flange as far to the outside as we could to keep the tires in the fenders and limit tire rub on the fenders, hopefully these will work...we'll see. lol
We also went yesterday and looked at a '65 F100 long bed truck to maybe buy and rob some of the more expensive parts off of like the wing windows instead of buying new, the truck is cheap enough and has a title....we are still discussing it.
I wanted to add a little more info/thoughts for the folks that might come along at a later date wanting to find info on doing a CV chassis swap.
First let me say that on our first build we knew nothing, we spent money on things that we really didn't need to buy, as it goes the more of these swaps you do the more ideas you get and the more things you see that can be repurposed in the build.
On our first build we bought inner fenders, and a new radiator support because we thought that the pieces we had from the Uni were not in good enough shape (original parts), so we bought aftermarket re-pop parts to wind-up cutting up to make them fit the '98 CV chassis. On the second build the '65 we bought it had better inner fenders but the radiator support was pretty rotten.... but I patched it back together and it has worked out fine.
In this build we had no inner fenders and the radiator support was a big POS, but I decided to use it, patching all the rot that is keeping it from being usable, in reality this is labor intensive but is in my mind the right thing to do. Not just as a cost saving measure but cutting up and modifying a new expensive part just doesn't sit with me well.
The radiator support of course would have gone into the scrap if the slick was being restored, but then if it was being restored we wouldn't have cut the firewall and floor out of the slicks cab and married it to the CV floor and firewall. Once you go down this road (reusing the donor firewall and floor) you'll see there is little limit to what your willing to modify and re-purpose, the amount of fabricating to mate the parts together isn't that difficult but it is a lot of patching and welding, lots of hammering to manipulate metal and grinding welds to smooth them out.
If you have been following this build you would have noticed we opted not to buy new cab steps and cut them down to fit (like we did in the Uni) but instead just fabricated our own that we will spray with bed liner. The several sheets of steel we bought to do this fabrication was way cheaper than just one of the re-pop steps, of course you need a way to cut the metal but I'd assume if your doing this type of swap you have access to the tools necessary to do the work.
My point is that there isn't really a limit or reason doing this type of swap or build to buy a lot of new parts just to cut or modify them to fit the build, it's way easier to just fix or modify the parts you have in most cases, yeah the lower portion of our radiator support is pretty bad, it holds the bottom of the fenders and lower valance and it is rotting away, I'll add metal and drill holes in the areas I have to, but if it's not structural as far as making it support the weight it will just get a little patch here and there to slow the rotting for another 20 years or so.
And yes I know the type of builds we have done, and are doing, isn't the most popular way to do things, many people frown on what we do, but there are lots of these trucks out there it's not like we are taking a vehicle that is good enough to restore and cutting it up, we are using the bottom of the barrel trucks that are inching ever closer to being scrapped, so in a way we are saving these trucks and giving them a new long life on a modern chassis and drive train.
That is the way we want it also, we would never consider taking a nice truck and cutting it up, and when it comes to the donor vehicle we feel the same way, I could have bought a really nice 2k11 CV P71 that had about 80k on the clock, the guy that owned it had spent a ton of money on it with suspension and performance upgrades, he started out at $6k and I could have bought it for less, but the problem is it was too nice of a car to cut up. Would it have made a good donor, hell yes, but it wasn't so much the money as it was just how nice and clean the car was, just simply too nice to cut up, it was better suited for someone to use and enjoy as it is.
I've learned so much doing these builds, fabrication, electrical systems, chassis/body, I don't claim to be a authority but we have learned a lot, I'd never do another build without using the donor floor and firewall, even though it was a lot of work I can see the end result is going to be a better built vehicle that will be tighter and stronger. It will be better for leg room, pedal placement, HVAC (on the cheap), and driver comfort will be vastly improved.
There is nothing wrong with the other two truck builds, both are driven daily, both are basically trouble free as they were intended, the Uni could have benefited from the donor floor and firewall swap but we didn't know any better at that time. I guess it's like anything you do over and over you get better at it and not necessarily by finding short cuts but by finding a better way to do some things, sometimes it saves you money, sometimes it just makes more sense to do it a certain way like making the cab steps.
I've said this over and over there isn't a right or wrong way to do a build like these trucks we have built, a lot of it simply boils down to preference, time, and money, I guess we work kinda' fast compared to other builds I've watched, we built the other two trucks in about a year, this one is taking longer because of my wife's work which is fine, her business comes way ahead of any project we may want to do.... gotta' pay the bills, and her business helps finance the builds.
I had a goal of this truck moving under its own power by the end of the year, I doubt that is going to happen, so I've changed the goal to getting it to the frame shop by the first of the year...that should be doable. I have to get the rear frame section straightened before I can mount the fuel tank, and I need the fuel tank mounted for it to move under it's own power....lol
-----
Both of the trucks we have built are well received by the public, I've never had a comment that we ruined something or that I don't like what you did (maybe those people just keep their mouth shut?) not really a day goes by that someone doesn't come in to the shop and say I like that truck or ask questions about it (Uni). And it's not that we are looking for positive comments about them either, we both like our trucks and that is good enough, all the positive comments are just icing on the cake so to speak.
----
When this '62 flair side is finished I don't know what I'll do with my free time, my father-in-law wants us to build him something truck-wise but it might be a Ford or a Chevy, one thing for sure is that it'll probably be on a 1 ton chassis, we have looked at a couple old '50s F600s both the COE and straight truck varieties, I'd love to do a COE but we'll see what turns up, one thing for sure it will be a flat bed truck on a modern chassis with a modern injected engine....we will see what happens next year.
Hope this isn't too long, I just wanted to pass along a few thoughts that might help someone else in the future. Sorry no pictures... more build progress posts and pics to come!
Still moving along with the flair side build and making progress...lol
We finally finished the passenger side cab step to CV floor....
New wheels and tires came in and are installed.
Mock up of fresh air intake for the CV HVAC...
This is kinda' a take on Fred's build, we used 4" plastic flanges that are intended for a vacuum system (woodworking) and a flexible 4" ID foil lined hose (not sure of it's intended purpose), it's a really tight fit and I cut up the CV air box so I could install that flange inside the box, I still need to do some trimming on the outside for appearance purposes but it should work well pulling fresh air from the passenger cavity of the cowl.
Got the steering column mocked up, mounts made, and everything hooked up, we did have to cut the X shape sliding steering shaft (about 2" off of it) so the column would fit in the location for the mounts to hit the bottom of the dash, actually the steering wheel placement wound-up in a better location than the Uni with the aftermarket GM column that we had to add a 3" spacer to get the steering wheel in a comfortable location.
I also notched the bottom of the dash so the column could be raised (like the Uni), it leaves about 3-4" of the raw CV column exposed that we'll have to find something to use as a trim cover, shouldn't be a big deal.
If you look at the picture below you can see that the roll bar from the CV P71 is now mounted, it just clears the roof but is removable, after a headliner is installed it probably will be very difficult to remove but it's one of those things that will never come back out of the truck once it's finished.
I'm just about ready to send the truck to the frame shop, just have a couple more things to do and it can be loaded on a trailer.....
So we have a problem with the flare side build that some of the parts are defective or missing, a couple of the broken or defective parts were the wing windows, while the glass was good the pivot bolts at the bottom are broken on both sides, while this is repairable it's easier to just find good used parts to replace the defective items. The truck is also missing a rearview mirror, both sun visors, defroster grills from the top of the dash ( I robbed them for the '65 build), metal door access covers (inside the door for window access) on both sides, we also needed a good dash/gauge bezel that hadn't been cut up so we can cut it up for the CV cluster...lol, glove box liner, passenger side hood hinge and spring, hood latch, and a few other misc parts.
The passenger side door on the flair side has a nice crease in it below the door handle that runs almost the entire width of the door and while fixable it'll require filler to get the couture back, the original hood is just junk and we had located a better hood that we bought for $40 at a local swap meet but it is the same color as the Uni and we are going to use it on the uni because that hood is really bad, of course the drivers side wiper pivot (I already bought new from Carolina Classics $45), there are more little odds and ends parts that you don't realize until your doing mock up or final assembly are missing, remember we bought the flair side sheet metal only when we got the truck it was just those parts no frame, basically just a pile of parts with a lot of missing stuff.
Anyway we bought a '65 F100 long bed that had the majority of the parts we needed, it is missing the dog house but most everything including a good hood came with the truck along with a good title and VIN tag.
The cost of the truck with a title was less than buying the remainder of the parts we needed, we'll pull all the parts we need then it will find a new home probably as a file cabinet.... the bed floor is totally rotten, bed sides (outside) are pretty good and the bed could be cut down to make it a short bed for a CV swap but short beds are not that rare to find which makes cutting one down a lot of work that might not be worth the effort unless you just wanted to go down that road, the cab isn't too bad (would need floor pans and cab corners), all the glass except the windshield are good parts, the doors are a lot better than the originals from the flair side...and it has all the other parts we need except a hood latch that goes behind the grill so we are still on the hunt for that part.
This was a "custom cab" truck I believe, the body trim (which we robbed off the truck, needs a good polish), deluxe heater, two sun visors, drivers side exterior door lock all point to it being a custom cab although I'm not really sure just what makes a F100 a custom cab truck, it had no script on the doors like I've seen on earlier custom cab trucks but Ford may have stopped adding that to the trucks by '65.
Here's a picture.
Pay no attention to that looming hulk of a truck in the background more about that later...lol
--------
Hope everyone has a safe, happy and Merry Christmas!