
Hexenschuss
-
My wife's nightmare
- Posts: 342
- Joined: October 3, 2009, 8:22 am
- Location: Mooresville, NC

Re: Hexenschuss
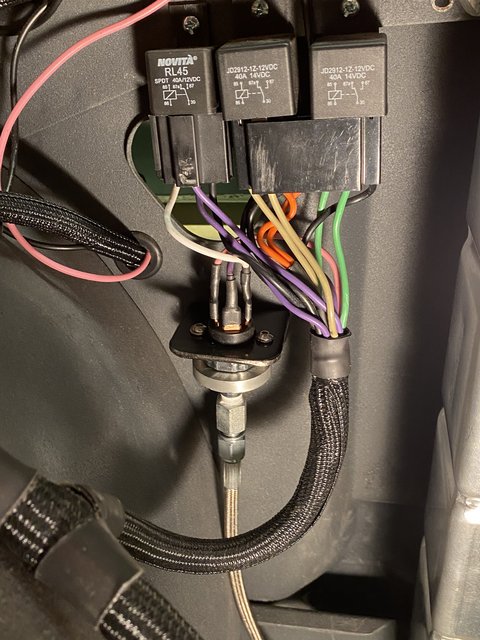
Got a picture of the switch that's controlling the fuel pump relay. It is a Standard Motor Parts PS64. Wired the "S" terminal to the start circuit and the "I" terminal to the run circuit. The "P" terminal goes to the coil of the relay. Found a write up on-line. I did remote mount it since I didn't have a lot of extra wire to work with. Made a bracket out of some angle and a metal ring I found in a bucket of junk. Worked out pretty good.
-
My wife's nightmare
- Posts: 342
- Joined: October 3, 2009, 8:22 am
- Location: Mooresville, NC
Re: Hexenschuss
Well, Saturday January 28, 2023, the old girl made her maiden voyage on the paved road! Nothing fell off and we made it back in one piece(s)!
The front end definitely needs aligning, but it drove and rode really good. There are a few new items added to the "fix before the next trip list" but it was a pretty short list. I did notice a coolant leak after parking it. Appears to be a head gasket so that repair has begun, not completed, just begun
Anyway, I'm happy it goes and stops and the doors stay shut
-
My wife's nightmare
- Posts: 342
- Joined: October 3, 2009, 8:22 am
- Location: Mooresville, NC
Re: Hexenschuss
After pressure testing and wiping and pressure testing and wiping, all I could tell was there was coolant dripping from the separator plate and the oil pan bolt where the pan drops down around the rear main cap on the passenger side of the engine. Nothing from the intake or the head. Pulled the transmission, clutch, flywheel, bellhousing and separator plate. Pressure test again and see a drop form on the same bolt head. Scratched my head for a few hours and discover coolant running down the oil pan gasket. And it is traced back to the drain plug in the block. I had checked it before, but it seemed dry. And I'm assuming that during the wiping of the block, I loosened/disturbed the paint and/or clearcoat which allowed the coolant to "come out" and then I could get a wet spot on my rag. And the casting around the plug is cracked, probably from being overtightened sometime in the past. So, all of this is to say, the coolant was tracking through the paint down to the pan gasket and running to the rear of the block. (Insert curse words of your choice here!) Drain the coolant, pull the plug out and get soaked from what was left in the block, retape and reinstall it. Put everything back together and refill the system with a treatment of K-seal and everything seems dry for now. Haven't had a chance to take it out for a roadtrip yet but it looks good so far.
Thanks to Jeff for capturing some footage of the road test a few weeks ago
https://www.youtube.com/watch?v=B-4IIVgiFG4
Thanks to Jeff for capturing some footage of the road test a few weeks ago
https://www.youtube.com/watch?v=B-4IIVgiFG4
-
My wife's nightmare
- Posts: 342
- Joined: October 3, 2009, 8:22 am
- Location: Mooresville, NC
Re: Hexenschuss
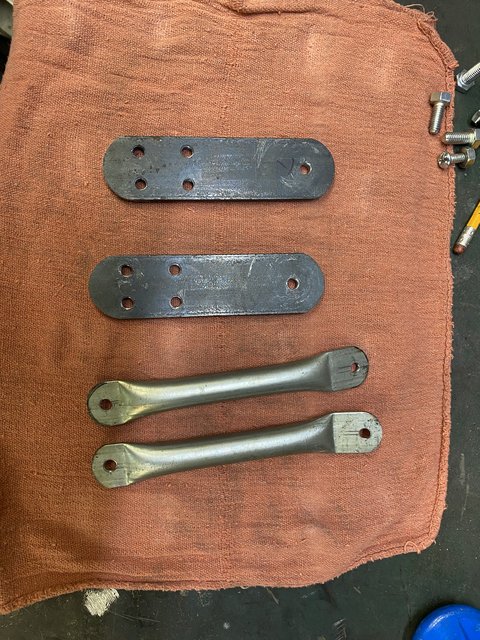
Haven't done much lately to the truck but over the weekend I did manage to get the mirrors installed. Made some brackets and arms for the mirrors I ordered from somewhere online several years ago. They turned out pretty good and got them powder coated yesterday.
Here are the pieces I made:
An in-progress shot:
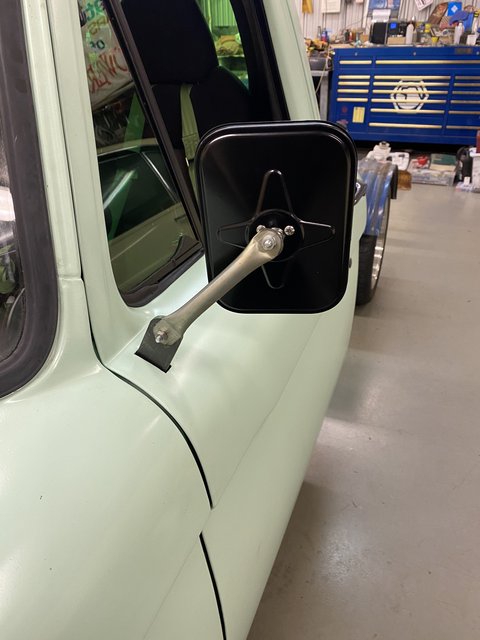
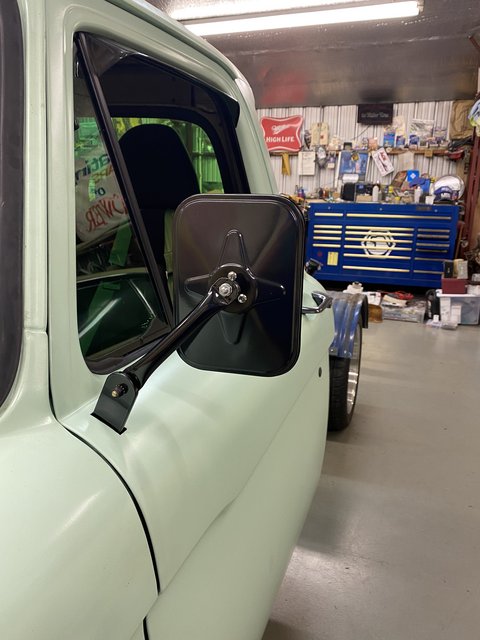
After the "color- matching":
Here are the pieces I made:
An in-progress shot:
After the "color- matching":
-
JeffinMooresville
- Posts: 242
- Joined: January 23, 2018, 8:12 pm
- Location: Mooresville, NC
Re: Hexenschuss
I like ‘em… looks good.
Jeff in Mooresville
63 Flareside and 65 Styleside projects underway
63 Flareside and 65 Styleside projects underway
-
My wife's nightmare
- Posts: 342
- Joined: October 3, 2009, 8:22 am
- Location: Mooresville, NC
Re: Hexenschuss
Thanks, I'm happy how they turned out. Haven't got to drive it to see if the tubing I used is going to be "sturdy" enough, the flattened ends are pretty easy to bend so I may need to redo them with some heavier wall tubing. And the reason I haven't driven it again is the rear axle seals began leaking. Of course I have a Frankenstein rear axle assembly. It has old style big bearing ends but the axles are the new style big bearing. Everything seemed fine but evidently the retainer collar got into the axle seals. I bought a set of new style bearings locally but the new retainer collar O.D. is way too big, won't fit into the axle housing. Haven't found anybody willing to do some machining on them so I ordered new ones from the place the axles came from today. Supposed to be here Thursday so I'll see what these collars look like. The originals just needed to be shortened .2-.3", but yours truly split the old retainers and pressed the bearings off prior to obtaining replacement parts. Could've turned the originals down and all would have been good. Just another couple of weeks of not really accomplishing much of nothing: 
-
My wife's nightmare
- Posts: 342
- Joined: October 3, 2009, 8:22 am
- Location: Mooresville, NC
Re: Hexenschuss
Another set of axle bearings arrived on 3-23 and I pinned down a machinist buddy and he said he would cut the collars down for me on Friday except he only works half a day on Fridays, asked if Monday would be ok. What else am I going to say but "sure that will be just fine!". Heard nothing Monday so I called him late Tuesday and he said he was going to call me Monday because the ID of the collars were different. (I took the first set of too big ones also so he could make another pair for the extra bearings I now have) So now it's going to be Friday before they will be ready. Picked them up late Friday and everything seems like it will be good to go. Took a drive through the country today and all is dry and no strange noises, smells, or anything else!! Now to talk the machinist into turning down the other pair of collars so I'll have an extra set if something does happen later on.
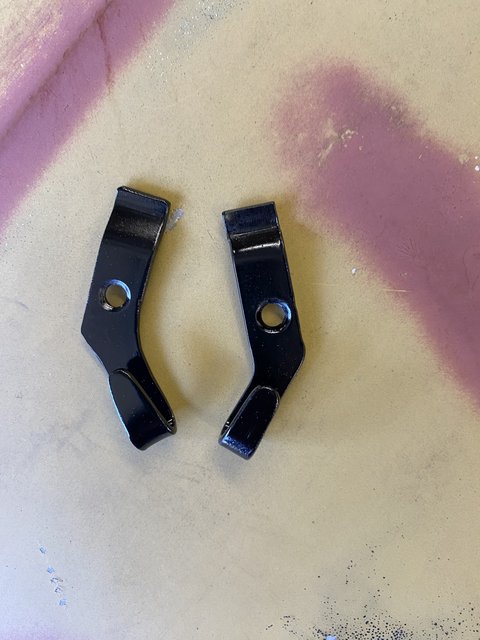
While I was waiting for axle parts I looked for the coat hook that I took out of the truck a few years ago. Remember putting it in a bag with the screw but couldn't find it! Finally saw it in another bag of screws. How does that happen??? Since I had some free time I decided the driver needs a coat hook too. So made a pattern and now I have a coat hook on both sides. It's the little things that really tickle me, not sure why but............
What I started with
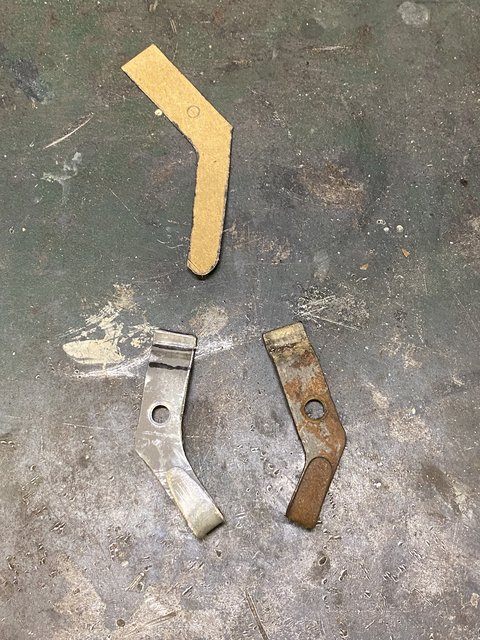
And after a little paint
While I was waiting for axle parts I looked for the coat hook that I took out of the truck a few years ago. Remember putting it in a bag with the screw but couldn't find it! Finally saw it in another bag of screws. How does that happen??? Since I had some free time I decided the driver needs a coat hook too. So made a pattern and now I have a coat hook on both sides. It's the little things that really tickle me, not sure why but............
What I started with
And after a little paint
-
My wife's nightmare
- Posts: 342
- Joined: October 3, 2009, 8:22 am
- Location: Mooresville, NC
Re: Hexenschuss
Not much going on here except putting miles on it when I can. Did get the frontend set, well almost. The first trip there was a misunderstanding of how the spacers on the upper control arms were supposed to be installed. I didn't stand around while he had it on the alignment rack because it seemed he didn't want me looking over his shoulder. After he came to the waiting room and asked if I had longer bolts we discovered that I should have shared more information with him. I went back home and removed the extra spacers and the bolts were long enough to get the caster settings where we wanted them. I made another appointment and the caster was pretty close but really needed some different thickness spacers to really get it right. Ordered some "precision washers" (actually shaft spacers for machinery) but haven't made it back to the frontend shop yet. We also noticed the front ride height needs to be raised a bit to get the lower arms and tie rod ends level. It has a bit of bumpsteer in it now. But we agreed to put a few hundred miles on it and let everything settle in, then do a final alignment. It drives much better even with it not being exactly 100%.
-
My wife's nightmare
- Posts: 342
- Joined: October 3, 2009, 8:22 am
- Location: Mooresville, NC
Re: Hexenschuss
Been putting miles on the truck, just went up to the mountains yesterday for a car show, about 100 miles each way. Stayed on backroads all the way and it was a blast. My friend with the 64 Fairlane followed along. I finally drug the bed out of storage last weekend and have been formulating the plan of attack for it. The front crossmember is completely rusted away and the front panel and floor have quite a bit of missing material. The second crossmember back from the front is only half present which puzzles me because the remaining part is very solid. Since two crossmembers needs to be recreated, I've procured material to do all three of them. So I've spent last week drilling spotwelds to remove the middle crossmembers. I'll get some pictures posted sometime soon.
I did get one project completed recently. The inspection panels on the doors had speaker holes cut into them and I'm not planning to reinstall them. I do have a set of original storage compartments, but they are kinda hard to operate with the door closed or while driving. I wanted a cup holder and a small open storage compartment. this is what I came up with for the drivers side:
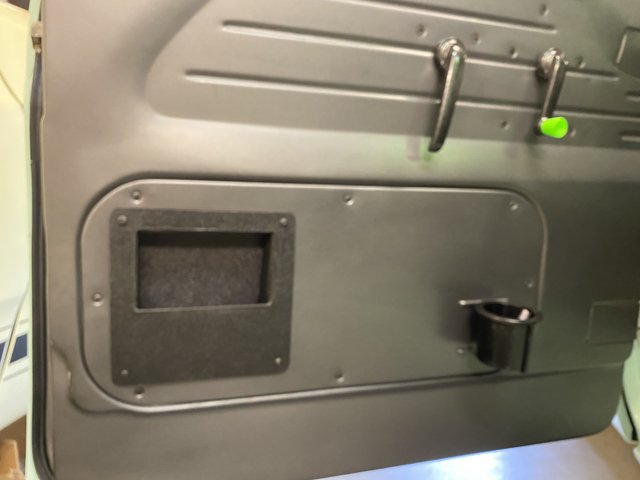
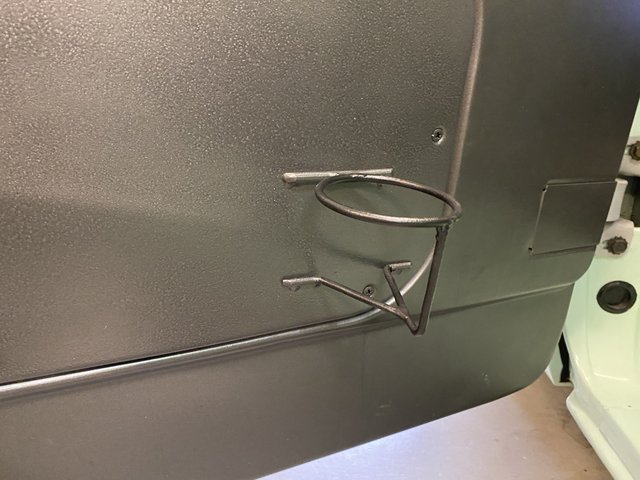
The storage compartment turned out a little bit small, but it will hold a phone and some keys. It was made from several pieces of ABS sheet "welded" together with a soldering iron. The speaker holes were squared up to accept compartment and used u-nuts and screws to attach it. The cupholder is round rod welded to the panel with a plastic drop-in unit. I did spray the rod with spray-on Plasti-dip, no rattles even when empty. I like where it is but my wife didn't want one on her side because she will get her foot hung on it when getting in and out. So there is an old-fashioned plastic hang from the window channel cupholder. (It hits my knee but that is a secret we all must keep please!) I did make the compartment on the passenger side larger than the first one. The photo is hard to make out but it is the back of the
door panel with the ABS box installed. There is sound deadener on them too.
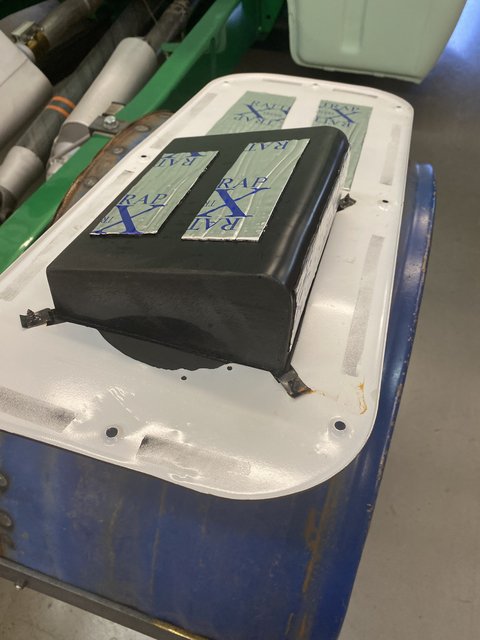
The only thing I'm not crazy about is the radius of the compartment mounting flanges are not the same as the access panels, but I couldn't get that to happen because the speaker holes were cut too close to the edge. I tried different designs for many weeks but finally gave up and just made the "square".
I did get one project completed recently. The inspection panels on the doors had speaker holes cut into them and I'm not planning to reinstall them. I do have a set of original storage compartments, but they are kinda hard to operate with the door closed or while driving. I wanted a cup holder and a small open storage compartment. this is what I came up with for the drivers side:
The storage compartment turned out a little bit small, but it will hold a phone and some keys. It was made from several pieces of ABS sheet "welded" together with a soldering iron. The speaker holes were squared up to accept compartment and used u-nuts and screws to attach it. The cupholder is round rod welded to the panel with a plastic drop-in unit. I did spray the rod with spray-on Plasti-dip, no rattles even when empty. I like where it is but my wife didn't want one on her side because she will get her foot hung on it when getting in and out. So there is an old-fashioned plastic hang from the window channel cupholder. (It hits my knee but that is a secret we all must keep please!) I did make the compartment on the passenger side larger than the first one. The photo is hard to make out but it is the back of the
door panel with the ABS box installed. There is sound deadener on them too.
The only thing I'm not crazy about is the radius of the compartment mounting flanges are not the same as the access panels, but I couldn't get that to happen because the speaker holes were cut too close to the edge. I tried different designs for many weeks but finally gave up and just made the "square".
-
My wife's nightmare
- Posts: 342
- Joined: October 3, 2009, 8:22 am
- Location: Mooresville, NC
Re: Hexenschuss
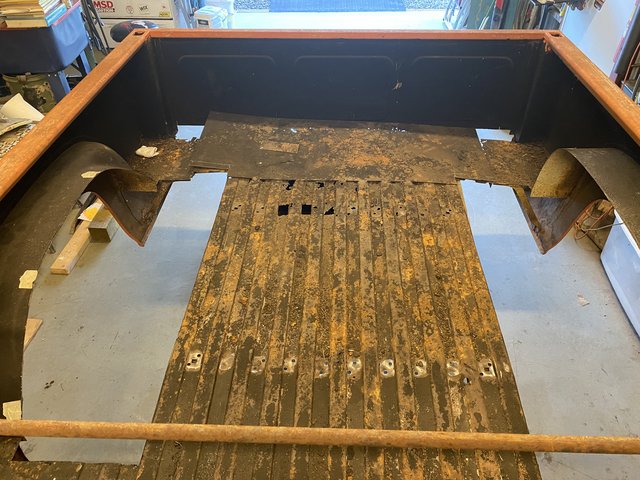
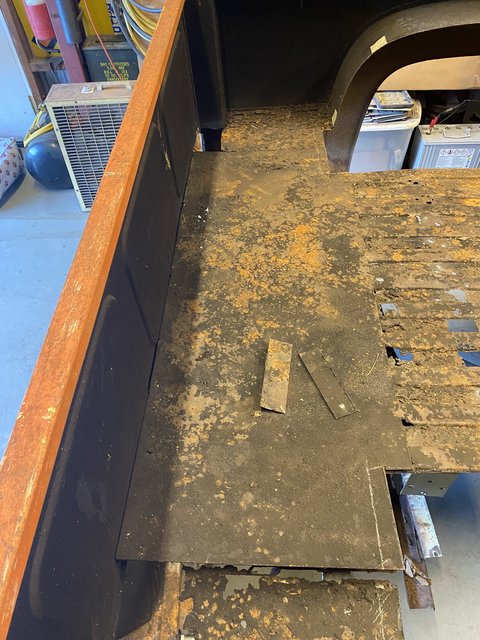
Here are some pics of the bed before any cutting took place:

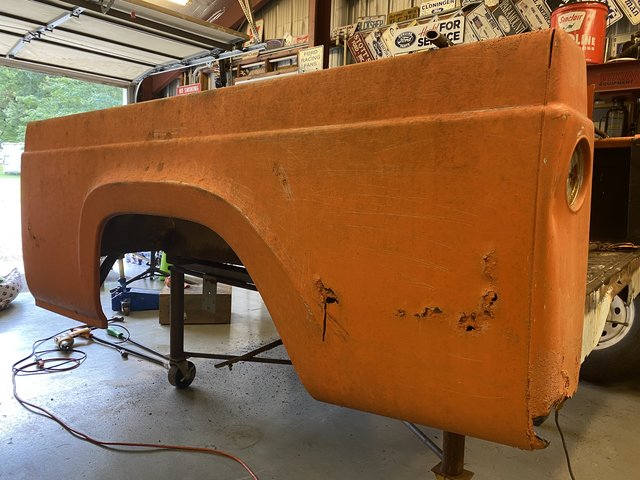
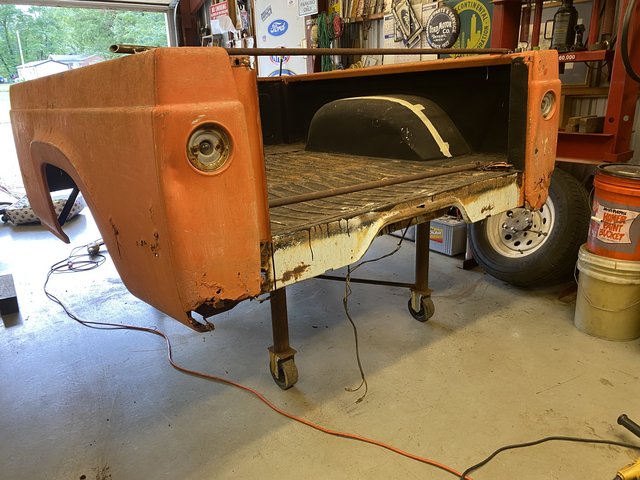
Actually the previous one shows the spotwelds drilled on one crossmember already
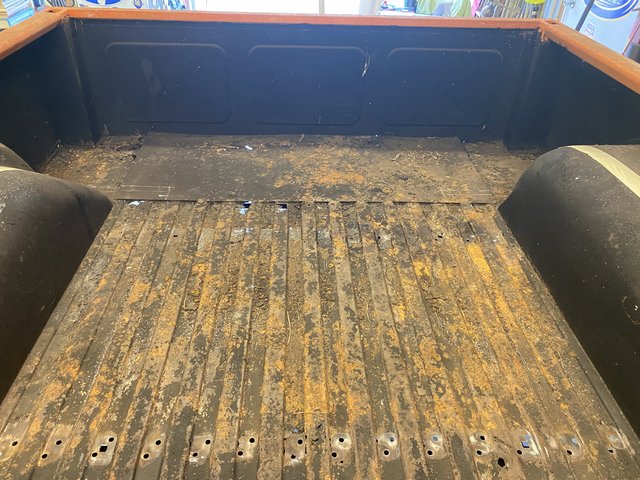
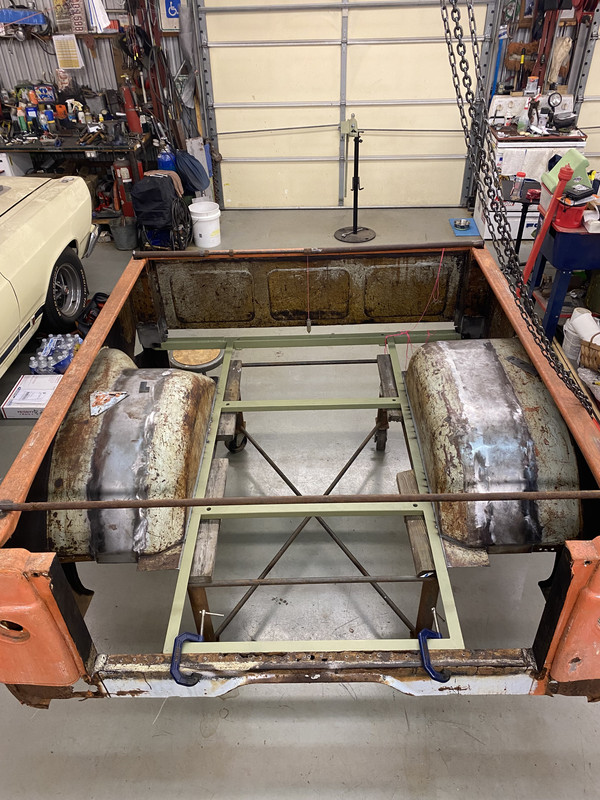
Here is what it looks like since last week, I'm waiting for sheet metal to start putting some back together:

The crossmembers are done, but I need to set the bed on them so I know where to trim the center ones. More to come hopefully soon
Actually the previous one shows the spotwelds drilled on one crossmember already
Here is what it looks like since last week, I'm waiting for sheet metal to start putting some back together:
The crossmembers are done, but I need to set the bed on them so I know where to trim the center ones. More to come hopefully soon
-
My wife's nightmare
- Posts: 342
- Joined: October 3, 2009, 8:22 am
- Location: Mooresville, NC
Re: Hexenschuss
Well the wheel tubs have been widened, still need a little touch-up welding and grinding. Got a "frame" made that consists of the front crossmember and the two center ones with 1 1/2" angle in between them all. Looks like a ladder. The tubs will get spot welded to the vertical section of the angle and the new floor will attach to the horizontal angle section, it is facing the center of the bed. Hopefully pictures can be added sometime soon cause I'm sure my description leaves alot to be desired. Also been making a small metal brake to make the filler sections in the bed. Using 16 gauge sheet so finding an off the shelf brake that isn't ridiculously priced has been a challenge. It looks like my homemade one is going to be just fine. It will take a piece a little over 19", which should cover all of the pieces I'll need to make for this. May cut it in half and stretch it out a few feet after I get finished with the bed.
-
My wife's nightmare
- Posts: 342
- Joined: October 3, 2009, 8:22 am
- Location: Mooresville, NC
Re: Hexenschuss
Wow, time flies doesn't it?? The lower front corner/stake pockets have been replaced with new metal which allowed these areas to be welded to the replacement front crossmember. This set the heights of everything else in the bed. The wheel wells are welded back to the bed framing but I dropped the frame 1/4" from original and that allows most of the original spot weld holes to show inside the bed. I can fill them but it will be much easier if the bed is mounted on the rotisserie. The last several weeks I've been salvaging some sections from a rear piece of a bed I ran across at a swap meet. The guy was trying to sell it for a bench and wanted a lot more than it was worth, but the last day of the swap meet he decided to accept my previous offer. The rear cross piece that the bed floor, the tailgate hinges and the end caps attach to was pretty much non-existent on my original bed. The swap meet piece finally gave up a very nice replacement that got sandblasted last week and is awaiting a few patches. Should get most of the patches in this week and weld the whole thing to the new bed frame. Then time to figure out how to repair the bottoms of the bed end caps. Unfortunately the swap meet section has rusted out bottoms too 
-
My wife's nightmare
- Posts: 342
- Joined: October 3, 2009, 8:22 am
- Location: Mooresville, NC
Re: Hexenschuss
What's that saying, "the best laid plans of mice and men often go awry"? I experienced it again last week. The day after my "pledge" to get the rear panel finished last week, a couple friends came by the shop just as I started welding the first patch in. We shot the breeze for awhile, they left, I tacked the patch in and trimmed another piece for the next days activities. Got up Wednesday morning and my right eye was terribly irritated. Put some drops in and went to work. (at 5:30am) Called my wife about 1:00pm and told her I was at an urgent care to see what was wrong with my eye. (First she'd heard of it cause she was asleep when I left) Waited over an hour for the doctor to tell me there was a piece of metal in it. I'm 50+ years old, worked on rusty old cars all of my life and never had that!! I usually wear glasses and had them on the night before, only thing I can figure is it fell out of my hair or something during the night. She plucked it out in a flash and I was a new man. However, on the hour ride back home, I started feeling achy and had an aggravating cough. Needless to say, today is the first day I've left the house and still ain't 100%. Can't say I caught it at the urgent care but I work by myself and don't come in contact with hardly anyone. Who knows?? My wife was greatly surprised I went to have my eye looked at. She said it must've been terrible for me to see a doctor! Thankfully she hasn't had any of my other symptoms and no I did not go to the doctor to have them diagnose my second issue.
All of that to say, the rear cross piece is still waiting for me on the sawhorses, I checked today when I got home
Hope y'all are staying healthy, and wear your safety equipment!!
All of that to say, the rear cross piece is still waiting for me on the sawhorses, I checked today when I got home
Hope y'all are staying healthy, and wear your safety equipment!!
-
My wife's nightmare
- Posts: 342
- Joined: October 3, 2009, 8:22 am
- Location: Mooresville, NC
Re: Hexenschuss
Not really any huge strides on the bed repairs but making small steps mostly every evening. Most of the holes/severely damaged places have been made whole, just need to grind the welds and see how all of it looks. The tag light bracket was completely missing but I remembered back when I was working at the Ford dealership, new trucks still came in without rear bumpers. There was a temporary tag light/plate holder that would be removed when the customer wanted a bumper installed. I squirreled away a few of these at that time. Dug one out and after some slicing and dicing of the bracket, I have a new tag light. It needs to be permanently attached but I want to POR-15 the underside of the cross piece and it will be in the way. Maybe I'll get all of that finished up this week.
-
My wife's nightmare
- Posts: 342
- Joined: October 3, 2009, 8:22 am
- Location: Mooresville, NC
Re: Hexenschuss
Still eating this elephant with a teaspoon. Worked a lot of overtime last week so not much accomplished until yesterday. Finally ground all of the welds and got the tag light bracket welded into place. Acid washed it and got a coat of POR 15 on. Took a few days off after Christmas so should be able to get this thing installed finally.
-
My wife's nightmare
- Posts: 342
- Joined: October 3, 2009, 8:22 am
- Location: Mooresville, NC
Re: Hexenschuss
Did get the rear crossmember installed. Wound up using panel bond adhesive. Quite an enjoyable time getting it in place and not getting all of the adhesive on everything else!!
Cut the right bed end cap off with a sawzall which went surprisingly well. That allowed me to do some rust treatment/prevention on all of the pieces behind the end cap. Did some patching on the end cap and am waiting to get my courage up to cut it so a new lower section can be welded on. I am planning to weld the end cap back on from the outside, eliminating the factory seam. While I am waiting for my courage, I have repaired a lot of rust damage on the rest of the bed, mainly where the floor filler pieces attach to the bedsides. Still have more to repair than what has been repaired but it's getting there.
I did find a shop that is supposed to brake a piece for the front bed panel, then I can start getting new filler panels made and installed. The owner went on a mission trip after Christmas, so I am awaiting his return. Hopefully he'll get it the end of this week.
-
My wife's nightmare
- Posts: 342
- Joined: October 3, 2009, 8:22 am
- Location: Mooresville, NC
Re: Hexenschuss
Picked up the piece from the fab shop for the front bed panel patch. Got it trimmed and fitted. Looks like its gonna work great. Need to do a little work to the original bed panel to get it ready to accept the patch. I did use a flanging tool to make a flange on the top edge of the patch to accept the original front panel. Planning to use panel adhesive again to help weatherproof the joints. It will be an interesting deal to get all of it lined up and clamped but am really excited to finally get this piece in place!
-
My wife's nightmare
- Posts: 342
- Joined: October 3, 2009, 8:22 am
- Location: Mooresville, NC
Re: Hexenschuss
The front panel is glued into place and I'm very pleased how it turned out. Been working on the bed end cap repair. I bought patch panels but the profiles are quite different. My bodywork buddy said it will all work out with a bit of tacking and hammering. We'll see how that goes, planning to tackle that this week.
-
My wife's nightmare
- Posts: 342
- Joined: October 3, 2009, 8:22 am
- Location: Mooresville, NC
Re: Hexenschuss
Let's see how this works!!
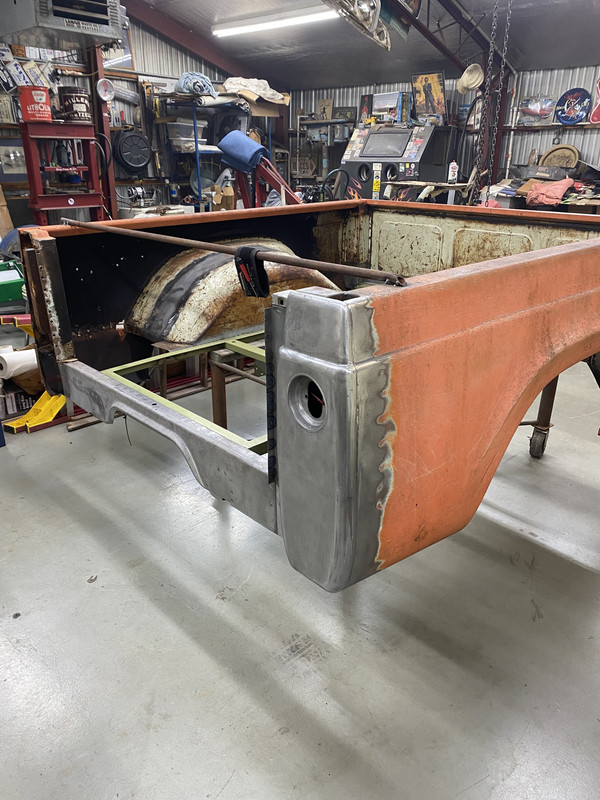
This is the "frame" for the new floor and the widened wheel houses
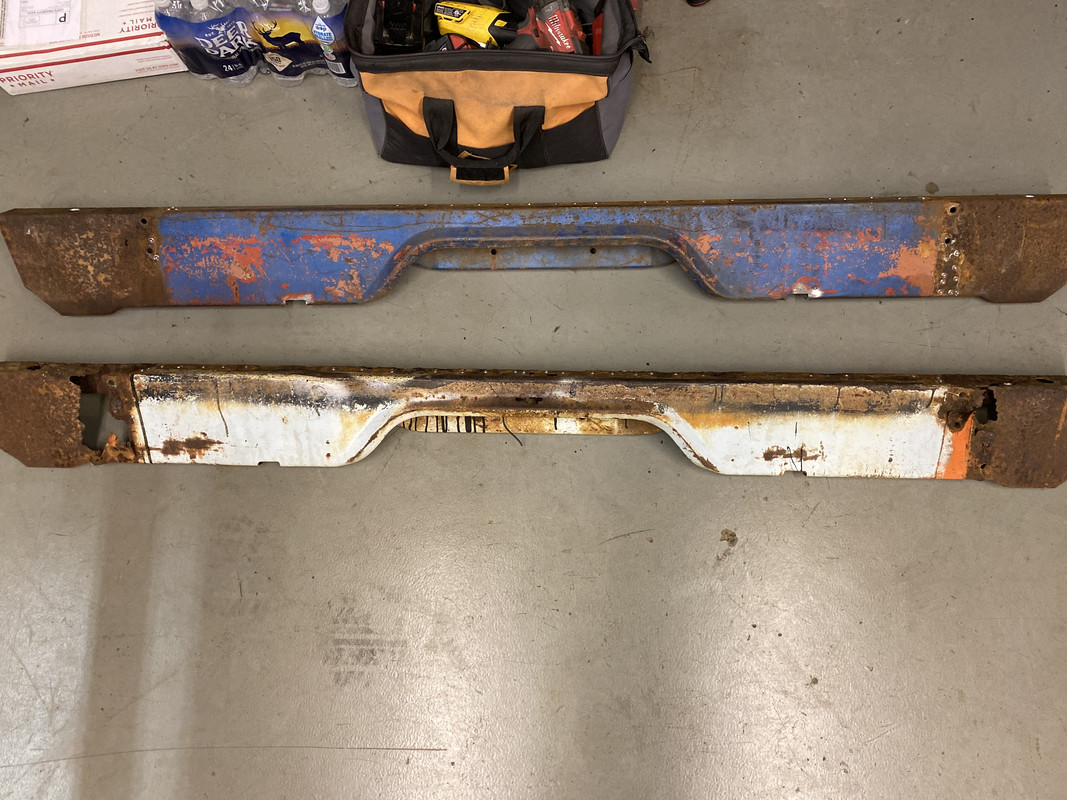
The reclaimed rear bed panel
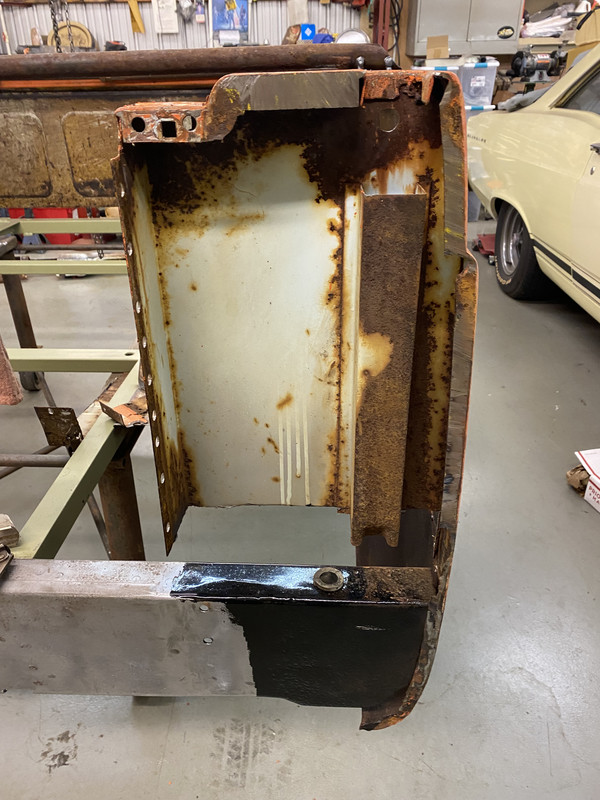
Passenger side bed cap repair
Working on the drivers side bed cap repair, would like to get the replacement panel welded to the bottom of it this week.
This is the "frame" for the new floor and the widened wheel houses
The reclaimed rear bed panel
Passenger side bed cap repair
Working on the drivers side bed cap repair, would like to get the replacement panel welded to the bottom of it this week.
Re: Hexenschuss
That is looking good. You've got a lot of work to go but I've been following this build and you're going to be done before you know it.