Hexenschuss

A place just for our project & build threads.

Moderators: Kid, Casey 65

My wife's nightmare
Posts: 342
Joined: October 3, 2009, 8:22 am
Location: Mooresville, NC
United States of America

Re: Hexenschuss

Post by My wife's nightmare »

Image
Well after some patch work, the doors got painted. Didn't get any action shots of the repairs but wound up replacing quite a large section of the outer skin and more of the door bottom that had previously been worked on.
Image
Image
Thanks to my lovely wife, the doors got hung and pretty much aligned. I didn't do enough fitting before taking everything apart, plus so much of the lower part of the cab was missing (i.e. RUSTED!!!) Had to rig up some pull points and a come-a-long to get the tops of the doors "adjusted". I think they're going to be just fine. My neighbor came over and looked them over. He used to do bodywork and said they were as good as he could get them without doing some metalwork and repainting them. Got the right fender on and hopefully will get the left one on this week.
grump
Posts: 959
Joined: September 14, 2006, 6:47 pm
Location: ohio

Re: Hexenschuss

Post by grump »

Lookin good, sounds like your door bottoms were in about the same condition as mine are. It'll take some rebuilding of the bottom corners but I'll get them done. I'm a ways behind you but I'm getting there.
My wife's nightmare
Posts: 342
Joined: October 3, 2009, 8:22 am
Location: Mooresville, NC
United States of America

Re: Hexenschuss

Post by My wife's nightmare »

One door came from a junk yard that was fairly straight but the bottom was really rusty. That's the one that had to be repaired again. the other one wasn't too bad but did need some patches in the corners. Just one of those things where you decide you're going to do it and make it happen. Hope you get on yours soon Grump!

Did get most of the front of the truck mounted and lined up. Trying to decide if I will paint the grille or not. Picked up paint for the lower valance and hope to get that done this weekend. We'll see what the weather does!
Image
JeffinMooresville
Posts: 242
Joined: January 23, 2018, 8:12 pm
Location: Mooresville, NC
United States of America

Re: Hexenschuss

Post by JeffinMooresville »

Impressive, Looking good, that boy is getting close to driving. I can’t wait. Come on over to the wood shop and we fix you up a flatbed.
Jeff in Mooresville
63 Flareside and 65 Styleside projects underway
My wife's nightmare
Posts: 342
Joined: October 3, 2009, 8:22 am
Location: Mooresville, NC
United States of America

Re: Hexenschuss

Post by My wife's nightmare »

I'm thinking burly maple with mahogany strips :D :D
Seriously trying to avoid a "temporary bed" because I know myself and it will become a permanent bed. But we'll see what happens when the driving begins!

Started putting the internals back in the doors and discovered the key didn't work. I decided to rekey the door locks.

Does anybody have instructions for putting this thing back together????

Image


Just kidding, got them done and started on the driver's side. I fought that lock for many hours over several days. It would lock but unlock when you turned the key back to neutral position and vice-versa. Finally pulled the passenger side parts out of the storage bag and there it was, the little retainer clip that holds the cylinder rod at the latch was missing. Nowhere to be found in the parts pile. I did find an extra for the passenger side but wound up stealing one from a spare door. Now to get the windows and weatherstripping put in it.
My wife's nightmare
Posts: 342
Joined: October 3, 2009, 8:22 am
Location: Mooresville, NC
United States of America

Re: Hexenschuss

Post by My wife's nightmare »

Well it has come to my attention that the cab is sitting too high on the frame which doesn't allow the bumper and lower valance to line up. Too far in to do any metal surgery so decided to do a body drop. A buddy recommended delrin and cut a set for me on his lathe. Got them in last night but ran out of time to put the valance and bumper on to see if my measurements are going to come out right. Here are the new body mounts:
Image
My wife's nightmare
Posts: 342
Joined: October 3, 2009, 8:22 am
Location: Mooresville, NC
United States of America

Re: Hexenschuss

Post by My wife's nightmare »

Well the new cab mounts appear to be just the ticket. I did stick the bumper on and the clearances are much better. The bumper needs some more tweaking. It was hit pretty hard on the driver's side and I was able to get it fairly straight, but it still has a twist in it. Got a strap wrench and the torch out a few days ago and from my rudimentary measuring the twist should be pretty much gone. Haven't had a chance to try it again thanks to this company I work for. They think I have nothing else to do but spend the majority of the day doing stuff for them. Lots of overtime last week which helps pay for this project though :D
Here's what it looked like before working on the twist:
Image

I also have been cleaning up the side and vent windows, trying to get them ready to put back together. Hoping to do them all at the same time because I'm going to set the glass in the frames and lift channels with urethane. Did that on the 65 and was very pleased with the way they came out. Shouldn't have to worry about water settling into the vent window frames again. I didn't enjoy using setting tape on a truck I helped a friend do a few years ago.
JeffinMooresville
Posts: 242
Joined: January 23, 2018, 8:12 pm
Location: Mooresville, NC
United States of America

Re: Hexenschuss

Post by JeffinMooresville »

Wow, the Delrin pucks are cool, have to tell me where you got the cylinder. The pucks still look like they are 3/4” thick… how much difference between those and standard cab mounts ? Truck is looking good.

Jeff
Jeff in Mooresville
63 Flareside and 65 Styleside projects underway
My wife's nightmare
Posts: 342
Joined: October 3, 2009, 8:22 am
Location: Mooresville, NC
United States of America

Re: Hexenschuss

Post by My wife's nightmare »

The delrin came from amazon. They are actually a bit shy of 1/2" thick. I wanted to have some extra adjusting room and with the factory washers on top, they're right at 1/2". I'm still puzzled as to where I mis-measured or whatever and couldn't use the factory isolators, but these will be just fine and hopefully not cause any issues down the road.
Haven't made much progress the past few weeks. Had some home projects and a couple side jobs to get done. The side glass is ready for tinting whenever I get time to clean a space out and not get in a hurry. I did straighten the lower left part of the grille out this week and was going to test fit it. Realized I had picked up an extra 65-66 stone deflector that was in the shop, blasted it, epoxied it, and basecoat/clear coated it. Holes don't line up!! Found the original one last night and will have to do the same things to it, PLUS a lot of bodywork!! Glad I bought extra white paint :D
My wife's nightmare
Posts: 342
Joined: October 3, 2009, 8:22 am
Location: Mooresville, NC
United States of America

Re: Hexenschuss

Post by My wife's nightmare »

Well, the weather has really cooperated here lately and allowed for the grille to get blasted, bumper stripped, correct stone deflector ready and all of it primed and painted as of last Friday. Got the stone deflector semi-mounted this evening, ran out of bolts. So that means blasting and phosphating bolts tomorrow hopefully. And probably a week or so of masking the grille off to blackout around the headlights and make the "floating bars"!!
Image
This was late Friday while these parts were still drying after moving them in the shop
JeffinMooresville
Posts: 242
Joined: January 23, 2018, 8:12 pm
Location: Mooresville, NC
United States of America

Re: Hexenschuss

Post by JeffinMooresville »

Looks good man… interested to see how they look with the green. Is that Wimbledon white ?
Jeff in Mooresville
63 Flareside and 65 Styleside projects underway
My wife's nightmare
Posts: 342
Joined: October 3, 2009, 8:22 am
Location: Mooresville, NC
United States of America

Re: Hexenschuss

Post by My wife's nightmare »

Yes, it is Wimbledon white. Actually, the mixer used Corinthian white because his book didn't go past 1968. It did take a week to get the grille blacked out, but only about 6 hours to tape it up :roll: The bumper and stone deflector are mounted and got started bolting in the grille. Need a few more u-nuts so planning to dig through storage containers sometime this week.

Plan is to get the rear and side glass installed by end of the week and get started on the carpet.
shipwrecked
Posts: 1464
Joined: December 29, 2012, 10:06 pm
Location: Yorktown VA
Contact:
United States of America

Re: Hexenschuss

Post by shipwrecked »

man i am loving this paint job. look forward to seeing it assembled.
The months may change, but I am always APRIL
'63 F100 Custom Cab 223inline 6, 3speed manual- mostly stock
https://www.youtube.com/coastiereid
Truck has been home in CA,OR,WA,NJ,VA since it's birth in San Jose Jan63
My wife's nightmare
Posts: 342
Joined: October 3, 2009, 8:22 am
Location: Mooresville, NC
United States of America

Re: Hexenschuss

Post by My wife's nightmare »

Image
Image


Not sure why the photos didn't attach last night, but here they are, like me, always a little bit behind!
I'm really happy with all of the colors. I wasn't real sure about the gloss on the white parts but one of my buddies that has painted for 40 years said it will stand up better to scrubbing bugs off of it if its glossy. It turned out to be a nice contrast with the flat clear green on the body. I hope there will be lots of bugs on the grille of this one soon!

And hope you get your share on yours too April!!
JeffinMooresville
Posts: 242
Joined: January 23, 2018, 8:12 pm
Location: Mooresville, NC
United States of America

Re: Hexenschuss

Post by JeffinMooresville »

Man, what a difference the grill makes… I think you nailed the floating bars.
Jeff in Mooresville
63 Flareside and 65 Styleside projects underway
My wife's nightmare
Posts: 342
Joined: October 3, 2009, 8:22 am
Location: Mooresville, NC
United States of America

Re: Hexenschuss

Post by My wife's nightmare »

It sure did turn out better than I was expecting. And she looks so much happier with the front end mostly back together :lol:
My wife's nightmare
Posts: 342
Joined: October 3, 2009, 8:22 am
Location: Mooresville, NC
United States of America

Re: Hexenschuss

Post by My wife's nightmare »

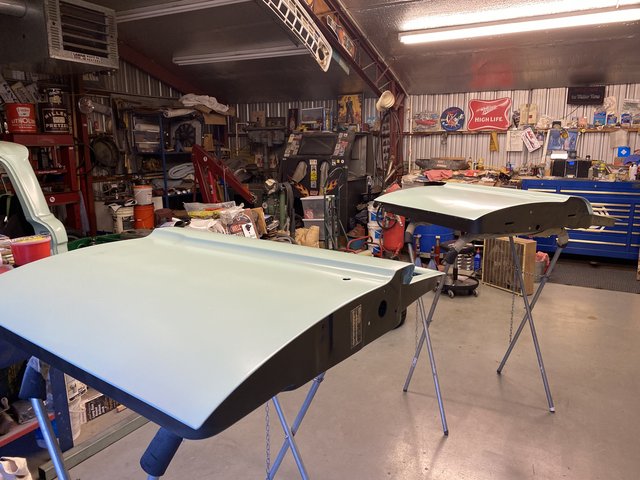
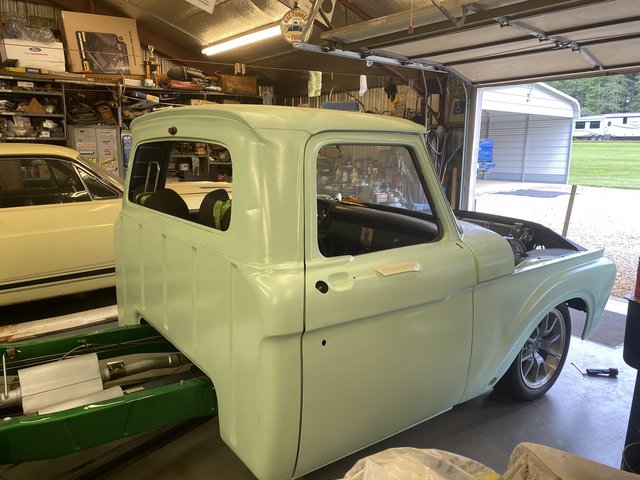
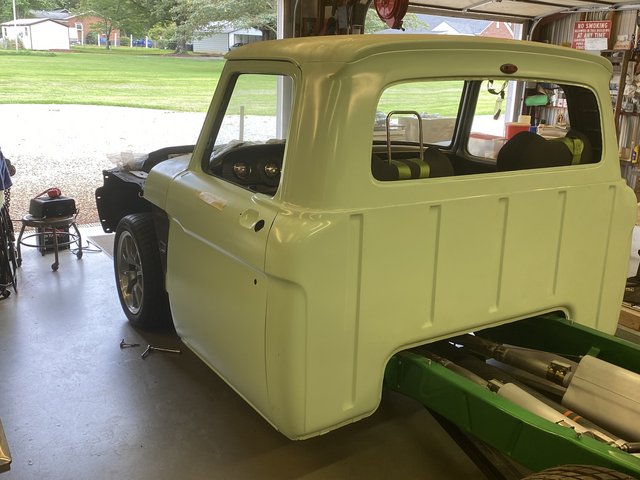
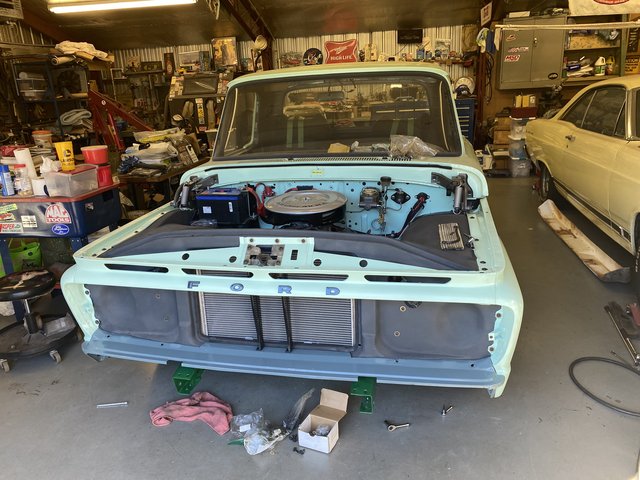
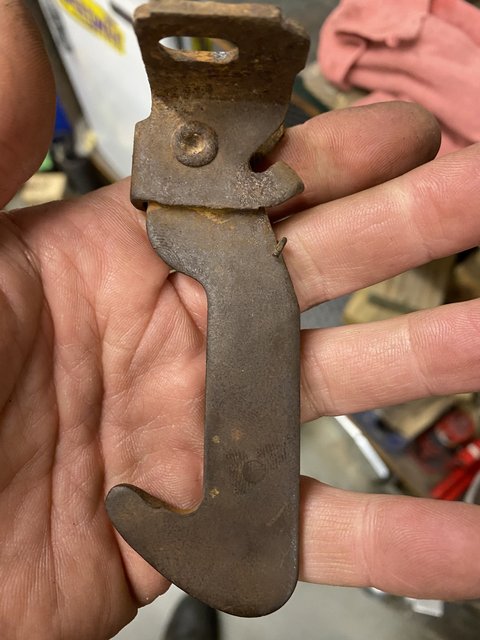
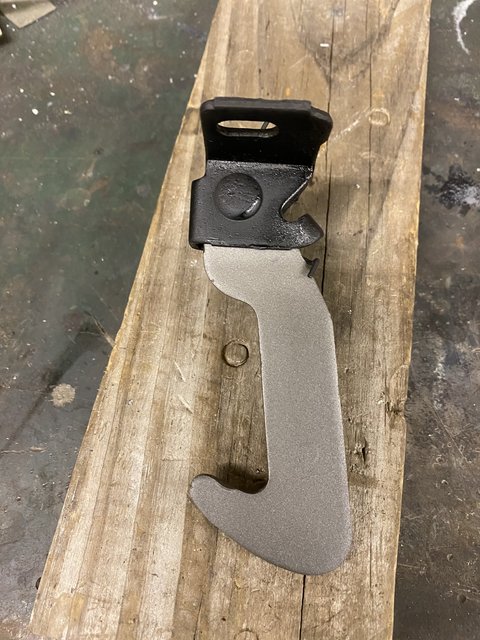
Amazing how quickly the time passes. Haven't accomplished much lately, been building a storage rack for the back seat of my new work truck. Got it together enough this weekend to put it in the truck and see how it works this week. I'll get some pictures when its all done. Did get the hood put on last Saturday. Needs adjusting and I just haven't had long enough to start messing with it. Wanted to have emergency flashers on this one and have fought with this for 6 or 8 months. I had an original switch but it wouldn't function and was unrepairable. I found an old universal headlight switch I'd bought in a dollar box at a swap meet years ago. All of its functions worked but I needed three common terminals plus power and this one only could give me two at each position. So I opened it up, modified the movable contact and put a travel stop on the knob shaft. The switch tested out just fine but for all of those months every time I tried to get the flashers to work I would always get crazy lights. (I did not have taillights hooked up which was mistake #1) Found a pair of old trailer lights and temporarily wired them up and after remembering to plug up the indicator lights, the old truck now has functioning emergency flashers. Its the little things that make me happy and/or drive me insane, in no particular order!!
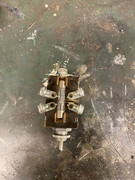
Here is the switch when I started:
Image
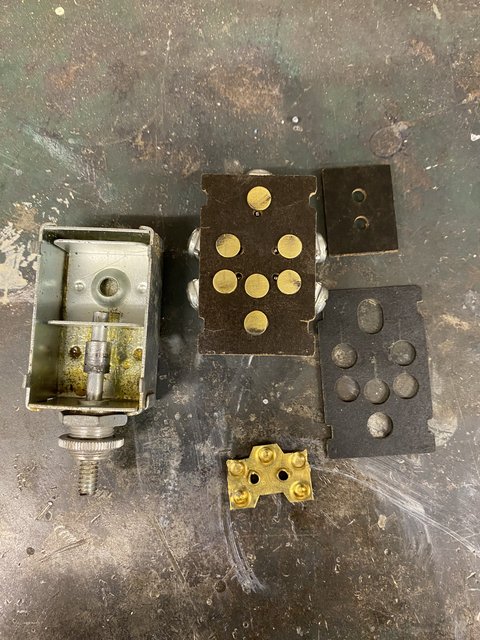
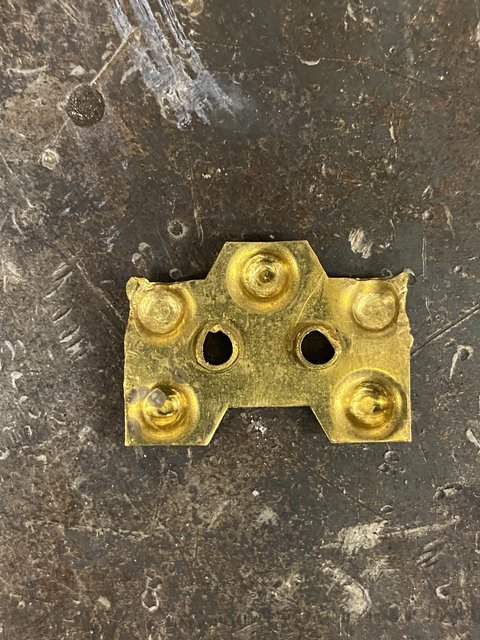
After disassembly: (And it really was this clean inside!!)
Image
The movable contact that got an extra nub on the lower left corner:
Image
Homemade contact modifying tool :D
Image

In the midst of figuring out the best way to add a pressure switch to control the electric fuel pump. I know the easy way to do it but I'll way over-think it and spend way to long actually getting it installed. Just ordered a few fittings so maybe the coming weekend I can get all that finished.
My wife's nightmare
Posts: 342
Joined: October 3, 2009, 8:22 am
Location: Mooresville, NC
United States of America

Re: Hexenschuss

Post by My wife's nightmare »

I've forgotten how much "fun" it is putting the glass back in these things! Spent a few evenings last week on the passenger side door. Put this piece in, take it back out so this other piece will go in, and repeat again and maybe again, again. I need to write the order down for the next time!! I've always had a thing for the old colored plexiglass windows in drag cars and customs from the 60's so this one got green. Need to get the drivers side finished and hopefully I can talk my neighbor into helping put the rear window in sometime next week. And the vent shades are waiting to go home too.
Image
My wife's nightmare
Posts: 342
Joined: October 3, 2009, 8:22 am
Location: Mooresville, NC
United States of America

Re: Hexenschuss

Post by My wife's nightmare »

Well she's "dried-in" now. My neighbor came over the other night and saw the back glass and asked why it wasn't in the truck. I told him I just hadn't had time to get it in. (Couldn't tell him the truth, that I was scared to, gotta keep a good face you know!!) He asked if I had any rope and ten minutes later we were admiring his skills :D
Image
Got a couple new wires pulled to hook up an oil pressure switch to control the electric fuel pump Friday. Need to finish a bracket for the switch and the wiring. Maybe I'll have some time to get started on the carpet the next week or so.
My wife's nightmare
Posts: 342
Joined: October 3, 2009, 8:22 am
Location: Mooresville, NC
United States of America

Re: Hexenschuss

Post by My wife's nightmare »

Amazing how quickly the days can pass! Haven't made much progress on much of anything in those days except I did get the hood latch and safety catch installed. Had to replace the spring on the safety catch. The leg that hits the hood was broken but found another spring on an oddball catch that I'd picked up somewhere. (Guess it's not really an oddball, it just isn't for a Slick!)
Before:
Image
After replacing the spring and a few minutes in the blaster:
Image

Did finish the fuel pump control switch too. I need to get some pictures of that.
Post Reply