
Hexenschuss
-
6166 Junkyard Dog

- Posts: 3502
- Joined: July 23, 2006, 9:34 am
- Location: Reidsville, N.C.
- Contact:

Re: Hexenschuss
LOOOOKS Good so far ,, also I like it when I see USA Made familiar parts being used,, Get the tire fixed ?? 
Tom,
@
Lazy FORD Ranch
Where Ford Trucks Rest in Peace
Dakota,,, RIP will never be the same looking for 61-66 trucks again ,, Kathy
Kathy
Slickstock,,, York, PA
Slickstock,,, Kansas City, MO
Slickstock,,, Altoona, IOWA
Slickstock,,, Salina, KS
Now Cooper will try his best

Cooper now has 2018 Slick Stock,, give him a fair star
Slickstock Kansas City, Mo
@
Lazy FORD Ranch
Where Ford Trucks Rest in Peace
Dakota,,, RIP will never be the same looking for 61-66 trucks again ,,
Slickstock,,, York, PA
Slickstock,,, Kansas City, MO
Slickstock,,, Altoona, IOWA
Slickstock,,, Salina, KS
Now Cooper will try his best
Cooper now has 2018 Slick Stock,, give him a fair star
Slickstock Kansas City, Mo
-
My wife's nightmare
- Posts: 355
- Joined: October 3, 2009, 8:22 am
- Location: Mooresville, NC
Re: Hexenschuss
There is a lot of your metal in this one!
I put four patches on that tube and wound up having to buy a whole new tire and tube!!! I still laugh about that. Thanks Cooper!!
Planning to go to Carlisle Ford show but I ain't bringing the wagon nowhere close to y'all!
I put four patches on that tube and wound up having to buy a whole new tire and tube!!! I still laugh about that. Thanks Cooper!!
Planning to go to Carlisle Ford show but I ain't bringing the wagon nowhere close to y'all!
-
JeffinMooresville
- Posts: 243
- Joined: January 23, 2018, 8:12 pm
- Location: Mooresville, NC
Re: Hexenschuss
Looking good Doug, going to be sweet. With the metalwork you did on that cab it looks like it just rolled out of the factory, really clean.
Jeff in Mooresville
63 Flareside and 65 Styleside projects underway
63 Flareside and 65 Styleside projects underway
Re: Hexenschuss
Looks great!
-
My wife's nightmare
- Posts: 355
- Joined: October 3, 2009, 8:22 am
- Location: Mooresville, NC
Re: Hexenschuss
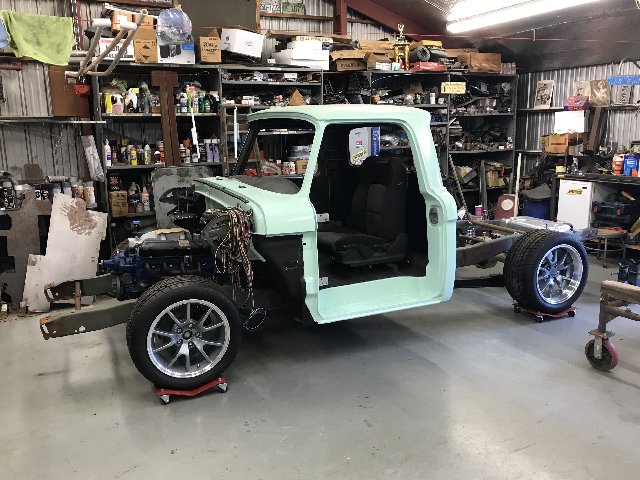
Thanks for all the kind words! Not much has happened since last weekend. My nephew has my cherry picker so we can replace the front wheel bearings in his tractor. Its a tricycle frontend so he wants to pick it up with the cherry picker. He just finished school last Thursday so we should take care of that pretty soon. Then I hopefully can get the cab off the rotisserie and on a cart so I can go get the frame.
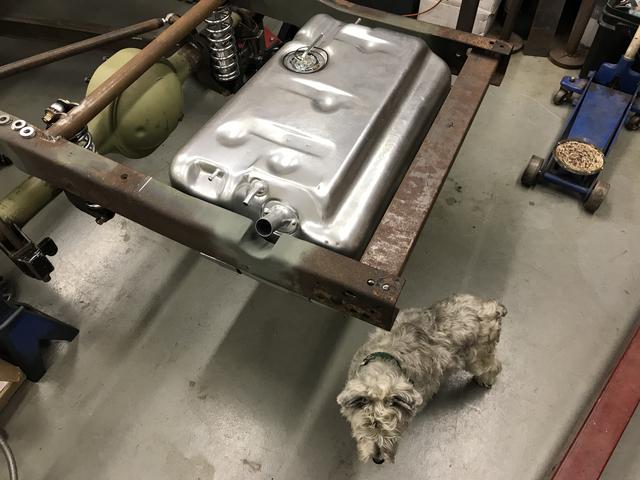
For the rest of y'all's sake, when we were at the AutoFair in Charlotte last April, I was visiting with Tom and Kathy and Cooper. I had my shopping wagon and Cooper began attacking the rear tires. It was really entertaining but Kathy made him stop. Tom has to use their handtrucks for something and that really set Cooper off. He and Tom wrestled with the handtruck tires for awhile and they told me they had to but solid tires for it because the dog kept popping the tube types. Tom put the handtrucks away and Copper realized my wagon was still there so he let the back tires have it again and this time he bit a hole in one of them! Kathy dragged him back into their trailer and I had to drag my wagon around with a flat tire. Next time I will have a spare with me!!
For the rest of y'all's sake, when we were at the AutoFair in Charlotte last April, I was visiting with Tom and Kathy and Cooper. I had my shopping wagon and Cooper began attacking the rear tires. It was really entertaining but Kathy made him stop. Tom has to use their handtrucks for something and that really set Cooper off. He and Tom wrestled with the handtruck tires for awhile and they told me they had to but solid tires for it because the dog kept popping the tube types. Tom put the handtrucks away and Copper realized my wagon was still there so he let the back tires have it again and this time he bit a hole in one of them! Kathy dragged him back into their trailer and I had to drag my wagon around with a flat tire. Next time I will have a spare with me!!
-
My wife's nightmare
- Posts: 355
- Joined: October 3, 2009, 8:22 am
- Location: Mooresville, NC
Re: Hexenschuss
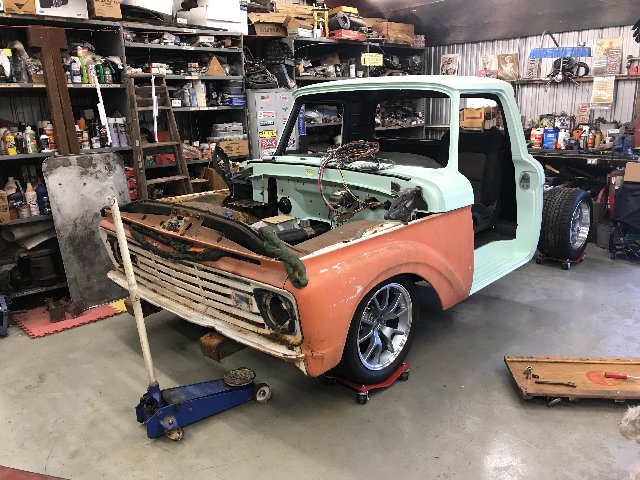
Amazing how quickly time passes. I have been getting odds and ends completed and should have been posting about them. No excuses except I just don't make time to do it. Finally got the frame back home first part of December. Cut the engine mounts off again to correct the misalignment from rushing the task the first time. Had to replace the oil pan with a double sump one after all of that, but the engine can be installed now without pulling and twisting and cussin and..… Fabbed a transmission crossmember but don't think I have a photo of it. Its not real pretty but it does what it needs to do. Have also been trying to get the fuel tank mounted. Its from a 67-72 Ch@%y, 20-some gallons. Its not as slim as a Mustang but I wanted more than a 15 gallon tank and the fill tube is on the side.
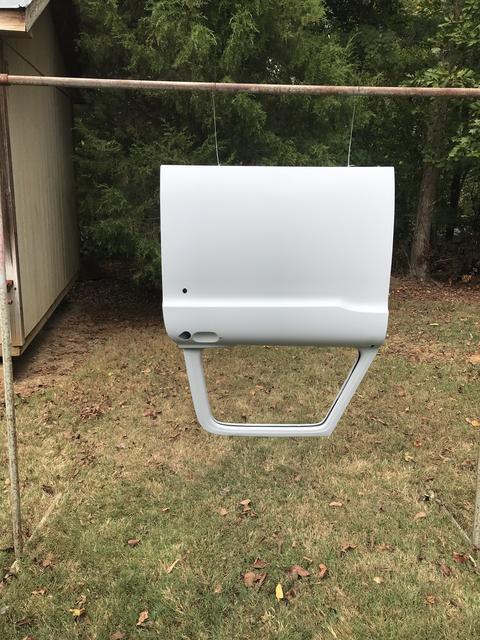
The doors are in epoxy, waiting for warm weather to paint them.
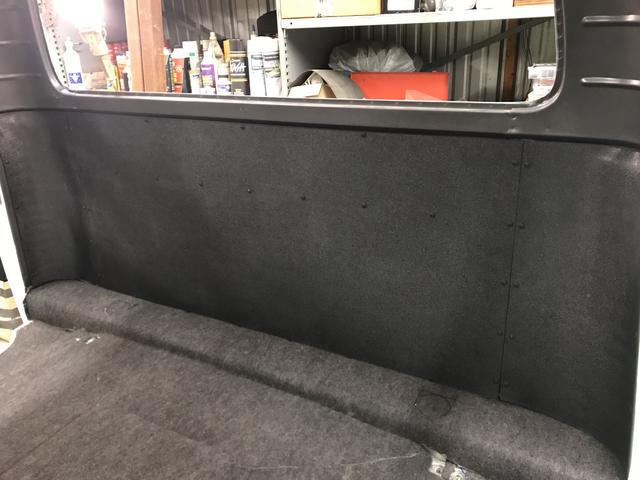
Also made a panel for behind the seats out of ABS.
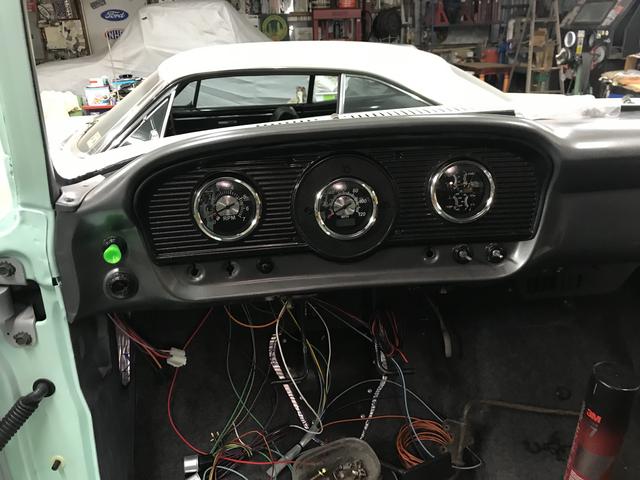
Instrument panel turned out ok, not real crazy about how the speedometer is "out of line" with the other two, but its wired and ready to go.
More to come, hopefully I won't take so long to update this thread
The doors are in epoxy, waiting for warm weather to paint them.
Also made a panel for behind the seats out of ABS.
Instrument panel turned out ok, not real crazy about how the speedometer is "out of line" with the other two, but its wired and ready to go.
More to come, hopefully I won't take so long to update this thread
-
JeffinMooresville
- Posts: 243
- Joined: January 23, 2018, 8:12 pm
- Location: Mooresville, NC
Re: Hexenschuss
Looking good, i really like the abs filler on back wall.
Jeff in Mooresville
63 Flareside and 65 Styleside projects underway
63 Flareside and 65 Styleside projects underway
-
My wife's nightmare
- Posts: 355
- Joined: October 3, 2009, 8:22 am
- Location: Mooresville, NC
Re: Hexenschuss
Got the cab and front Sheetmetal put back on in January and have been working on getting the wiring done. It was quite a relief that all of the holes and other things lined up after all of the rust repair! I'm using a universal harness from Speedway Motors and am overall pleased with it. It's taken awhile to figure out the contacts on the original switches but think I've got it sorted out. We'll find out when I get a battery put in it. Slow progress but marking something off just about everyday. Brake lines and fuel lines are next after the wiring is completed.
-
My wife's nightmare
- Posts: 355
- Joined: October 3, 2009, 8:22 am
- Location: Mooresville, NC
Re: Hexenschuss
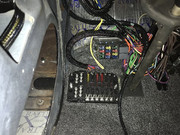
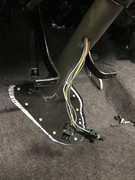
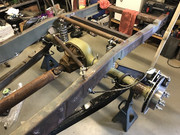
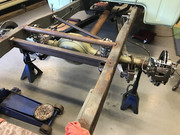
Time sure can fly by, I have been doing a little work when I get an opportunity. Most of the wiring is complete, only things left are the alternator (which I need to fab up some mounting brackets for so I'll know where the wiring will go) and the starter solenoid. The wiring took much longer than I expected, no one to blame but myself! The steering connection took several attempts as well but feel like it is good to go. The actual shaft in the column needs a little more trimming and a floor support needs to be finished as well as patching the original column support at the dash. It was cut into many pieces to help get the wheel where it was more comfortable. The park brake cables and brackets on the frame were reused and connected to the park brake levers on the rear calipers. I had cut the original crossmember out when the frame was boxed so there were several sets of brackets and mounting tabs made and then discarded before I had a functioning system. It definitely ain't pretty but should work quite well. The new rear axles are in place and it looks like I may have gotten lucky with my "geusstimating measuring" and the rear track should be just right to fill out the rear wheel wells. Last week I started running brake lines and have completed the run from the master to the rear axle. In the process of finishing the front passenger side and hopefully late next week the drivers front will be complete as well, then the fuel lines can get started.
This is the fuse panel that came with the wiring harness. I added the fuse panel at the bottom of the photo for some additional circuits that were not in the Speedway kit. It is a marine type panel from Amazon that is really pretty nice quality
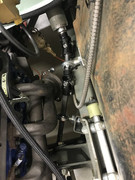
The turn signal switch wiring is converted to a weather-pack connector. The hole cover for the steering column is a "replacement" that I need another picture of that shows the lower column support.
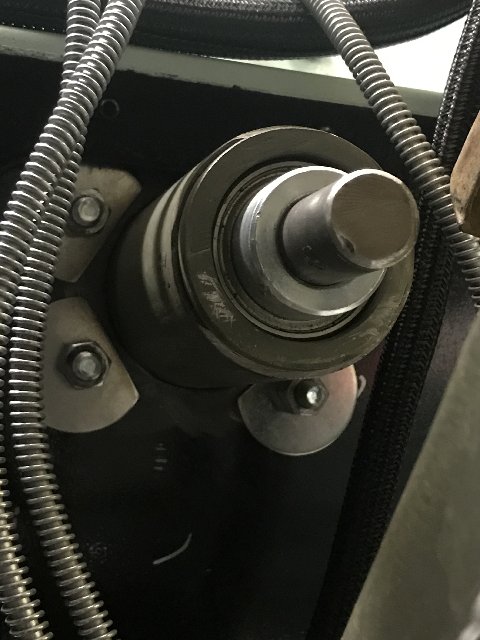
Here is my bundle of one snake that connects the column to the rack. It is surprisingly smooth turning the steering wheel even with the truck sitting on car skates. Keeping fingers crossed it will feel the same on the road:
The new park brake mounting location
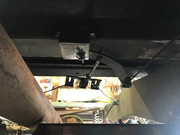
And a couple shots of the rear axle. The flex line from the axle to the frame hard line is missing. really need to do better with my photo documenting
This is the fuse panel that came with the wiring harness. I added the fuse panel at the bottom of the photo for some additional circuits that were not in the Speedway kit. It is a marine type panel from Amazon that is really pretty nice quality
The turn signal switch wiring is converted to a weather-pack connector. The hole cover for the steering column is a "replacement" that I need another picture of that shows the lower column support.
Here is my bundle of one snake that connects the column to the rack. It is surprisingly smooth turning the steering wheel even with the truck sitting on car skates. Keeping fingers crossed it will feel the same on the road:
The new park brake mounting location
And a couple shots of the rear axle. The flex line from the axle to the frame hard line is missing. really need to do better with my photo documenting
Re: Hexenschuss
Great looking truck man! Your metal work is clean and detailed. Looking forward to seeing it making some noise.
Did you get the rear disk brakes as a kit? I need to do something similar to the rear end of my '62.
Did you get the rear disk brakes as a kit? I need to do something similar to the rear end of my '62.
-
JeffinMooresville
- Posts: 243
- Joined: January 23, 2018, 8:12 pm
- Location: Mooresville, NC
Re: Hexenschuss
Looking good Doug. I didn’t know that the steering linkage had those stabilizers mounted to frame. This is probably why it operates so smoothly. I will have to put the biohazard suit on and come over and check it out. Jeff
Jeff in Mooresville
63 Flareside and 65 Styleside projects underway
63 Flareside and 65 Styleside projects underway
-
My wife's nightmare
- Posts: 355
- Joined: October 3, 2009, 8:22 am
- Location: Mooresville, NC
Re: Hexenschuss
The rear disc kit came from Summit Racing but the mounting bracket kit was from The Right Stuff Company. Its a nice kit overall and went together as hoped for. It does use GM calipers in case anyone has allergies!!
The supports for the steering linkage were quite a challenge for me but if I'd run a different style header there would have been much more clearance and a straighter shot to the rack.
The supports for the steering linkage were quite a challenge for me but if I'd run a different style header there would have been much more clearance and a straighter shot to the rack.
-
SteveCanup
- Posts: 1096
- Joined: November 7, 2014, 11:08 pm
- Location: Wytheville, Virginia
Re: Hexenschuss
Somehow I missed this build thread....fantastic build. I just sat here and read through the entire thread. As usual...I must what size wheels and tires are you running? They look great!
1964 F-100

-
My wife's nightmare
- Posts: 355
- Joined: October 3, 2009, 8:22 am
- Location: Mooresville, NC
Re: Hexenschuss
Steve, the wheels are for 94-00 Mustangs, 17x9 with 255/40/17 front and 17x10.5 with 315/40/17 on the rear. The offset of the rears worked out fairly good with the tape measure, haven't put the bed on to see if they actually are going to do what I think they will. Thank you for the kind words and your work is helping to keep me motivated!
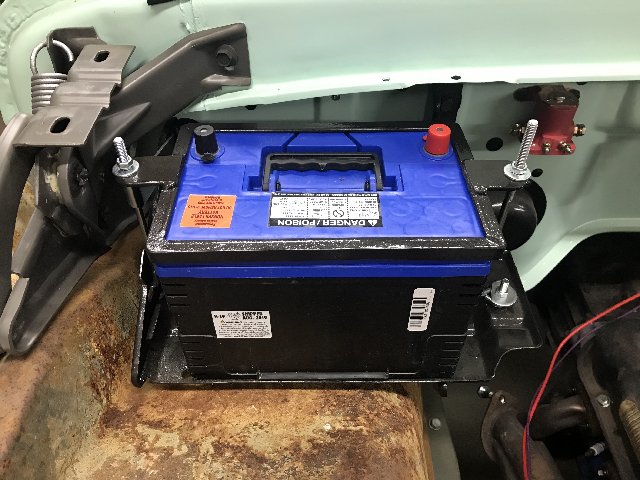
Last weekend I finally bought a battery to get ready to check out the new wiring. The truck didn't have a hold down or any hardware. The tray had a few holes that were cut out and patched and Flashbacks provided the hardware. I scrounged up some 1/2" angle and a couple pieces of plate and now I have a custom hold down for the new battery. And that is supposed to be wrinkle paint on the tray and hold down but it didn't wrinkle, just bubbled!!
Not a huge thing to show off but that was all I had time for over the weekend.
Hopefully this weekend I'll get the rubbers for the cab mounts straight finish up the steering column
-
SteveCanup
- Posts: 1096
- Joined: November 7, 2014, 11:08 pm
- Location: Wytheville, Virginia
Re: Hexenschuss
Great idea for the battery hold-down. I might try to make one like that...
1964 F-100
-
My wife's nightmare
- Posts: 355
- Joined: October 3, 2009, 8:22 am
- Location: Mooresville, NC
Re: Hexenschuss
The hold down was pretty easy, just cut a V out in the top edge so when you bend it, the cut sides are close enough to weld together. I clamped a 1/2" bolt in the vise and bent my pieces around it for a little bit of a radius. You could miter all of the pieces but it was faster for me this way rather than trying to line up separate pieces.
Found some shop time this weekend and tried to finish up some loose ends on the steering column. Didn't take a photo but most of the set screw holes are drilled in the shafts for the universal joints. Should be able to finish that tomorrow. Had quite a storm come up this afternoon so I packed up and went to the house to relax. I made a new plate to cover the column and clutch linkage hole in the floor, planning to run a hydraulic clutch so won't need a hole for any linkage. The column itself has been moved toward the drivers side for a little more room out around the engine and the original mount bracket has been chopped up quite a bit to get a better angle with the new bucket seats. Yes it will probably be comfortable only for me, but don't think many others will be driving it! I felt like I needed something to support the column when it passes through the floor so I made a lower mount and it turned out pretty good.
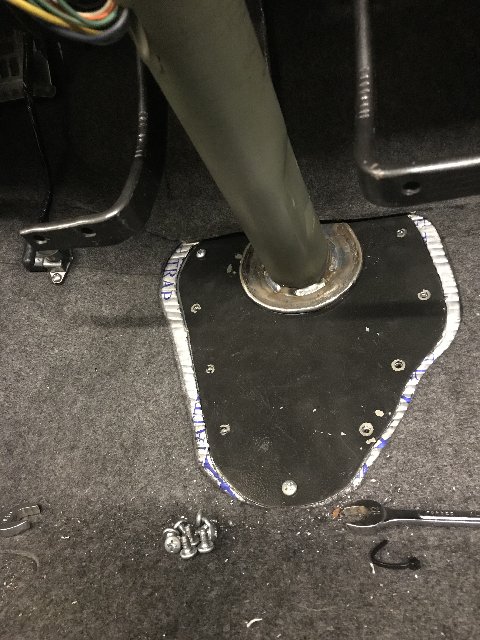
And a shot from outside underneath:
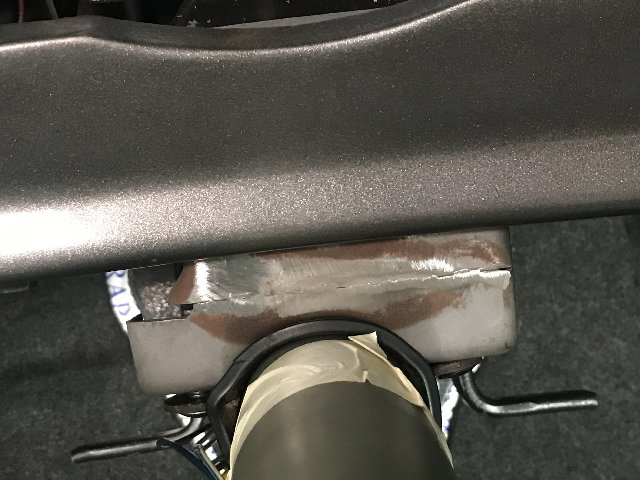
Since the column moved over, the mount under the dash required some surgery. Most of this was done months ago but I never went back to make it presentable. Left it in etch primer and still need to put some real primer on it, slick it up and finish paint it but another small victory
Yes a new tilt column would have been much easier but what is the fun in that???
Found some shop time this weekend and tried to finish up some loose ends on the steering column. Didn't take a photo but most of the set screw holes are drilled in the shafts for the universal joints. Should be able to finish that tomorrow. Had quite a storm come up this afternoon so I packed up and went to the house to relax. I made a new plate to cover the column and clutch linkage hole in the floor, planning to run a hydraulic clutch so won't need a hole for any linkage. The column itself has been moved toward the drivers side for a little more room out around the engine and the original mount bracket has been chopped up quite a bit to get a better angle with the new bucket seats. Yes it will probably be comfortable only for me, but don't think many others will be driving it! I felt like I needed something to support the column when it passes through the floor so I made a lower mount and it turned out pretty good.
And a shot from outside underneath:
Since the column moved over, the mount under the dash required some surgery. Most of this was done months ago but I never went back to make it presentable. Left it in etch primer and still need to put some real primer on it, slick it up and finish paint it but another small victory
Yes a new tilt column would have been much easier but what is the fun in that???
-
My wife's nightmare
- Posts: 355
- Joined: October 3, 2009, 8:22 am
- Location: Mooresville, NC
Re: Hexenschuss
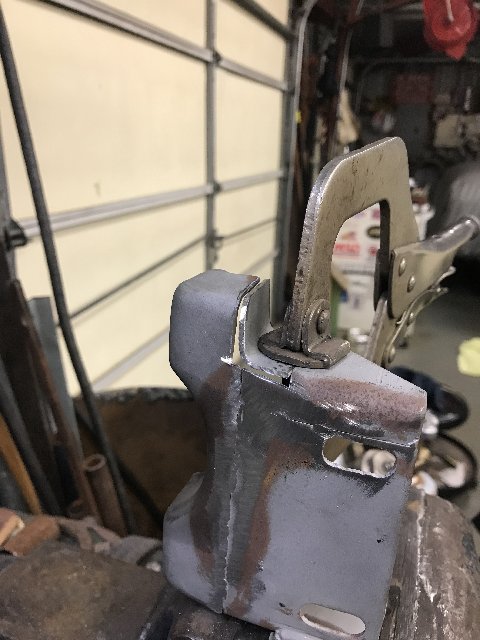
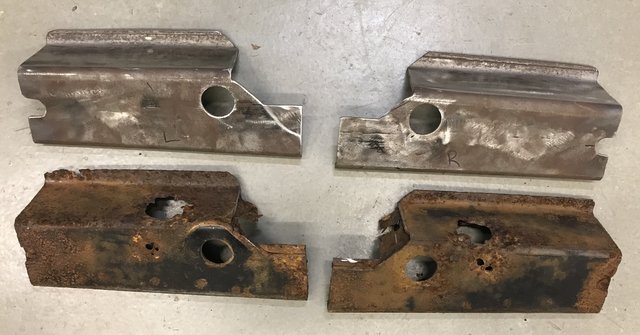
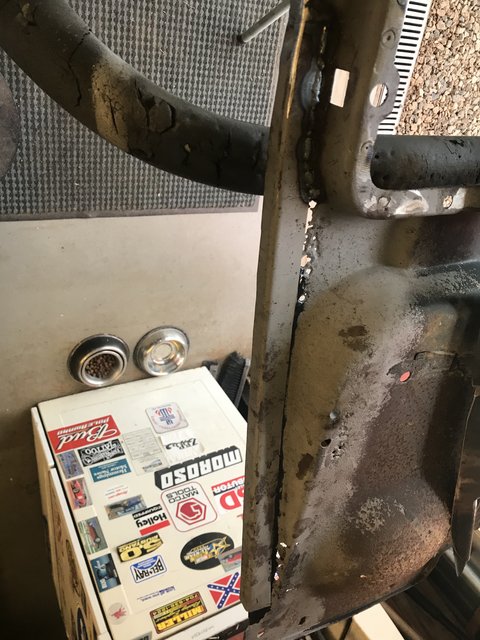
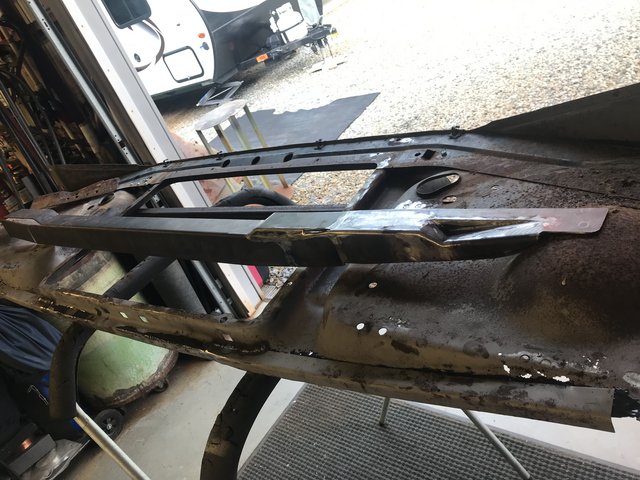
Ok I've really been slack about posting anything, but have been lurking every day and enjoying everyone else's posts. I have been working on the truck a little here and there. Took the front sheetmetal apart to remove the badly damaged radiator brackets on the radiator support so I can make new brackets for the new radiator. I really wonder how bad things happen to good trucks. How/why do you take an air chisel to the brackets holding your radiator in and then sheetmetal screw some tabs on to hold the radiator back in???? Anyway. the spotweld cutter came out and all of that was removed BUT then I started looking at what was left of the lower portion of the radiator support and thought "might as well fix this while its on the table"! Had a piece of 3" square tubing that became these: (The new ones are on the top  )
)
20 gauge broke in an "L" to patch the lip on the front side and used panel adhesive to attach since there was not a lot of good metal to try welding to. You can barely see a section in the photo below. These were about 20" long on each side.
Then had a 6' piece of 14 gauge broke into an "L" to make the brace along the rear. Pretty much finished with the right side, just started on the left end today. This is an in-progress pic of the right side. I will get more photos, thought I had more, duh!!
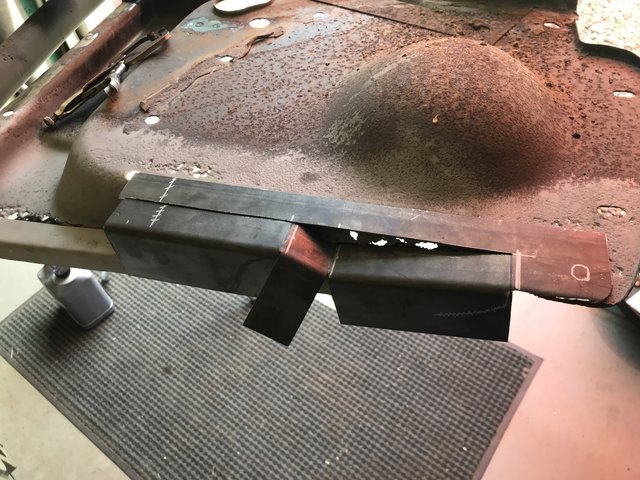
Of course I could have bought a new one but they're almost as much as the truck cost at the start of all this! And labor is cheap at the shop I'm using so why not fix what you got.
20 gauge broke in an "L" to patch the lip on the front side and used panel adhesive to attach since there was not a lot of good metal to try welding to. You can barely see a section in the photo below. These were about 20" long on each side.
Then had a 6' piece of 14 gauge broke into an "L" to make the brace along the rear. Pretty much finished with the right side, just started on the left end today. This is an in-progress pic of the right side. I will get more photos, thought I had more, duh!!
Of course I could have bought a new one but they're almost as much as the truck cost at the start of all this! And labor is cheap at the shop I'm using so why not fix what you got.
-
My wife's nightmare
- Posts: 355
- Joined: October 3, 2009, 8:22 am
- Location: Mooresville, NC
Re: Hexenschuss
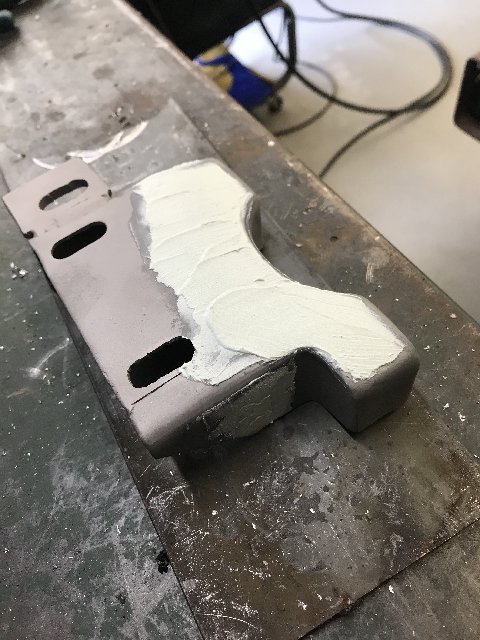
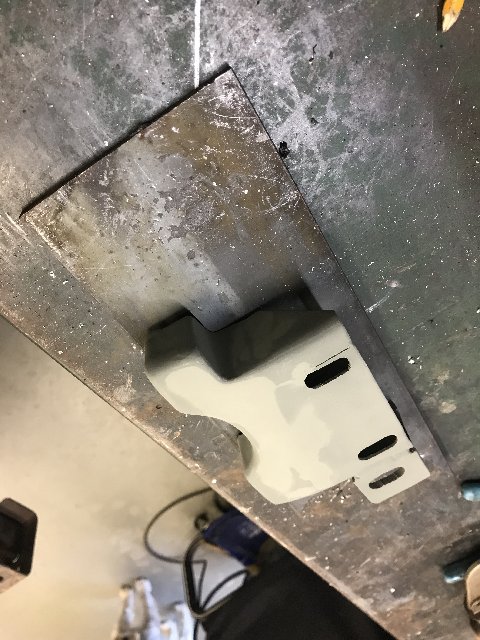
Ok, apologies ahead of time as I am not a photographer. Here are a few more shots of some of the patchwork for the bottom quarter of the radiator support.
This is a little better shot of the 20 gauge pieces that were glued to both ends.
Left side
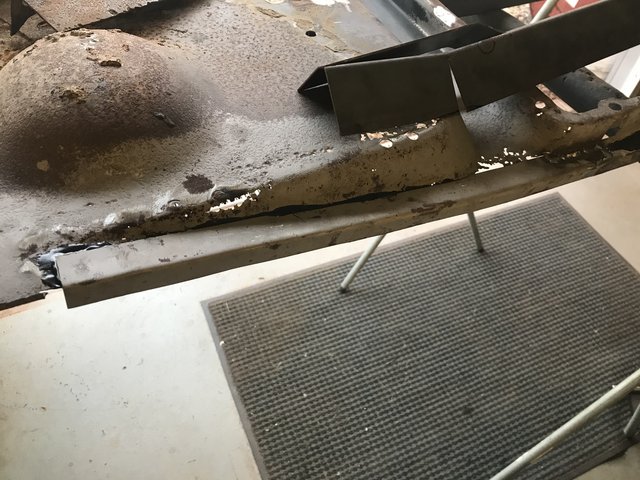
Right side
And the still not completed 14 gauge piece that will run along the backside
Hoping to get a little break with the heat and rain to blast the rest of the radiator support so I can spray some epoxy on it all, get the new pieces attached, and start figuring out brackets for the radiator. Oh yeah and repair all the other rusted out spots above the new patches!!
This is a little better shot of the 20 gauge pieces that were glued to both ends.
Left side
Right side
And the still not completed 14 gauge piece that will run along the backside
Hoping to get a little break with the heat and rain to blast the rest of the radiator support so I can spray some epoxy on it all, get the new pieces attached, and start figuring out brackets for the radiator. Oh yeah and repair all the other rusted out spots above the new patches!!
-
SteveCanup
- Posts: 1096
- Joined: November 7, 2014, 11:08 pm
- Location: Wytheville, Virginia
Re: Hexenschuss
Doug...it looks good. My radiator support was just like that. Solid except the for bottom outer edges. I pretty much did the same as a new support costs a kidney...lol. I appreciate the work that you are doing, rather than toss the part, you found a way to fix it and continue to use it. That's what this is all about. I might have to cruise down to the Mooresville area at some point in the future. I was in Salisbury (where I used to live) just last week. My oldest daughter is expecting to give birth to a baby boy...any day now. My son-in-law has a patina'd blue and white '66 sitting in his garage that is wasting away right now.
Anyway...keep the updates coming! They keep me motivated too!
Anyway...keep the updates coming! They keep me motivated too!
1964 F-100
-
My wife's nightmare
- Posts: 355
- Joined: October 3, 2009, 8:22 am
- Location: Mooresville, NC
Re: Hexenschuss
Steve, I wish I'd known you were in the area, we definitely could have visited. I'm on the Salisbury side of Mooresville anyway. You are welcome anytime y'all are back down this way. (I'm trying to figure out where this blue & white pickup is at!! )
I'm getting closer to finishing up the radiator support, hopefully make some progress over the weekend, we'll see. You're keeping me going on this thing so thanks!!
I'm getting closer to finishing up the radiator support, hopefully make some progress over the weekend, we'll see. You're keeping me going on this thing so thanks!!