Page 12 of 53
Re: my shipwrecked '63
Posted: June 24, 2016, 6:49 pm
by shipwrecked
didn't do any welding this week. just cleaned up the garage a little and decided to clean up my engine parts. I had neglected the fly wheel for a while, but put a good amount of elbow grease on it.


Then out of the blue, we had a serious storm hit the community I live in, and I am about to lose two trees in my yard, one of which will fall onto my house and my garage. 80MPH Sideline winds, torrential down pour, and thunder/lightning. They classified it as a microburst.


I spent as much time I could in the little free time I had to move all the body panels I could fit out to my yard shed (lawnmowers pushed outside) and then brought all the parts from the upstairs of my garage to the bottom floor. If the tree falls, it will definitely hit the up stairs section and could possibly take the whole garage down. This is not a small tree! There is a giant widow maker that broke off from 40 feet up, and is wedged inside the fingers of the tree.

The root system of this tree was lifting out of the ground. Like a heart beating! It may not be easy to see, but the brownish color in the ground is actually where the ground lifted, and settled again. The whole tree is leaning towards the garage and there is a disturbance of two feet from the roots lifting out of the dirt. The grass is just a thin skin holding on.

I have to wait till 1 July before the trees come down. They just need to hold on and I need to be calm. I would be a bit devastated if I lost my garage to this tree and the equipment and vehicle pieces inside. I have no where else to put them right now. I may go rent a big trailer and load it all and park it at the base. But there doesn't appear to be any rain in the forecast till Tuesday. Its the wind I worry about. We get some heavy winds in the area all the time.
Re: my shipwrecked '63
Posted: June 25, 2016, 8:33 am
by unibody madness
Be safe! if you can move stuff away from the tree I would, even if it was out in the rain.
Re: my shipwrecked '63
Posted: June 28, 2016, 7:00 am
by shipwrecked
Still need a few days till I get these trees cut down. I haven't gotten any work done in the garage. I barely could walk on Saturday and I spent all day at work Sunday. I am going to be overworked again this week, but I am going to see about taking all of next week off to work on the house, yard and truck.
I did get a package from SMS yesterday. I was a little disappointed that I didn't get my full order. I got the vinyl that will go on the skirt and back side of my seat. I am waiting for them to ship me the embossed section.

Re: my shipwrecked '63
Posted: July 1, 2016, 8:09 pm
by shipwrecked
will be back in the garage tomorrow!

Re: my shipwrecked '63
Posted: July 3, 2016, 8:03 pm
by shipwrecked
the cleaning and organizing began

Re: my shipwrecked '63
Posted: July 5, 2016, 7:06 am
by shipwrecked
Did some cleaning up in the garage- I moved the small stuff back upstairs in the garage and pretty much just left the big panels down in the outside yard machine shed.
I started doing some purchasing on Sunday night. $400.00 on door parts- the anti-rattle kit, some vent window rubber, lift channel, cab pad kit etc. It doesn't take long for me to blow my paycheck on this truck. I am at a point of no return... I have spent thousands of dollars on parts, hundreds of hours on this project that if I were ever to sell it, it wouldn't be near the selling price I put into it. A labor of love, a labor of stress (both relief and cause of) and a feeling of accomplishment.
I need to go buy some slicksand or high build primer so when I get to that point I won't be stuck waiting. I may drive up to EHT today before a mandatory meeting at work. I am on leave, but the meeting is all hands on deck.
I started to work on the last small patch on the floor, but wouldn't you know it- 10 minutes into the job, I ran out of wire!
I need to get more wire and fabricate a small patch for the rounded corner of the floor pan.

When I finish the floor pan today, I will start on my back corners. The cab supports are done, the passenger side floor is done, the steps and remaining floors are good. Time to finish up the bottom of the cab so I can put the undercoating on, and begin on the cab roof!
Re: my shipwrecked '63
Posted: July 5, 2016, 8:37 am
by SteveCanup
Looking good....if you do it right (which you are) you will have more in the truck than you will be able to get out of it...
Re: my shipwrecked '63
Posted: July 5, 2016, 8:09 pm
by shipwrecked
finished filling holes in the cab floor. I am going to start the cab corners tomorrow. I honestly am not going to waste a lot of time grinding down my welds on the floor. I will clean them up, but I am going to be putting a insulation and sound barrier on the floor. On the underside I am using a tinted bed liner.
Cab corners, then roof.. This is the portion on the roof that needs fixing. Both sides are like this.

Re: my shipwrecked '63
Posted: July 6, 2016, 6:57 am
by bruceandersson
If I recall your truck was from out west wasn't it? That's the famous roof rot that comes with so many ford trucks built in San Jose. Whomever was in charge of painting the trucks never painted the inside of the roofs. Its the only area where our midwest rust belt trucks tend to be more solid than western trucks. Should be an easy fix based on everything else you've done.
Re: my shipwrecked '63
Posted: July 6, 2016, 7:20 am
by shipwrecked
Yes my truck was built in San Jose, and it spent it's life in Oregon. wet wet raining Oregon... I took it to Washington for two years, and in New Jersey for a year. The roof rot is right where an inside pinch weld brace/ what ever it is... is barely touching the roof skin. It was never painted inside the cab roof. It was full of surface rust when I got it, and in the three years I have owned it, it got worse. I will be working on cab corners today. That will allow me to get the cab back outside soon, sandblast the bottom again, and then get epoxy on the bottom. Once epoxy is on there, I will mix up my undercoating tinted bed liner and get that painted on there. I still need to go drill a hole in the cab support on the passenger side. The support is in place, welded and steady... gotta put the hole in there.
I feel I am finally getting somewhere! I want to move on it faster, but this week being off work has not been any free time with being called back in for an important issue. It is a sensitive subject but I have to go in.
Will post more pictures of the progress soon! BTW- who would have guessed 96 people would subscribe to my youtube channel watching this build. I started doing update videos for my family/friends a year ago, and now it grew to people all over US / Canada watching.
Re: my shipwrecked '63
Posted: July 6, 2016, 7:42 pm
by shipwrecked
started directing the cab corners this afternoon.
This is the driver side.

And the passenger side

I did fill these holes inside the passenger side.

I took the remaining bit of chassis saver i had left and painted inside of the cab corners (original metal) and I scribed out the new cab corner pieces.
Tomorrow is a wash- I will be at work from 0400 until who knows what.
stay tuned for more.
(bought some slick sand primer filler today too... getting ready!
Re: my shipwrecked '63
Posted: July 9, 2016, 7:24 pm
by shipwrecked
Got the driver side cab corner installed, and about 85% of the passenger side on. I stopped without finishing because I keep blowing holes through the panel on the passenger side. The gas on my welder is acting up which happens when I am getting low... I will need a new bottle this week anyway.


in the mail today i got my embossed section of my upholstery from SMS out in Oregon.

I didn't get as far today as I had hoped. I had to go to work for the memorial service for our Recruit who passed away this week. I know all about it- I was right next to him when he went down. I would prefer not to discuss it- just know that he saved someone else life by donating his organs. It's been a tough week.
Re: my shipwrecked '63
Posted: July 10, 2016, 6:46 pm
by shipwrecked
I finished welding up the cab corners and took the cab out back for blasting it.
Got it blasted, but of course it was 100 degrees out and I blew threw a 50 oz bottle of water, 12oz gatorade, and a 20 oz coffee... Im still dehydrated.
I put epoxy primer on it as well.

\
Since I was out there anyway, I took the core support out of the shed and blasted that as well. What a pain that was. I blew thru a pipe nipple on my blaster and had to stop and run down to the ACE hardware to buy a new one.
Anyway, a coat of epoxy was sprayed on it as well.

Re: my shipwrecked '63
Posted: July 10, 2016, 6:57 pm
by SteveCanup
Looks Great! Good job! ....and be careful in that heat, it can kill you.
Re: my shipwrecked '63
Posted: July 17, 2016, 7:18 pm
by shipwrecked
did some seam sealing the other day. I used Eastwood's crushable seam sealer on all the under cab joints.

Here is a big F-up. I ordered Medium Quartz Grey monstaliner a month ago and when I put it on the bottom of the cab, I saw it was OD green... I am getting it straightened out. It needs two to three coats, this is only one coat anyway. I will get the right stuff this week.

Decided to do some more sand blasting on the inner fenders and the valances.

Got them all cleaned up and got a fresh coat of epoxy on the inner fenders... Only issue I have is in the passenger fender below where the battery goes. It was rust held on by POR 15, and when I blasted, it flaked right off into this hole. The entire section will need to be cut out and replaced. It is paper thin and pin holed.

In less than one week, I received my rebuilt harmonic balancer back looking brand new from Damper Doctor. They accepted two "cores" back from me I pulled from old engines, and gave me credit for them. I paid about 160 for the rebuild service, but credited 60 for the cores.
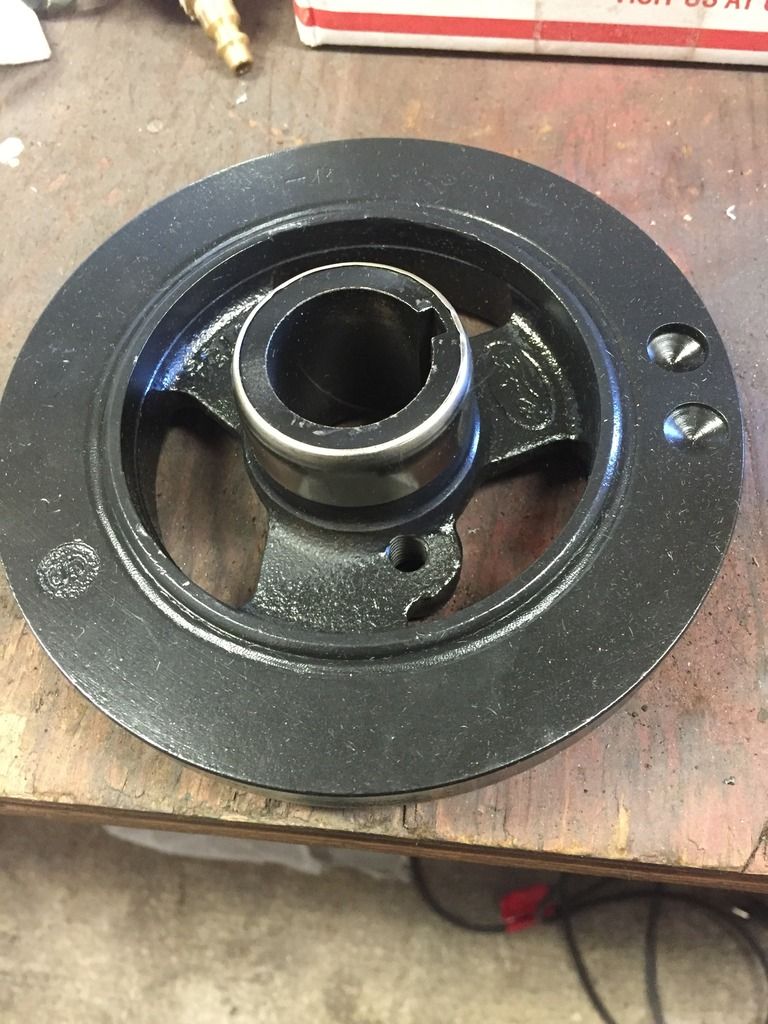
Next- I need more blasting grit from Tractor Supply. I had used all that I have multiple times. I need to do maintenance to the blaster, as the hose is rotting and the pipe nipples are worn thin from the grit hitting them. The valves need replacement and I need to drain it out to get the debris out. It happens when you recycle the grit (despite using screen to catch the debris).
Stand by for more. I am taking tomorrow off to do more work in the garage.
Re: my shipwrecked '63
Posted: July 18, 2016, 3:49 pm
by shipwrecked
Todays progress is slowed by the heat!

It was 100 degrees in the garage. and 105 in the sun. UGH. Felt like I was back in the Kingdom of Bahrain.
Anyway, I did go buy more grit, and I put the valances in Epoxy primer.


Tomorrow I want to try working on that roof of the cab. Its due...
Re: my shipwrecked '63
Posted: July 21, 2016, 7:42 pm
by shipwrecked

misc pieces drying. I got the replacement undercoating in the mail today. I plan to work on that this weekend.
Re: my shipwrecked '63
Posted: July 21, 2016, 8:55 pm
by grump
Nice hang system. Beats having to find some where to hang all the different wires individually. You're doing great April.
Re: my shipwrecked '63
Posted: July 24, 2016, 2:58 pm
by shipwrecked
wanted to do some interior cab seam sealing today, but the tape wouldn't stay on. Its so nasty hot/humid out.
Anyway, I did do some quick block sanding to find some hi-lo spots and do a little filling. I will sand that down so I can put another coat of epoxy on.
A lot of the highs, are due to factory imperfections I bet. There are little dings (coming outward) from behind where the fuel tank support is, and a few behind the upper rear cab supports (those flat pieces in the rear blind spots where you would mount the upper portion of a seat belt)

ran out of welding gas- so Im stuck with the roof holes for a little bit. I will make the drive up to Atlantic City in a few days if I can.
Plan for Tuesday morning is to put the correct Monstaliner on. It came in the mail the other day, and I got refunded some money from the messed up order. I sent the picture to them, and that was good enough to show. I think it was awesome they did that, I didn't even ask for a refund.
Re: my shipwrecked '63
Posted: July 24, 2016, 8:26 pm
by shipwrecked
I quit at 3 pm today cause it was so hot still. At 6, I went back out and though it was still as hot, I decided to put some coveralls on and sit down to do some sanding.

Since there was so much exposed metal, and it's humid as heck out right now- Thunderstorms expected again... I threw a quick coat of epoxy on it. I need to go up and buy more- but its expensive.


 I spent as much time I could in the little free time I had to move all the body panels I could fit out to my yard shed (lawnmowers pushed outside) and then brought all the parts from the upstairs of my garage to the bottom floor. If the tree falls, it will definitely hit the up stairs section and could possibly take the whole garage down. This is not a small tree! There is a giant widow maker that broke off from 40 feet up, and is wedged inside the fingers of the tree.


