Thanks for the kind words, Kevin.
I'll explain why I cut where I did. I don't think you need a template to make the cuts. After doing a lot of measuring and trying to decide where crowns started and stopped on each piece, I came to the conclusion there is only one sane place to cut them all from front to back, it would have to be a pair of straight cuts in from the edges joined by an angled cut between them and no measurement from the top edge to bottom edge mattered. They were all totally different there.
I'll explain that last bit first. If you cut 2 inner fenders entirely in half and join the front half of one with the back half of another, you are not changing the top to bottom measurement on either piece, just line up the edges the best you can and soldier on! You could possibly change the crown a small bit to help with the gap but then the edges will not line up. I felt the edges were the control and I could make the crowns meet, eventually, with some relief cuts and hammer work.
Where did I start? Start with the big truck inner fender.
If you look at the big truck inner fender, there is a large flat pad that takes up the majority of the front portion of the fender. That is where the regular inner fender bulges in towards the radiator. Same area the regular fender has a smaller flat spot for the regulator to mount. For what I want in the end, It will be a lot easier to re-crown the regular inner fender to produce a uniform crown top to bottom (in the regulator pad area) than it would be to tackle the big truck inner fender in that area. Looking at the back edge of that large flat spot, it makes a small reverse radius back down to join the "normal" contours of the inner fender. That was my main control area. Another control area is the top edge where the fender bolts to the inner fender. That has to stay straight and maintain it's normal contours or your fender won't fit. That was the hardest part to get right for me. The bottom edge really didn't matter where it was cut as long as I avoided that large flat spot mentioned above.
My measurements: All are in inches and I measured all 3 inner fenders I had. All were straight and original with no damage. The big truck inner fender is listed first and then followed by the previously modified fender and an untouched original fender.
Top edge of inner fender, front to back = 38-1/8, 38-3/16, 38-1/4.
Bottom edge of inner fender, front to back = 42, 42-1/4, 42-3/16
Center of the third slot back for fender mounting on the top flange = 14-1/4, 14-1/4, 14-1/8
There are obviously production tolerances at work here. I picked a number to work with in each instance.
That was all of my control measurements. Everything else I tried to measure I could not reproduce my results time after time. The corner to corner distances were all over the place, no common holes for attaching items to the inner fenders checked out.
My controlling items were now this:
38-3/16" from front to back at the top edge
42-3/16" from front to back at the bottom edge
I would maintain the 3rd slotted hole by cutting around it instead of thru it.
Where to cut? Came out pretty clearly when looking at all the pieces. I decided to cut the piece I wanted out of the big truck fender and use it for the template on where to cut the stock fender.
Top cut: 14" back from the front edge I cut 7" in from the outside edge at a right angle to the outer flange of the inner fender.
Bottom cut: 23" back from the front edge I cut 11" in from the outside edge at a right angle to the outer flange of the inner fender. (Note: that is from the bottom of the actual inner fender, it is not from my existing notch, it's from the original factory bottom edge of the inner fender.)
Once you make those 2 cuts in from the edges, you join them with a straight cut from end of cut to end of cut. This cut will be diagonal across the inner fender. You now have your pattern for the cuts on the stock inner fender. The other thing I did was move the top edge cut back 2" to avoid the slotted fender mounting hole. I cut in to the edge of the step, and cut forward to the original cut. That gave me a small step at that joint but it saved the slotted hole.
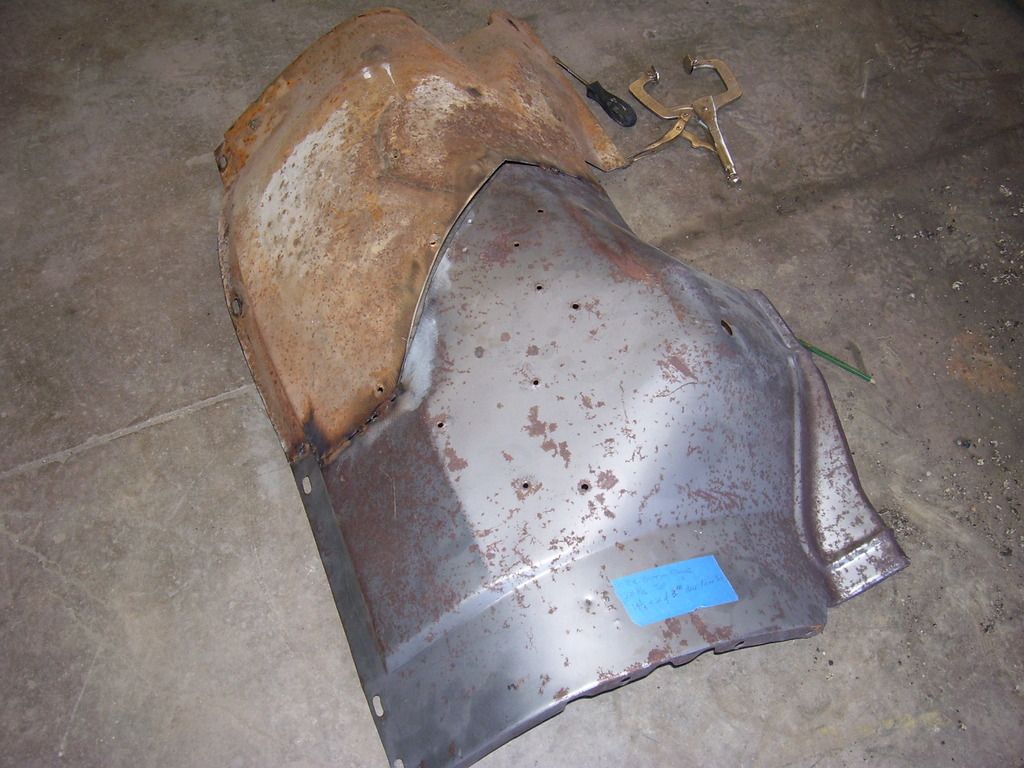
I just used a series of clamps to clamp that piece over the top of the stock inner fender. I cheated it towards the back edge of the stock inner fender about an eighth of an inch. Once everything was clamped tight, I used the edge of the big truck piece to guide me as I cut along it and cut thru the stock inner fender below it. I now had 2 matching edges. Butt those edges against each other and clamp them together. This took as long as anything else. I decided my main concern was keeping that top edge straight so the fender bolted in correctly. In hind sight, I probably should have bolted my 2 pieces to the fender and used the fender as a jig to make sure they were straight at that flange. What I did was use a stringline along that edge after tacking it in place. I cut it apart a few times before I was happy with the line of the edge of the fender along that top edge.
Once I was happy with the top edge and had it clamped in place, I lined up the bottom edge and clamped it. My bottom edge was simple since I joined it back together where the notch is cut out for the Dakota upper a-frame. Don't know what the bottom edge would look like if you had the stock lower edge to contend with. I knew before I cut it all apart that the 2 pieces had a slightly different crown in the area there were going to meet in the middle. No way around that. Then it's a normal clamp and tack operation covered in the pictures.
I considered cutting out a portion of the stock inner fender and leaving all the edges all intact so I didn't have to do much measuring, the fender line stayed in tact and the whole thing would fit together easier (possibly). The biggest drawback to that is you would have 4 times the welds to make. Decided against that.
I have more pictures and can get more measurements if you need them. That was my logic(or lack thereof).
SPark


