Page 1 of 7
Progress is good...
Posted: January 28, 2009, 8:27 am
by jwh f-100
Here’s Sylvia.. My “10 footer”… Show winner, No way. Just someday want it to be a nice little cruiser.
This is where I started. The only thing I added was the wheels.

Then the wood box had to go. Box chop in progress.

Cleaned up the frame and added a mustang tank. Thanks Uncle Skip. I plan to change the mounting a bit.
[albumimg]2620[/albumimg]
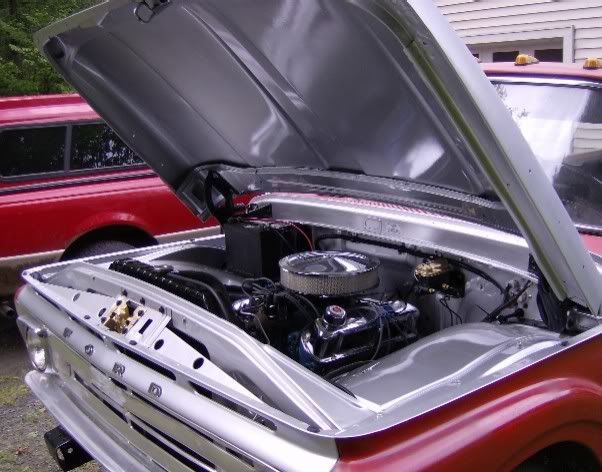
Pulled the engine and painted under the hood.
Before -
[albumimg]3364[/albumimg]

Now - ( too bad it knocks

)

All new brake parts. Front to rear.

Exhaust with headers, Thrush glass packs, crossover, and dual exit in front of rear wheels.

Rewired complete truck.


New (to me) CC dash


Now

To do list.
Repair/replace engine.
New bed floor
Interior. Seat, carpet, all new door seals.
Steering / suspension.
And hopefully someday paint it.
Posted: January 28, 2009, 9:24 pm
by 65f100_Thug
hey what kind of master cylender is that? I have a reman just like it still in the box. IT was in a bunch of stuff i got at a yard sale with a bunch of new old stock parts. Looks like i will have to drill holes in the firewall on my 65 then maybe hook right up with the ols rod. RIGHT?
Oh by the way your truck is looking good ,been admiring the wrong box cut down for a while.... . . . .Thug.
Posted: January 28, 2009, 11:57 pm
by BackyardRest
Very Nice! Gotta love the Silver Red paint combo too.
Keep up the pic postin'
Posted: January 29, 2009, 7:29 am
by jwh f-100
65f100_Thug wrote:hey what kind of master cylender is that? I have a reman just like it still in the box. IT was in a bunch of stuff i got at a yard sale with a bunch of new old stock parts. Looks like i will have to drill holes in the firewall on my 65 then maybe hook right up with the ols rod. RIGHT?
Thug, it is a '70 f-100 drum/drum MC. Ask around but I don't think you need to do any drilling. All you should need to do is shorten the rod that comes with the new MC.
BackyardResto wrote:Gotta love the Silver Red paint combo too.
Yeah, I do like the red and silver together but I am going with.......
all silver

but strongly leaning to black and silver. HHHMMMMMMMM

Posted: January 29, 2009, 9:55 pm
by ezernut9mm
you do good work jason! i like the silver/red combo too.
Posted: February 5, 2009, 7:47 pm
by jwh f-100
Good weather heading our way.... Saturday will be the first day in months spent with the slick......Sorry for the nothing post but I'm stoked..
I like.... I got the intake from Donnie (Racerx) and the carb is from ebay


Posted: February 5, 2009, 8:40 pm
by ezernut9mm
i thought that your engine bay already looked pretty good, but it looks like it's about to get better looking under there.
Posted: April 2, 2009, 12:33 pm
by jwh f-100
Well if all goes well I'll be working on my bed this weekend. I'll be starting with the rear crossmember. It needs to be completely rebuilt.
Here is the plan, see pic below..
The green is my rear bed pillars.
I will be sliding 3" x 3/16" wall square tubing up inside the pilar. The tubing will be cut to make a 2" x 3" C-channel with a step at the bottom. The open end of the C-channel will face center. The new rear crossmember will be made with two 1 1/4" square tubes welded together. The x-member will fit between the flanges on the C-channel. A 1/8"gusset will also be added. The gusset and the two square tubes will add up to the interior dimensions of the C-channel. The channel, gussets, and tubes are black in the pic.
Next a repair section will be added to make the rear x-member appear stock. Red in the pic.
Then the roll pan will be added. Blue in the pic.
I am still unsure where the plate will go..
http://i269.photobucket.com/albums/jj59 ... edrear.jpg
Posted: April 2, 2009, 1:49 pm
by Greg D
Jason, you do some real nice work! I love the box conversion too. the wheel arch has the "balance" that the long Unis have, I wonder how many people look at it and wonder what is "different" with it. The Silver will be beautiful!
Posted: April 3, 2009, 7:23 am
by "Whitey Ford"
That engine bay is beautiful. Very nice truck
Posted: April 4, 2009, 7:06 pm
by jwh f-100
Added braces to keep thing square

parts for repair..

parts installed

rear panel installed

Posted: April 4, 2009, 9:12 pm
by twistedfreak
very nice looks good
Posted: April 5, 2009, 7:06 am
by racerx1699
Very nice Jason, keep the pic's coming
Posted: April 5, 2009, 8:50 am
by Gritsngumbo
Jason: Thanks for sharing the pics. You didn't get rid of that wooden bed did you? Would look cool on my crew LOL.
Posted: April 5, 2009, 2:49 pm
by jwh f-100
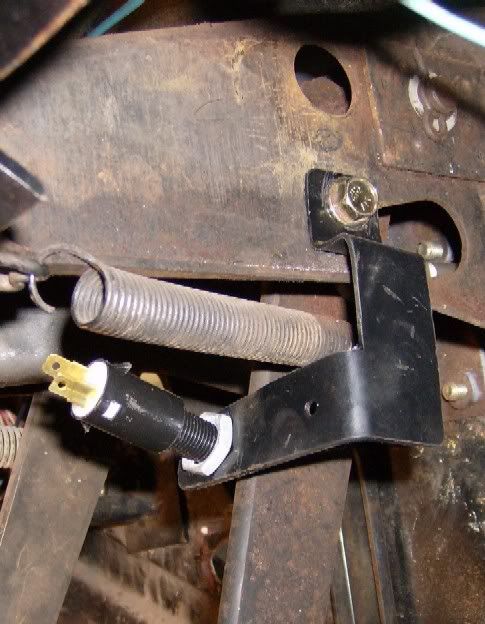
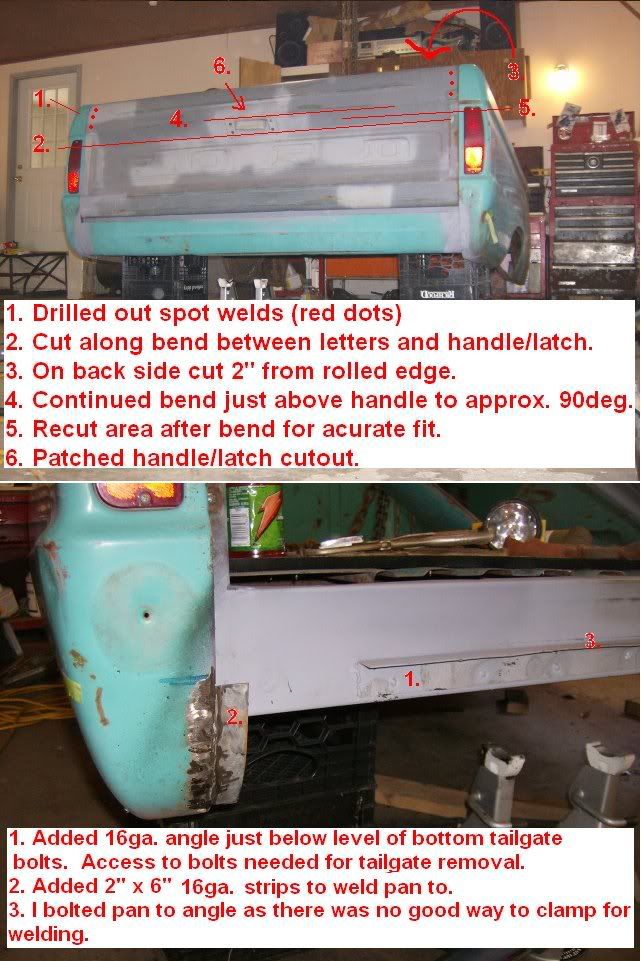
I ended up making a roll pan from a otherwise shot tailgate. I realy like the seam on the roll pan. I'm still not sure what I'll do for the plate.
Brackets added to attach roll pan.

Pan installed.

Support braces removed and tailgate installed. The tailgate closes.... Bonus. LOL

Posted: April 5, 2009, 4:28 pm
by twistedfreak
looks very nice man like your idea on the roll pan going to go out and do some thinking like your idea very much
Posted: April 5, 2009, 4:58 pm
by Fanatic
That body line in the roll pan really works, Jason.
Posted: April 5, 2009, 5:16 pm
by jwh f-100
Gritsngumbo wrote:Jason: Thanks for sharing the pics. You didn't get rid of that wooden bed did you? Would look cool on my crew LOL.
The bed is yours IF you promise not to say the word CREW... I just started to get it off my mind. LOL
twistedfreak wrote:looks very nice man like your idea on the roll pan going to go out and do some thinking like your idea very much
I can't take credit.. But, YAH, you should consider doing something creative with your slick.

LMAO
Posted: April 6, 2009, 9:18 am
by crey
Hey man, that roll pan looks killer!
Do you have any pics of what you did to get that on there?
What part of the gate did you cut to get that exact result?
Posted: April 6, 2009, 11:47 am
by jwh f-100
crey wrote:Hey man, that roll pan looks killer!
Do you have any pics of what you did to get that on there?
What part of the gate did you cut to get that exact result?
crey, It is the top edge of the tailgate...
