

cool cool - i like what your doing - really like the movement of the axle c/l forward - cant wait to see the steering box relocation job
you are so selling me on a straight axle swap - cheap is something i likkie
10 deg of caster would make it a beast to turn on the street? I suppose you want it to track really straight...
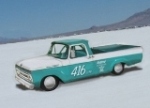
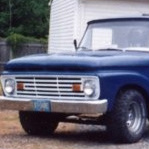
'62 Unibody LSR
-
unibody madness
- Posts: 2147
- Joined: December 4, 2008, 4:33 pm
- Location: Paradise,CALIFORNIA 95969

Thanks for the clarification. I certainly understand the need to clear the decks in the garage, I spent twenty years in a job that I only just managed to get through because of the sawdust therapy I practiced in the garage. Now I work mostly on my unibodies and my sons stepside to get my kicks
John
John
Turk build thread at:
http://slick60s.com/viewtopic.php?f=32&t=18944
It does not matter what you think, it only matters what you do about it!
http://slick60s.com/viewtopic.php?f=32&t=18944
It does not matter what you think, it only matters what you do about it!
-
62bigwindow
- Posts: 408
- Joined: December 27, 2009, 6:03 pm
- Location: durham missouri
-
Gary Seymour
- Posts: 1192
- Joined: September 15, 2006, 5:17 am
- Location: Brown County, Indiana
This is a really cool build thread, thanks for sharing!
When I first got my truck, I had a friend photoshop it to see what it looked like dropped. He told me the wheels would have to move forward in the wheelwells. I've moved the rear ahead 1-3/4", but haven't done the front. Might have to consider doing it!
Are you going to remove those mirrors for the speed run? Those ears might cost you some MPH
-
BIGREDTODD

- Posts: 46
- Joined: November 1, 2010, 6:41 pm
- Location: RIVERBANK, CA
62bigwindow:
I would drill the monoleafs if if made for a cosmetic improvement...probably run it by the manufacturer if you have any doubts though...
Gary,
Yeah, mirrors are already in the junk pile...although we would have gotten style points if we ran with them...hehe
I would drill the monoleafs if if made for a cosmetic improvement...probably run it by the manufacturer if you have any doubts though...
Gary,
Yeah, mirrors are already in the junk pile...although we would have gotten style points if we ran with them...hehe
UNIVERSAL = IT WILL FIT ANYTHING ELSE
-
BIGREDTODD
- Posts: 46
- Joined: November 1, 2010, 6:41 pm
- Location: RIVERBANK, CA
The first installment of the steering box relocation...
Here's the piece of the firewall I removed. Way more than was necessary, but I wanted plenty of room to work with, and a larger piece will be easier to modify & reinstall.

Here's a ROUGH idea of how the box will be repositioned.


Changing the position of the box/column will "tilt" the column and wheel down somewhat, which is the explanation for the next step. There's a fair amount of interior room to be gained by sectioning the factory column drop a bit. This all has to be modified before the box is laid out and mounted, as the box mounts have no adjustment.


Marked out for removing 1 1/2" from the drop.

I use paint to mark things for cutting. In this case, you can see the bright silver paint, and how much shorter the drop is. This will move the column up closer to the dash a surprising amount.

Close up of sectioned drop. Note that I pie-cut the back to accommodate the new angle of the column.

Welded back together


That's more like it...something small that no one would ever notice but me, but it will make climbing into the roll-caged interior just that much less difficult.

Installed on the dash once again. Here you can see what this was worth. 1 1/2" removed from the drop, and remounted higher on the slotted mounts. Now the column is hugging the dash as it should, and the angle the column passes through matches the drop very closely.


Here's the piece of the firewall I removed. Way more than was necessary, but I wanted plenty of room to work with, and a larger piece will be easier to modify & reinstall.
Here's a ROUGH idea of how the box will be repositioned.
Changing the position of the box/column will "tilt" the column and wheel down somewhat, which is the explanation for the next step. There's a fair amount of interior room to be gained by sectioning the factory column drop a bit. This all has to be modified before the box is laid out and mounted, as the box mounts have no adjustment.
Marked out for removing 1 1/2" from the drop.
I use paint to mark things for cutting. In this case, you can see the bright silver paint, and how much shorter the drop is. This will move the column up closer to the dash a surprising amount.
Close up of sectioned drop. Note that I pie-cut the back to accommodate the new angle of the column.
Welded back together
That's more like it...something small that no one would ever notice but me, but it will make climbing into the roll-caged interior just that much less difficult.
Installed on the dash once again. Here you can see what this was worth. 1 1/2" removed from the drop, and remounted higher on the slotted mounts. Now the column is hugging the dash as it should, and the angle the column passes through matches the drop very closely.
UNIVERSAL = IT WILL FIT ANYTHING ELSE
-
Brian Taylor
- Posts: 1469
- Joined: August 18, 2009, 3:52 pm
- Location: Dallas , Texas
- Contact:
-
BIGREDTODD
- Posts: 46
- Joined: November 1, 2010, 6:41 pm
- Location: RIVERBANK, CA
While my batteries are charging on the camera, I figured I'd make a quick update. I laid out the holes for the new steering box mounting plate, using a carpenters square to locate the c/l on the frame, then transferred the measurements onto the 3/16" plate (which will be trimmed down and gusseted before final welding)

Checked the holes for alignment on the original frame holes. We're all good.

The batteries in my drill were all dead after the first round of holes, so I decided to spend some time on the rear end that I had been avoiding. First to go was the utilitarian bumper. Good riddance.

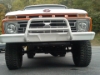
You can see how far the rear end needs to come down

In addition to a huge stack of leaf springs, there were these coil sprin helpers. Actually a cool set-up if you needed something like that. There's also quite a bit of room to modify the rear shackles for a few inches of drop as well.


I managed to salvage all 4 u-bolts, and drop the rear end down after removing the original shocks. I forgot to take a play by play on removing the leaf springs, but I removed all of the "flat" overload springs, as well as the bottom two arched leaf springs.

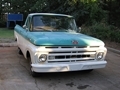
I set everything back down to check the height and I'm pretty pleased. Actually starting to look like something I'd refer to as a "stance". I'm looking for a couple more inches drop in back, as the front will drop an additional inch with everything bolted back on. There's currently about 4 1/2" clearance above the axle to the bottom of the frame, so it looks like the notch may not be necessary in back.


Now back to the box relocation. More updates in a bit.
Todd
Checked the holes for alignment on the original frame holes. We're all good.
The batteries in my drill were all dead after the first round of holes, so I decided to spend some time on the rear end that I had been avoiding. First to go was the utilitarian bumper. Good riddance.
You can see how far the rear end needs to come down
In addition to a huge stack of leaf springs, there were these coil sprin helpers. Actually a cool set-up if you needed something like that. There's also quite a bit of room to modify the rear shackles for a few inches of drop as well.
I managed to salvage all 4 u-bolts, and drop the rear end down after removing the original shocks. I forgot to take a play by play on removing the leaf springs, but I removed all of the "flat" overload springs, as well as the bottom two arched leaf springs.
I set everything back down to check the height and I'm pretty pleased. Actually starting to look like something I'd refer to as a "stance". I'm looking for a couple more inches drop in back, as the front will drop an additional inch with everything bolted back on. There's currently about 4 1/2" clearance above the axle to the bottom of the frame, so it looks like the notch may not be necessary in back.
Now back to the box relocation. More updates in a bit.
Todd
UNIVERSAL = IT WILL FIT ANYTHING ELSE
-
BIGREDTODD
- Posts: 46
- Joined: November 1, 2010, 6:41 pm
- Location: RIVERBANK, CA
Here's the update I'm sure a lot of you are curious about. I have nearly completed the physical relocation of the steering box assembly.
Here's the raw 3/16" mount plate, setting in place...(side/front view):


Rough shape marked for the cut out.

3/16" plate formed using the marked cut-out for a guide.

Plate marked to the actual shape of the boxing cap.

Here's how the 2 pieces will fit together around the box. They will be welded together, and the cap will have some material removed for clearance at the shaft/worm gear area.

Mount plate tacked in place:

Boxing cap with material removed, following approximate contour of the box (side & top view).


Top & side view of new mount assembly tacked in place with the cuts smoothed out and blended in a bit.


That's all for today...
Todd
Here's the raw 3/16" mount plate, setting in place...(side/front view):
Rough shape marked for the cut out.
3/16" plate formed using the marked cut-out for a guide.
Plate marked to the actual shape of the boxing cap.
Here's how the 2 pieces will fit together around the box. They will be welded together, and the cap will have some material removed for clearance at the shaft/worm gear area.
Mount plate tacked in place:
Boxing cap with material removed, following approximate contour of the box (side & top view).
Top & side view of new mount assembly tacked in place with the cuts smoothed out and blended in a bit.
That's all for today...
Todd
UNIVERSAL = IT WILL FIT ANYTHING ELSE
You are building for the Production Pickup class.
Subclass (?) goes by cubic inches, and a few other modifications - right?
What are you guys going run CID and what is the record you are trying to beat?
Subclass (?) goes by cubic inches, and a few other modifications - right?
What are you guys going run CID and what is the record you are trying to beat?
1964 F 100 - I am going to do "something" with it.......
viewtopic.php?f=32&t=15942
1987 Mustang LX Convertible, 2.3 Auto - cruiser.
1994 F 150 XLT 2WD
~ Yes - I adopted another cat..............
Cam L Milan,
You'll be missed my friend.
viewtopic.php?f=32&t=15942
1987 Mustang LX Convertible, 2.3 Auto - cruiser.
1994 F 150 XLT 2WD
~ Yes - I adopted another cat..............
Cam L Milan,
You'll be missed my friend.
Todd:
I find myself in the unenviable position of having the opportunity to reconsider my proposed wheel/axle cl location (see my thread for details).
My question for you is what is the diamter of the tire you have on the truck when you showed the "after" pic of moving the axle forward?
I had planned moving mine 3/4" fwd, but due to a screw up on my part, I ended up with 1/4" ... since you weent all the way to 2.5", I'm thinking that 1.5" will get me into virgin steel with my new holes & avoid have to hole-saw thru fresh mig welds... and yet still won't be far enough to puit me in danger with the driveshaft...
Fun stuff. Thanks!
Paul
-
BIGREDTODD
- Posts: 46
- Joined: November 1, 2010, 6:41 pm
- Location: RIVERBANK, CA
Greg,
Our first go will be in the E/PP class, 260" CID limit. I believe (Tim, correct me if I'm wrong) he needs to go 119 m.p.h. at Elmo and 127 m.p.h. at B'ville to set new records.
Nolabama,
Yeah, fair amount of time...it would have gone quicker, but I had to hand form the 3/16" cap without the use of heat. My oxy-acetylene set-up ran out of acetylene...so it was a bit more of a challenge, but I'm happy with the result.
Paul,
The tires are about 27" inflated. I just placed the axle on the stock pin, and measured how much I wanted for it to look "right". I just threw a measuring tape on it and made the call. Wish I could say it was more scientific, but I just put it where I thought it looked best and made everything else work.
Same goes for the box. I had to consider header routing options for the rear driver's side exhaust port (which will still be tight, but there are 2 options) when placing the box, while also considering pitman arm & drag link geometry which, after all, is the whole point of moving them.
Thanks for the interest!
Todd
UNIVERSAL = IT WILL FIT ANYTHING ELSE
E/PP is correct. 260.9 CID is the limit and we will use the 258CI engine just like in the "Brick" but with a bit more compression. I will be getting a set of custom pistons from Ted Eaton. The Elmo record is 118.9 mph (held by Charlie Burns '57 with an engine built by me  ) and the Bonneville record was bumped to 128+ this year by a sbc so there is a matter of pride to get it back. After all that there will be some class changes but we will go into that later.
-
charliemccraney
- Posts: 1743
- Joined: July 9, 2008, 10:02 pm
- Location: Lawrenceville, GA
This site is so wide spread on its knowledge base!!! I love this technical stuff/talk that I have no clue what is being said at all times, but let me tell you.... I do understand the pictures and the effort of what you are doing and therefore, I am staying up on this build just because it is so interesting... We have so many members that the builds on these trucks are so different but the love put into them is all the same....  Man I love this place we call Slick-ville!!!!
Keep up the work guys and keep the pics coming... I love the fab work...
Keep up the work guys and keep the pics coming... I love the fab work...
BIGREDTODD wrote: I managed to salvage all 4 u-bolts, and drop the rear end down after removing the original shocks. Todd
i am one of the biggest ''cheapa$$e$ '' there is..... but i never reuse U-bolts that
are going on a vehicle, that will be driven on the road.....
they cost 10-20 dollars apiece ... but are SO important... IMO
they may look good... but how do we know.
.
.
.
'' I think what scares me the most about you guys is that I understand you '' ..... KID
'' lookin good, a little paint adds at least 100hp!'' ....... COOTER
'' well an old guy can dream cant he? ''............ICEMAN
''I would donate organs before selling my slick''........ HOOFBEAT RACER
.
.
'' I think what scares me the most about you guys is that I understand you '' ..... KID
'' lookin good, a little paint adds at least 100hp!'' ....... COOTER
'' well an old guy can dream cant he? ''............ICEMAN
''I would donate organs before selling my slick''........ HOOFBEAT RACER