61 Unibody

A place just for our project & build threads.

Moderators: Casey 65, Kid

Post Reply
RED
Posts: 55
Joined: August 21, 2007, 10:21 pm
Location: Lincoln Ne

61 Unibody

Post by RED »

My first vehicle. Previous owner hacked and welded a 86 grand marquis into the pickup. Wish they would have taken their time and done it right. Front end is saggy and cockeyed. Dash is cut to hell and wiring is a mess.
Image
Image
Image
Image
Image
Image
Image
Image
She goes in tomm to get a new camaro subframe. Gonna drop her a bit and update the brakes. I plan on using the 5.0 and AOD new wiring and havent decided on carb or fuel injection. She has a 8.8 in the rear with the triangle ears on the pumpkin so im gonna notch the frame a bit and put coil over shocks on that too. No bags....yet! Cab floor is shot but the bed is still decent.
User avatar
Rusty 63
Posts: 602
Joined: November 13, 2009, 8:04 pm
Location: Florida
Contact:
United States of America

Post by Rusty 63 »

Any idea what that tank came out of?
Leeroy
Posts: 1115
Joined: July 12, 2009, 3:52 am
Location: Melbourne, Australia
Australia

Post by Leeroy »

Is that the filled pipe on the bottom of the tank? I've never seen one like that before. I'm guessing the fuel would climb up the filler neck as the tank fills up?
User avatar
Alan Mclennan
Posts: 9324
Joined: October 14, 2006, 6:16 pm
Location: In the shed... Cranebrook NSW
Australia

Post by Alan Mclennan »

Leeroy wrote:Is that the filled pipe on the bottom of the tank? I've never seen one like that before. I'm guessing the fuel would climb up the filler neck as the tank fills up?
you know!, that is what I thought!, and if the hose leaks, you could loose a tank full1
Honey, If I say I`ll fix something I will, there`s no need to remind me every 6 months!!
66 f100 tabletop swb 351 Clevo C6 "Beryl"

Slick Stock 3 KCMO
Slick Stock 4 Altoona
Slick Stock 5 KCMO
Slick Stock 6 Altoona
Slick Stock 7 Salina KS
Slick Stock 8.............................. cry.gif
User avatar
Rusty 63
Posts: 602
Joined: November 13, 2009, 8:04 pm
Location: Florida
Contact:
United States of America

Post by Rusty 63 »

True. Put on a new hose prophalacticly every few years - but it'd beat the hell out of an in-bed filler w/ a mustang tank, imo...
User avatar
Alan Mclennan
Posts: 9324
Joined: October 14, 2006, 6:16 pm
Location: In the shed... Cranebrook NSW
Australia

Post by Alan Mclennan »

Rusty 63 wrote:True. Put on a new hose prophalacticly every few years - but it'd beat the hell out of an in-bed filler w/ a mustang tank, imo...
Thats true paul, I couldn`t see where it fills from tho!, any pic`s of that Red?
Honey, If I say I`ll fix something I will, there`s no need to remind me every 6 months!!
66 f100 tabletop swb 351 Clevo C6 "Beryl"

Slick Stock 3 KCMO
Slick Stock 4 Altoona
Slick Stock 5 KCMO
Slick Stock 6 Altoona
Slick Stock 7 Salina KS
Slick Stock 8.............................. cry.gif
User avatar
The Big M
Posts: 1360
Joined: August 9, 2006, 3:03 pm
Location: Rocky View County, AB
Canada

Post by The Big M »

Since the previous owner used so many pieces of the Grand Marquis donor, I'm guessing that's the origin of the fuel tank as well. Only it's mounted horizontally. The Grand Marquis tanks are mounted vertically, just behind the rear seat area, with the filler on the upper driver's side. That one looks similar to what I remember seeing in my '87. I thought about salvaging the one I had but it looked like it'd be a bear to remove.

Notice where the fuel pump pickup is. It should be at the bottom of the tank, but with the way it's mounted it ends up coming out the front. I'd rework that, I don't imagine it vents properly and it doesn't look overly secure.
RED
Posts: 55
Joined: August 21, 2007, 10:21 pm
Location: Lincoln Ne

Post by RED »

The filler is in the driver side corner of the bed. I assume the tank is out of grand marquis. I'm gonna have to figure something different out. I keenly remember going over an overpass and having her sputter and almost die barely made it to the top and rolled down the other side. Believe me there are plenty of things having to be "redone!"
RED
Posts: 55
Joined: August 21, 2007, 10:21 pm
Location: Lincoln Ne

Re: 61 Unibody

Post by RED »

Finally got some work done.
camaro subframe in
Image
Image
Cleaned up read for POR 15
Image
Image
still gotta weld in some motor mounts and radiator core supports. Im pleased.
Image
Image

The control arms and sway bar are being powder coated. I have some new Wilwood brakes going on and QA1 coil overs. Im getting pretty excited....and pretty broke. O well!!
User avatar
Fanatic
Posts: 1568
Joined: July 14, 2006, 11:39 pm
Location: Leesport, PA

Re: 61 Unibody

Post by Fanatic »

Now that there is one BIG brake pedal !
INEPTOCRACY: (in-ep'-toc-ra-cy) : a system of government where the least capable to lead are elected by the least capable of producing, and where the members of society least likely to sustain themselves or succeed are rewarded with goods and services paid for by the confiscated wealth of a diminishing number of producers.
User avatar
kstones63
Posts: 1504
Joined: April 7, 2007, 10:55 pm
Location: Phoenix, AZ
United States of America

Re: 61 Unibody

Post by kstones63 »

I would suggest to bolt a plate onto the subframe and then weld your mounts to that. I made the motor mounts for 4.6 DOHC on an extra subframe before I put the engine in the truck. After I got it put in the truck I still needed to move the engine back 3/4" and drop it down another inch. If you have the mounts welded to a plate, you might be able to take the mount out and change something without having to remove everything. I was able to slot the frame holes part way and then slot the mounting plates the other half to move the engine back.
Just my :2cents:

Kevin
kstones63
_______________________________________
63 F100
29 Ford Sedan Delivery
99 F250 PSD, 4x4, CC
95 F350 Flatbed Dually Diesel
RED
Posts: 55
Joined: August 21, 2007, 10:21 pm
Location: Lincoln Ne

Re: 61 Unibody

Post by RED »

Got some work done this weekend
Image
Image
Image
Image
Image
Image
The next question is what to tackle next......The cab, rear suspension, motor?? I guess I better start by picking up a few shifts at work to get some funds!!
User avatar
Total Gearhead
Posts: 134
Joined: July 4, 2009, 8:06 am
Location: The Garage! Wisconsin
Contact:

Re: 61 Unibody

Post by Total Gearhead »

Any progress? I'm starting mine soon. Any tips?
RED
Posts: 55
Joined: August 21, 2007, 10:21 pm
Location: Lincoln Ne

Re: 61 Unibody

Post by RED »

Been working slowing but getting some work done. Metal work is time consuming and a learning curve for sure. Never have done any welding or taken any classes just learning on the fly. Picked up a Miller 180 and got to work. Lets just say its been annoying, rewarding, and exciting.

Image
Image
Image
Image
Image
Image
Image
Image
Image
Image
Image

Gotta get the cab support and floor next. Then the passenger side. Need to replace the rear door sill and who knows how I'm gonna get that done. Might end up making it. This rust is killing me!!!!! O well at least the torx box and bed is in good shape.
rickairmedic
Posts: 1394
Joined: July 19, 2006, 9:27 pm
Location: Louisville,Ky

Re: 61 Unibody

Post by rickairmedic »

Red looks like your getting that rust under control . I will be doing alot of that this winter myself . Thank goodness I have a parts truck that has good pieces to replace most of the bad on my build truck :D.


Rick
if it aint broke fix it till it is :D
User avatar
foodstick
Posts: 3364
Joined: March 15, 2006, 6:45 pm

Re: 61 Unibody

Post by foodstick »

I have to tell you the truth RED, you seem to be doing pretty dang good for not having done this stuff before..
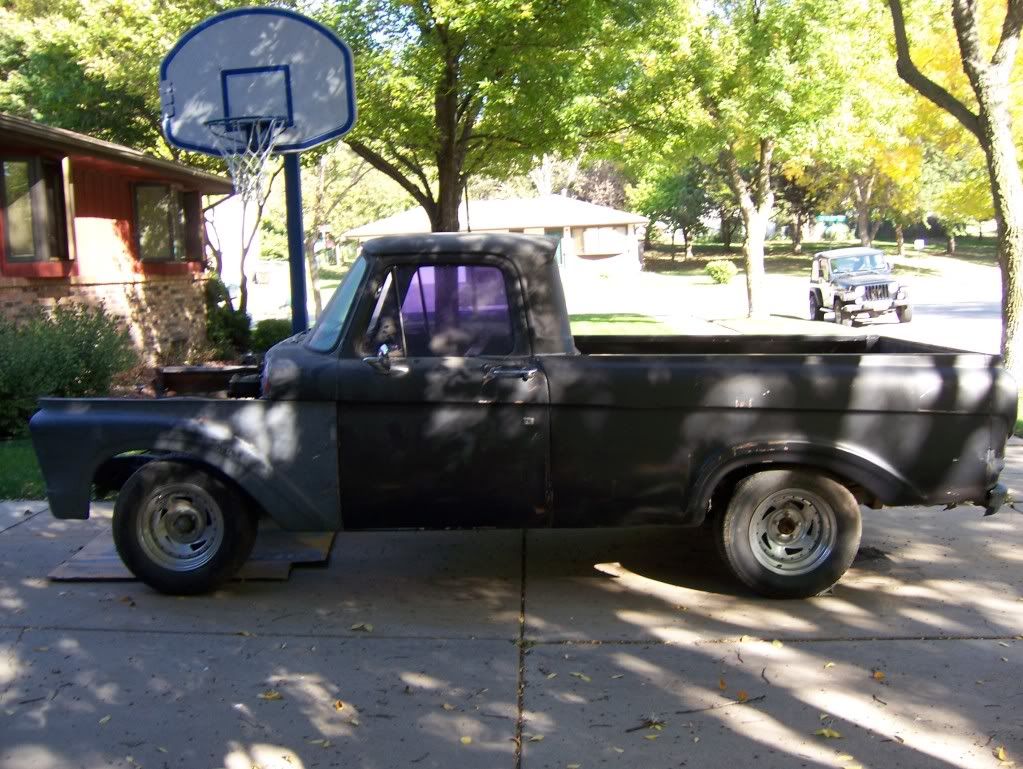
I think you can probably make that rear lower door jamb. You might have to make it from multiple pieces... the problem with getting another trucks parts for this repair is most trucks have rusted there, at least on the back of the metal.. and if they haven't they are probably to nice to chop up...

EVERBODY can work/bend metal ...the question is where are your skills now.. we all start out with the ability to bend a 90 degree in sheet metal using a vice or similar. You need to look at it and think, what can I do with flat metal and forming over a object, what can I bend a simple flange on? sometimes you can metal from other objects that are close...

Most of us don't have a real anvil, but if you can clamp a part down good and work edges of the tin, over the object below it.. you might be surprised with the results and you WILL learn some things.

A artist with steel can make complicated parts that flow and bend like anything they want. guys like us can always cheat a bit, if the metal is bulking, binding, making unwanted waves.. cut a slit with a thin cutting wheel , and remove that excess material. once you work in the shape you want you can weld it back together.

One of the most important things i learned watching a friend was this, when you are making complicated ares like the bottom door jambs.. if you get you parts close, tack them in place with spot welds in the places that line up perfect, then you can take your body hammer, or ballpean hammer and stretch that metal around,Always go slow while you are watching and learning, sometimes you have to wail on it. I almost got mad a few times watching my buddy pound away at a repair ;) it is thrilling when it works for you, every time a new part of the piece lines up correct, tack weld it down. I was literally shocked a few times with my final results.

If you weld it up good, grind the bad spots,some bondo and paint will make it look nice. Personally, I like seeing a good solid repair on a vehicle whether it is stock looking or not. If you are a true purist.. it means you must strive to an even higher level of finish, and skill, and achieving skill is an honorable thing in every aspect of life.
Post Reply